

Quick answer: Household mold is fundamentally a moisture problem. If you see or smell mold, the useful response is to stop the water source, dry the area, clean or remove affected materials, and prevent the moisture from returning. EPA says that moldy areas smaller than about 10 square feet can often be handled by homeowners in routine situations, while larger growth, extensive water damage, contaminated floodwater, HVAC involvement, or uncertainty about hidden damage may justify professional help. For cleanup, protect yourself from exposure, ventilate when appropriate, clean hard surfaces with detergent and water, dry them completely, and discard porous materials that cannot be fully cleaned and dried. Do not paint over active mold, do not mix bleach with ammonia or other cleaners, and do not spend money trying to identify the mold species before fixing the moisture problem.
 Visible mold on an interior wall is a sign that moisture has supported biological growth; cleanup is incomplete until the moisture source is corrected. Image: שי אבידן, Wikimedia Commons, CC BY-SA 4.0.
Mold can turn a small household moisture problem into a confusing mix of cleaning advice, health claims, product marketing, contractor quotes, and internet myths. One article says to spray bleach on everything. Another says any dark mold is a toxic emergency. A third recommends expensive air testing before you touch the wall. Meanwhile, the stain may keep returning because a leaking pipe, unvented shower, cold exterior surface, roof defect, or high indoor humidity has never been corrected.
The safest and most useful way to approach residential mold is to treat it as a building-moisture problem first and a cleaning problem second. The U.S. Environmental Protection Agency states that moisture control is the key to mold control. CDC likewise says that if you see or smell mold, you should remove it and fix the moisture problem; routine home testing is generally not recommended simply to identify the type of mold.
This guide focuses on ordinary residential situations: bathrooms, window areas, closets, basements, drywall, small leaks, condensation, carpets, furniture, and localized water damage. It also explains when the job is no longer a sensible do-it-yourself project. Floods involving sewage or chemicals, structural damage, large contaminated areas, major HVAC contamination, or homes occupied by people at higher health risk may require a different level of care.
1. Start With the Moisture Source, Not the Stain
If you clean visible growth without correcting the water source, the problem often returns. Mold spores are naturally present indoors and outdoors; what determines whether they grow is available moisture and a suitable surface.
Common moisture sources include:
- plumbing leaks behind cabinets or walls;
- roof leaks;
- failed window flashing or exterior sealant;
- condensation on cold windows, pipes, ducts, or walls;
- bathroom steam without effective exhaust;
- dryers venting indoors or leaking dryer ducts;
- wet basements and crawl spaces;
- poor drainage around foundations;
- air-conditioning condensate problems;
- humidifiers set too high;
- flooding or appliance leaks;
- water entering around showers or tubs.
What to do: Trace the moisture before buying cleaning chemicals. Look above, below, behind, and adjacent to the visible growth. Check plumbing joints, caulk lines, roof penetrations, exterior walls, condensate drains, and the opposite side of the wall if accessible.
How to verify success: The area should remain dry after cleanup. If the surface becomes damp again, the repair is not complete even if the mold has disappeared temporarily.
If you are also trying to find slow plumbing leaks or build a broader household leak-detection routine, the site’s existing home water-saving and leak-detection plan provides a useful companion workflow for meter checks, fixture inspection, and preventive monitoring.
2. Measure Humidity Instead of Guessing
Indoor relative humidity can be high enough to support condensation and mold even when no pipe is leaking.
EPA’s current guidance says to keep indoor relative humidity below 60 percent if possible and ideally around 30 to 50 percent. A simple digital hygrometer can show whether a bathroom, bedroom, basement, or closet repeatedly spends long periods above that range.
Humidity changes during the day. A basement may be acceptable in the morning and very humid after rain. A bathroom may spike during a shower and then remain elevated for hours if the exhaust fan is weak.
Practical method: Put a hygrometer in the problem room for several days. Note readings in the morning, afternoon, after showers or cooking, and during wet weather. If humidity stays elevated, improve ventilation, use air conditioning or dehumidification when appropriate, and investigate water entry.
3. Act Quickly After Leaks and Spills
EPA repeatedly emphasizes drying wet materials quickly. Its residential guidance states that if damp areas or materials are dried within roughly 24 to 48 hours after a leak or spill, mold growth often can be prevented.
That makes the first day after water damage important.
After a clean-water leak:
- Stop the source.
- Make sure electrical conditions are safe.
- Remove standing water.
- Move wet contents away from walls and floors.
- Increase safe drying with ventilation, dehumidification, or air conditioning.
- Open cabinets and drawers when safe so trapped moisture can escape.
- Check hidden layers such as carpet padding, wall cavities, and insulation.
If the water contains sewage, floodwater, chemicals, or another hazardous contaminant, ordinary household drying advice is not enough. Use disaster-cleanup guidance and consider professional remediation.
4. Decide Whether the Job Is Small Enough for DIY Cleanup
EPA says that moldy areas smaller than about 10 square feet—roughly a 3-foot-by-3-foot patch—can often be handled by homeowners in routine situations. This is not a magical safety boundary; it is a practical screening guideline.
Professional help becomes more sensible when:
- the visible mold exceeds roughly 10 square feet;
- multiple rooms are affected;
- there has been extensive water damage;
- mold keeps returning despite repairs;
- the growth appears inside HVAC equipment or ductwork;
- materials were contaminated by sewage or floodwater;
- structural materials are damaged;
- the source of moisture is hidden or unclear;
- you cannot safely access the area;
- occupants have health conditions that make exposure a particular concern.
Common mistake: Measuring only the darkest visible patch. If drywall is wet across a much larger area, the hidden problem may exceed the visible stain.
5. Protect Yourself Before Disturbing Mold
Cleanup can release spores and fragments into the air. CDC’s disaster mold-cleanup guidance recommends at least an N95 respirator, goggles, and protective gloves for mold cleanup after serious water damage. The exact protection needed depends on the scale of the job.
For a small routine cleanup, basic protection can include:
- gloves that keep cleaning products and contaminated material off the skin;
- eye protection without open ventilation when splash or dust is possible;
- a properly fitted particulate respirator when disturbing visible mold;
- old clothing or protective clothing that can be washed immediately afterward.
Read respirator instructions. Facial hair can prevent a tight seal on tight-fitting respirators. People who cannot safely wear a respirator should not assume that wearing one automatically makes a large cleanup suitable for DIY work.
6. Keep Other People and Pets Away From the Work Area
Children, pets, and people who are not participating in cleanup should not wander through a disturbed mold area.
For a small room, close the door when practical and keep contaminated materials from being carried through the home uncovered. Bag disposable materials before moving them through clean spaces.
If the project requires demolition, extensive drywall removal, or major containment, that is another sign that a trained remediation contractor may be appropriate.
7. Do Not Rely on Mold Color to Judge Risk
Black, green, white, gray, and orange growth can all occur indoors. Color does not reliably tell a homeowner which mold species is present or how a person will respond to exposure.
CDC does not recommend routine home mold testing simply to identify the type. If mold is present, the practical work is still to remove it and fix the moisture source.
The term “black mold” often creates unnecessary panic because many molds can appear dark. A dark color is a reason to clean the moisture problem—not proof that the home contains a uniquely catastrophic organism.
8. Skip Routine Air Testing When Visible Mold Already Answers the Question
If you can see or smell mold, testing rarely changes the basic cleanup decision. CDC notes that there are no widely accepted health-based standards for interpreting normal indoor concentrations of different molds in routine household sampling.
Testing can also be misleading. A short air sample is a snapshot influenced by weather, open windows, cleaning activity, and sampling location.
Testing may still have a role in specialized investigations, legal disputes, complex buildings, or professional remediation verification. But for an ordinary visible bathroom patch, money is usually better spent on fixing ventilation or a leak.
9. Clean Hard, Nonporous Surfaces With Detergent and Water
EPA’s basic cleanup guidance recommends scrubbing mold from hard surfaces with detergent and water, then drying the surface completely.
Suitable surfaces may include:
- tile;
- glass;
- metal;
- sealed countertops;
- some painted surfaces that remain intact;
- certain plastics.
Remove the visible material rather than merely changing its color. Use only enough water to clean; soaking the surrounding structure creates more moisture.
After cleaning, dry the surface and surrounding area thoroughly.
10. Understand Why Porous Materials Are Harder
Mold can grow into the pores and voids of absorbent materials. EPA notes that porous materials such as ceiling tiles and carpet may have to be discarded when moldy because complete removal can be difficult or impossible.
Examples include:
- ceiling tiles;
- carpet padding;
- some insulation;
- paper-faced drywall;
- cardboard;
- certain upholstered items;
- pressed-wood products that have swollen or deteriorated.
A porous item is not automatically trash. Valuable wood furniture, textiles, books, artwork, and heirlooms may justify consultation with a conservator or restoration specialist. But ordinary water-damaged building materials are often cheaper and more reliable to replace than to repeatedly clean.
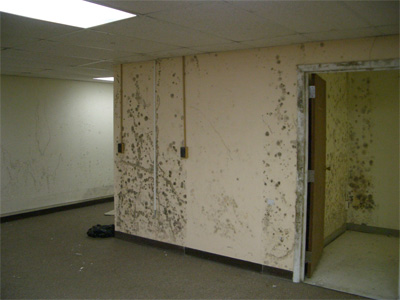 Mold can penetrate or grow through porous building materials, making some damaged drywall and similar materials difficult to clean completely. Image: U.S. Environmental Protection Agency / Terry Brennan, public domain.
11. Do Not Paint or Caulk Over Active Mold
Painting hides discoloration but does not solve moisture or growth underneath. EPA specifically warns against painting or caulking moldy surfaces before they are cleaned and dried.
Paint over damp or contaminated surfaces can peel, bubble, discolor, or allow mold to continue growing behind the finish.
The correct order is:
- stop moisture;
- remove or clean affected material;
- dry thoroughly;
- repair the surface;
- prime or paint only after the area is dry and clean.
12. Use Bleach Carefully—and Know Its Limits
CDC says household bleach can be used for some mold-cleaning situations, but it is not the only option. EPA’s general household guidance emphasizes detergent and water for hard surfaces and notes that biocides such as chlorine bleach are not routinely recommended as the sole approach to mold remediation.
If you choose to use bleach:
- follow the product label;
- ventilate the area;
- protect skin and eyes;
- never mix bleach with ammonia;
- never mix bleach with acids or other cleaners;
- do not assume bleach makes porous contaminated material salvageable.
Mixing bleach with incompatible products can release dangerous gases. More chemical is not more effective.
13. Never Mix Household Cleaners During Mold Cleanup
This deserves its own rule because it is a preventable hazard.
Bleach mixed with ammonia can produce toxic chloramine gases. Bleach mixed with certain acids can produce chlorine gas. Toilet-bowl cleaners, rust removers, vinegar, ammonia cleaners, and disinfectants should not be casually combined.
Use one product according to its label. Rinse or allow surfaces to dry as directed before applying anything else.
14. Control Dust When Removing Moldy Materials
Dry ripping and aggressive sanding can spread contaminated dust.
For small repairs, work methodically. Avoid unnecessary demolition. Bag debris before carrying it through the home. Clean surrounding dust after the material is removed.
If the work requires cutting large areas of wall, ceiling, or flooring, consider whether containment and professional remediation are warranted.
15. Understand Bathroom Mold as a Ventilation Problem
Bathrooms often develop mold because warm, humid air condenses on ceilings, grout, window frames, exterior walls, and painted surfaces.
A useful bathroom plan includes:
- running the exhaust fan during showers;
- continuing the fan after the shower long enough to reduce humidity;
- keeping the fan and grille clean;
- making sure the fan actually vents outdoors rather than into an attic;
- drying persistent water on window sills and shower surfaces;
- repairing failed grout and caulk where water enters the wall assembly.
If the ceiling repeatedly develops mold even with normal shower habits, check whether the fan is undersized, blocked, disconnected, or not exhausting outdoors.
16. Check the Bathroom Exhaust With a Simple Observation
You do not need specialized equipment for an initial check.
Turn the fan on and see whether it pulls air through the grille. Inspect the exterior termination if safely accessible. Listen for unusual motor noise. Check for lint or dust buildup.
A fan that makes noise but moves little air may not be solving the humidity problem.
17. Treat Window Mold as a Condensation Clue
Cold glass and frames can collect moisture when warm indoor air contains enough humidity. Mold may then develop on seals, paint, wood trim, and nearby drywall.
Clean the visible mold, but also reduce the condensation:
- lower indoor humidity;
- improve air movement around the window;
- open blinds or curtains periodically so cold surfaces can dry;
- repair failed seals or leaks;
- consider insulation or window upgrades if condensation is chronic.
If water appears during rain rather than cold weather, investigate exterior leakage instead of assuming humidity is the only cause.
18. Investigate Mold Behind Furniture
Large furniture pushed tightly against a cold exterior wall can block air circulation. The wall surface may remain cooler and damper than the room, allowing condensation and mold behind the furniture.
Pull the furniture away and inspect the wall. If the area is damp, measure room humidity and look for exterior water entry.
Leaving a small air gap can help, but persistent wetness requires a building repair, not just more space.
19. Watch Closets on Exterior Walls
Closets receive less heat and air circulation than occupied rooms. Clothing and stored boxes can also trap moisture against walls.
Reduce overcrowding, avoid storing damp items, keep boxes away from known condensation surfaces, and monitor humidity.
A closet dehumidifier product may help in a minor humidity problem, but it will not fix a leak through the wall.
20. Use a Dehumidifier as a Moisture-Control Tool, Not a Cure
 A dehumidifier can help control indoor humidity, but it should complement—not replace—repairs to leaks, drainage, or other moisture sources. Image: V.B.Speranza, Wikimedia Commons, CC BY-SA 4.0.
A dehumidifier can be useful in basements, laundry areas, or humid climates when moisture comes partly from the air.
Set it to maintain a reasonable humidity rather than trying to make the room extremely dry. EPA’s preferred range of roughly 30 to 50 percent relative humidity is a useful target when practical.
Maintain the unit:
- clean the filter;
- empty and clean the bucket;
- keep drainage hoses clear;
- leave enough clearance for airflow;
- avoid using damaged extension cords;
- follow manufacturer electrical requirements.
If the machine runs continuously and humidity remains high, investigate groundwater, leaks, or an undersized unit.
21. Do Not Use Fans Carelessly After Mold Is Established
Fans can accelerate drying when materials are newly wet and mold has not begun growing. But CDC’s post-disaster guidance warns that fans can spread mold spores if mold growth is already present.
That does not mean a fan is always forbidden. It means airflow should be planned so contaminated material is not simply blown throughout the home.
For significant mold growth, containment and controlled drying are better than placing a high-speed fan directly in front of the patch.
22. Inspect HVAC Drip Pans and Condensate Lines
Air-conditioning systems remove moisture from air. The resulting condensate must drain away.
Problems can develop when:
- the condensate pan is dirty or damaged;
- the drain line is clogged;
- insulation is missing from cold ducts;
- air leaks cause condensation;
- the unit is oversized or short-cycles and removes inadequate humidity;
- the system is poorly maintained.
EPA recommends keeping HVAC drip pans clean and drain lines unobstructed.
23. Be Cautious With Suspected Mold Inside HVAC Systems
If you suspect contamination inside central air-handling equipment or ducts, avoid turning a major DIY cleaning project into an exposure problem.
HVAC systems can distribute particles through multiple rooms. Internal insulation, coils, pans, and duct materials also require different cleaning approaches.
Consult HVAC and mold-remediation professionals when growth appears inside air handlers, extensive duct insulation, or areas that are not safely accessible.
24. Handle Carpet Differently From Tile
Tile is nonporous; carpet and padding are not.
A small clean-water spill that is dried rapidly may not require replacement. But carpet and padding that remain wet for days, are contaminated by sewage, or develop mold may be difficult to restore safely.
Do not clean only the visible fibers while leaving wet padding underneath.
25. Check Under Flooring After Significant Leaks
Laminate, engineered wood, vinyl planks, and other floor systems can trap water underneath. The top surface may look dry while the underlayment remains wet.
Signs include:
- swelling;
- cupping;
- soft spots;
- musty odor;
- darkened edges;
- mold appearing at baseboards.
A moisture meter and professional inspection can help when the extent is unclear.
26. Treat Drywall Mold Based on Depth and Condition
Painted drywall with very superficial growth caused by brief condensation may sometimes be cleaned if the surface remains sound and dry. Paper-faced drywall that is soft, swollen, crumbling, heavily colonized, or wet inside the wall often needs removal.
Do not assume the visible face is the entire problem. Water can travel inside cavities and wet insulation.
If removal exposes electrical wiring, plumbing, structural concerns, or a large area, use qualified professionals.
27. Do Not Sand Moldy Drywall as a Cleaning Method
Sanding releases large amounts of dust and may spread spores and contaminated particles. Removing damaged porous material is often more sensible than trying to sand away discoloration.
If a finish surface requires sanding after remediation, the material should already be clean and dry.
28. Handle Wood With More Nuance
Solid wood can sometimes be cleaned and dried successfully because it is more durable than paper-faced drywall or carpet padding.
However, mold staining can remain even after growth is removed. Staining alone does not prove that active mold is still present.
If wood is structurally damaged, rotten, persistently wet, or inaccessible, professional evaluation may be needed.
29. Save Valuable Items Before Treating Them Aggressively
Paintings, photographs, books, antique furniture, musical instruments, documents, and heirloom textiles may be damaged by ordinary household cleaning chemicals.
EPA recommends consulting specialists for valuable or sentimental items that are difficult to clean.
Move them to a dry, controlled environment if it can be done safely, isolate them from clean possessions, and obtain conservation advice rather than experimenting with bleach.
30. Understand the Difference Between Mold Removal and Stain Removal
After cleaning, a surface can remain discolored. Conversely, a surface can look clean while still being damp.
The cleanup goal is not cosmetic perfection. It is to remove contamination, dry the material, fix moisture, and restore the building safely.
Once the area is dry and stable, cosmetic repairs can follow.
31. Look for Hidden Mold When Odor Persists
A musty odor after visible cleanup may suggest:
- mold behind drywall;
- wet insulation;
- carpet padding contamination;
- water under flooring;
- cabinet backing damage;
- a leak that has not been fixed;
- HVAC condensate problems.
Do not repeatedly spray fragrance or disinfectant to cover the smell. Find the moisture and material source.
32. Be Careful Opening Walls
Hidden mold behind a small stain can become a much larger project once the wall is opened.
Before demolition, consider:
- electrical wiring;
- plumbing;
- load-bearing components;
- possible asbestos or lead-based paint in older buildings;
- the size of the likely contaminated area;
- how debris will be contained.
If the home is old enough for regulated materials to be a concern, have those risks evaluated before aggressive demolition.
33. Mold After Flooding Requires a Different Mindset
Floodwater can carry sewage, chemicals, fuel, and biological contaminants. A flood-damaged home may also have electrical and structural hazards.
CDC, EPA, FEMA, HUD, and NIH disaster guidance emphasizes:
- safe re-entry;
- personal protective equipment;
- rapid removal of wet material;
- drying;
- avoiding hazardous generator use;
- discarding materials that cannot be cleaned and dried.
Do not treat a flooded basement like a normal shower-wall mold patch.
34. Photograph Significant Damage Before Cleanup
For insurance claims or landlord disputes, document the condition before removing materials when it is safe to do so.
Take wide shots and close-ups. Record dates, the suspected water source, damaged contents, and repairs made.
Documentation should never delay urgent safety actions such as stopping active water or leaving a hazardous structure.
35. Renters Should Notify the Property Owner Promptly
If you rent, report leaks and mold in writing as soon as you notice them. Include photos and the date.
Do not make unauthorized structural changes. Local landlord-tenant responsibilities vary by jurisdiction, so use local housing or health authorities for legal requirements.
The important practical point is early documentation and moisture repair.
36. Do Not Ignore Small Repeated Leaks
A slow drip under a sink can cause more building damage than one obvious spill because it remains hidden.
Check:
- cabinet bases;
- supply valves;
- dishwasher connections;
- ice-maker lines;
- washing-machine hoses;
- water-heater connections;
- toilet seals;
- sink traps.
Feel for swelling, softness, or dampness. A small water alarm can also provide early warning near appliances.
37. Use Moisture Meters as Clues, Not Absolute Truth
Consumer moisture meters can help compare suspect building materials with nearby dry areas.
But readings depend on:
- material type;
- meter technology;
- temperature;
- salts;
- metal behind the surface.
Use the device to identify patterns rather than treating one number as a universal definition of “dry.”
38. Check Outdoor Drainage Around the Home
Indoor basement mold can begin outside.
Inspect:
- gutters;
- downspouts;
- soil slope;
- foundation cracks;
- window wells;
- roof drainage;
- irrigation spraying against the house.
EPA recommends maintaining gutters and ensuring the ground slopes away from the foundation so water does not collect around the building.
39. Do Not Store Cardboard Directly on Damp Basement Floors
Cardboard absorbs moisture readily and provides a good surface for mold.
In basements that occasionally become damp, use shelving and plastic storage bins for items that must be stored there. Leave space for air circulation and inspection.
If the basement routinely gets wet, fix drainage or groundwater entry rather than trying to protect storage alone.
40. Monitor Laundry Areas
Clothes dryers produce significant moisture. The dryer should vent outdoors according to manufacturer and local requirements.
Inspect the exhaust duct for disconnection, crushed sections, lint buildup, or indoor venting. Washing-machine hoses and drain connections should also be checked for leaks.
A laundry-room dehumidifier cannot compensate for a dryer vent that dumps humid air into the room.
41. Watch Humidifiers in Winter
Humidifiers can improve comfort in dry climates, but overuse can create condensation on windows and cold walls.
EPA recommends keeping indoor humidity below 60 percent and ideally 30 to 50 percent. If windows drip every morning, lower the humidifier setting and inspect other moisture sources.
Clean portable humidifiers frequently because the equipment itself can develop microbial growth.
42. Use Kitchen Exhaust During Moisture-Heavy Cooking
Boiling large pots, simmering for hours, and frequent dishwashing add water vapor indoors.
Use an exhaust hood that vents outdoors when available. Wipe recurring condensation from nearby windows and walls.
Recirculating hoods can capture grease and odor but generally do not remove moisture the same way an outdoor-vented hood does.
43. Avoid Long-Term Indoor Clothes Drying in Damp Rooms
Air-drying laundry indoors adds moisture to the room. In a well-ventilated dry climate, that may not create a problem. In a cold bedroom or damp basement, it can raise humidity enough to encourage condensation.
Measure humidity and use ventilation or dehumidification when necessary.
44. Make a Seasonal Humidity Plan
Humidity control changes with climate.
Summer: air conditioning and dehumidifiers often reduce moisture.
Winter: indoor humidity may need to be lower in very cold climates to prevent window and wall condensation.
Rainy seasons: basements and crawl spaces may need additional monitoring.
Do not use one fixed humidifier or dehumidifier setting all year without observing condensation and actual RH.
45. Understand Crawl-Space Mold as a Building Problem
Crawl spaces can collect ground moisture, plumbing leaks, outdoor humidity, and condensation.
Because access is limited and contamination can be extensive, crawl-space remediation often requires professional assessment.
Fixing only visible joist mold while leaving wet soil, torn vapor barriers, drainage problems, or leaking ducts can lead to recurrence.
46. Avoid Ozone Generators for Mold Cleanup
Devices marketed as ozone “air purifiers” are sometimes promoted for mold odors. Ozone is a lung irritant and should not be used as a casual substitute for source removal.
The correct approach is to remove contaminated material, clean surfaces, dry the space, and fix moisture.
47. Air Purifiers Are Supplemental, Not Remediation
A HEPA air purifier can reduce some airborne particles in a room, but it does not remove mold growing inside a wall or fix moisture.
Use filtration as a supplemental indoor-air measure, not the primary cleanup method.
If the source remains, the purifier will be continuously treating particles from an active problem.
48. Do Not Judge Cleanup by Smell Alone
A room can smell cleaner because of fragrance or disinfectant while the wall remains wet.
A successful cleanup should meet several conditions:
- the moisture source is fixed;
- visible mold and damaged material are removed;
- surfaces are dry;
- musty odor is gone without masking fragrance;
- humidity is controlled;
- new growth does not appear over time.
49. Give the Area Time Before Repainting
After cleanup, verify that the material is actually dry. If moisture is still trapped in drywall, wood, or masonry, fresh paint can hide the problem temporarily.
Use time, ventilation, and measurement where appropriate before final finishing.
50. Know What a Good Mold Contractor Should Explain
A credible contractor should be able to describe:
- the moisture source;
- the affected materials;
- containment strategy;
- what will be cleaned versus removed;
- how debris will be handled;
- how the area will be dried;
- how completion will be evaluated;
- what building repair prevents recurrence.
Be cautious with contractors who focus only on spraying a proprietary chemical while ignoring the leak or humidity source.
51. Ask for References and Scope in Writing
EPA recommends checking references when hiring a mold contractor. Obtain a written scope that distinguishes demolition, cleaning, drying, repair, and reconstruction.
Confirm whether the company carries appropriate insurance and whether local licensing rules apply.
Do not choose solely on the promise that a fogging treatment will “kill everything.”
52. Worked Example: Small Bathroom Ceiling Patch
A bathroom develops a 2-foot patch of dark spotting over the shower. There is no roof leak. The exhaust fan is weak, and the bathroom mirror stays wet for an hour after every shower.
Diagnosis path: The small area and repeated condensation suggest a humidity problem.
Action: Improve exhaust, clean the surface if the ceiling material is sound, dry thoroughly, and monitor humidity. If the drywall is soft or the staining returns despite good ventilation, investigate hidden water.
Success check: Humidity drops after showers and the patch does not return.
53. Worked Example: Mold Under a Kitchen Sink
A homeowner notices a musty odor and sees mold on the cabinet base. A supply valve has a slow drip.
Action: Shut off and repair the leak. Empty the cabinet. Inspect whether the base is merely surface-stained or swollen and deteriorated. Clean hard intact surfaces; replace damaged particleboard when it cannot be dried and cleaned reliably.
Common mistake: Spraying the cabinet and leaving the leaking valve unchanged.
54. Worked Example: Basement Wall Growth in Summer
A basement wall develops mold every July. No pipe leak is visible, but indoor humidity measures 72 percent.
Action: Inspect exterior drainage and foundation moisture, then operate appropriate dehumidification and maintain a lower RH. Move cardboard and furniture away from the wall.
Success check: Humidity stays below 60 percent, ideally closer to 30–50 percent, and no new condensation or growth appears.
55. Worked Example: Water Heater Leak Wetting Drywall
A failed water heater wets several feet of drywall and insulation overnight.
Action: Stop water, make the area electrically safe, extract standing water, and begin drying immediately. Because cavity insulation and drywall are saturated, removal may be needed even before visible mold appears.
The important intervention is rapid drying within the first 24–48 hours, not waiting for mold to become visible.
56. Worked Example: Mold After a Major Flood
A house was closed for a week after floodwater entered multiple rooms. Drywall, carpet, furniture, and cabinets are visibly contaminated.
Decision: This is not a routine DIY mold patch. Floodwater may contain sewage and chemicals, and the scale exceeds EPA’s small-area guidance. Structural, electrical, and respiratory hazards must be considered.
Action: Follow government disaster-reentry guidance, use qualified remediation support, and document damage for insurance.
57. Troubleshooting: “I Cleaned It and It Came Back”
Recurring mold usually means one of four things:
- the moisture source remains;
- hidden contaminated material remains;
- the cleaned material never fully dried;
- humidity or condensation is still too high.
Stop repeating the same cleaning product and investigate the cause.
58. Troubleshooting: “The Wall Is Dry but Still Stained”
Some materials retain staining after mold has been removed.
Confirm that the surface is dry and no active growth or musty odor remains. If the material is structurally sound, cosmetic refinishing may be possible after remediation.
If staining expands or returns, reassess moisture.
59. Troubleshooting: “The Dehumidifier Fills Every Day”
In a humid basement, frequent water collection can be normal. But continuous heavy collection may also point to:
- foundation moisture;
- open exterior air leaks;
- groundwater;
- plumbing leaks;
- an undersized unit.
Measure RH. The goal is not an empty bucket; the goal is controlled humidity and a dry building.
60. Troubleshooting: “There Is Mold Only Behind One Closet”
Check whether the closet sits on an exterior wall, whether boxes block circulation, and whether the wall is colder than the room.
Also inspect exterior leaks. Reorganizing storage can help air movement, but a wet wall still needs repair.
61. Troubleshooting: “I Smell Mold but Cannot See It”
Look for water history rather than randomly cutting walls.
Check:
- under sinks;
- behind appliances;
- under flooring near leaks;
- around windows;
- attics below roof penetrations;
- HVAC condensate areas;
- basement perimeter walls.
If the odor is persistent and the source remains hidden, a building professional with moisture-investigation experience can help.
62. A 30-Minute Small-Mold Assessment
Minutes 0–5: Photograph the area and estimate size.
Minutes 5–10: Look for the moisture source above, below, behind, and outdoors.
Minutes 10–15: Measure humidity and inspect adjacent materials for softness or swelling.
Minutes 15–20: Decide whether the material is hard/nonporous or porous and damaged.
Minutes 20–25: Identify required protective equipment and choose a cleanup method.
Minutes 25–30: Decide whether the job remains within a reasonable DIY scope or needs professional help.
63. A Monthly Moisture-Prevention Routine
- Check under sinks for leaks.
- Inspect the washing-machine area.
- Look at the water heater base.
- Check refrigerator and dishwasher supply areas.
- Clean bathroom exhaust grilles.
- Review basement humidity.
- Check window condensation.
- Inspect HVAC condensate drains.
- Look for roof or ceiling stains after storms.
- Keep stored cardboard away from damp floors.
64. Home Mold Cleanup Checklist
- I found and stopped the moisture source.
- I estimated the total affected area.
- I considered whether floodwater, sewage, or chemicals are involved.
- I checked whether the job exceeds roughly 10 square feet.
- I kept children and pets away from cleanup.
- I used appropriate gloves, eye protection, and respiratory protection.
- I did not mix household cleaners.
- I cleaned hard surfaces and dried them completely.
- I removed porous materials that could not be cleaned and dried.
- I did not paint or caulk over active mold.
- I checked behind adjacent materials for hidden moisture.
- I measured indoor humidity.
- I improved ventilation or dehumidification where needed.
- I checked HVAC condensate components.
- I documented significant damage.
- I used professional help when the scope or hazards exceeded DIY work.
- I monitored the area for recurrence after repair.
Frequently Asked Questions
Do I need to test mold before cleaning it?
Usually not when mold is visible or there is a clear musty odor. CDC does not recommend routine home mold testing simply to identify the species. The practical priority is removing the mold and fixing the moisture source.
Is black mold more dangerous than other mold?
Color does not reliably identify species or predict health effects. Different molds can appear dark. Treat visible indoor mold as a moisture and cleanup problem rather than trying to judge risk from color alone.
Can I clean mold with vinegar?
Various household products are promoted online, but EPA’s basic guidance for hard surfaces is detergent and water followed by complete drying. If you use any cleaner, follow its label and never combine products.
Should I use bleach?
Bleach can be used in some situations, but it is not the only option and does not replace physical removal, drying, and moisture repair. Never mix bleach with ammonia, acids, or other cleaners.
Can I paint over mold?
No. EPA advises cleaning and drying moldy surfaces before painting or caulking. Painting over active growth can hide the problem temporarily and the coating may peel.
What humidity level helps prevent mold?
EPA recommends keeping indoor relative humidity below 60 percent where possible and ideally around 30 to 50 percent. The practical target may vary with climate and condensation risk.
How quickly should wet materials be dried?
EPA recommends acting quickly and notes that drying damp materials within roughly 24 to 48 hours after a leak or spill often prevents mold growth.
When should I hire a mold professional?
Professional help is worth considering when the area is larger than about 10 square feet, water damage is extensive, floodwater or sewage is involved, HVAC systems are contaminated, hidden damage is suspected, or the work cannot be done safely.
Will an air purifier remove mold from my house?
A HEPA purifier can reduce some airborne particles, but it cannot remove mold growing inside building materials or fix moisture. Source removal and moisture control are still required.
Why does mold keep returning in my bathroom?
Recurring bathroom mold commonly points to persistent humidity, ineffective exhaust, condensation, leaks, or water entering around showers and tubs. Cleaning alone does not fix those causes.
Conclusion: Fix the Water, Then Fix the Mold
The most important principle in residential mold control is simple: mold is a moisture problem before it is a cleaning-product problem.
Find the leak, condensation pattern, flood damage, or humidity source. Dry materials rapidly after water events. Keep indoor humidity below 60 percent and ideally in the 30–50 percent range when practical. Clean small areas of intact hard material with detergent and water, dry them completely, and remove porous materials that cannot be restored. Use protective equipment, keep others away from the work zone, and never mix cleaning products.
The biggest mistake is making the stain disappear while leaving the building wet. The second biggest mistake is attempting a large or hazardous cleanup because a household spray makes the project look simple.
Your first practical step is to inspect the moisture path. Before cleaning anything, ask: Where did the water come from, and why will this surface stay dry after I am finished? If you cannot answer that question, the mold cleanup plan is not ready yet.
Sources and Further Reading
- U.S. EPA — Mold Cleanup
- U.S. EPA — Mold Cleanup in Your Home
- U.S. EPA — A Brief Guide to Mold, Moisture and Your Home
- U.S. EPA — Basic Mold Cleanup Steps
- U.S. EPA — Biological Contaminants and Indoor Air Quality
- CDC — Mold
- CDC — Homeowners and Renters Guide to Mold Cleanup After Disasters
- CDC — Guidelines for Cleaning Safely After a Disaster
Image Credits
- “Mold on wall1.jpg” — שי אבידן, Wikimedia Commons, CC BY-SA 4.0.
- “Mold on gypsum wallboard.jpg” — U.S. Environmental Protection Agency / Terry Brennan, public domain.
- “A Dehumidifier.jpg” — V.B.Speranza, Wikimedia Commons, CC BY-SA 4.0.