

Quick answer: Good dryer maintenance is mostly about keeping air moving freely and keeping lint away from heat. For a conventional vented dryer, clean the lint screen after every load, inspect the screen for invisible dryer-sheet or softener residue, keep the area behind and around the appliance free of lint, check that the exhaust duct is not crushed or kinked, and make sure the exterior hood opens strongly while the dryer runs. Periodically clean the full exhaust path; U.S. fire-safety guidance recommends annual duct cleaning as a practical preventive baseline, while the owner’s manual may specify a model-specific interval. If drying time suddenly increases, clothes remain damp, the cabinet becomes unusually hot, a “Check Vent” warning appears, or exterior airflow weakens, stop treating the symptom with longer cycles and investigate the airflow path. Ventless condenser and heat-pump dryers need a different routine: they do not use an exterior exhaust duct, but their lint filters, heat exchanger or condenser area, air paths, water tank, and drain system still need regular care according to the manual.
 A dryer can look clean from the front while lint or airflow restrictions are developing in the screen, exhaust path, exterior hood, or spaces behind the appliance. Photo: Baron Maddock, Wikimedia Commons, CC BY 4.0.
A clothes dryer is one of the simplest household appliances to use and one of the easiest to neglect. You put in wet laundry, select a cycle, and expect warm, dry clothes. When performance slowly declines, many people compensate by adding time, choosing a hotter setting, or running a second cycle. That can hide the actual problem: restricted airflow, a coated lint screen, a crushed duct, an overloaded drum, poor washer extraction, a blocked outside hood, or maintenance that has fallen behind.
Dryer care matters for more than convenience. The U.S. Consumer Product Safety Commission warns that lint can accumulate in dryers and exhaust ducts, restrict airflow, create excessive heat, and contribute to fires. ENERGY STAR also recommends cleaning the lint filter after every load because unrestricted airflow improves efficiency as well as safety. The core principle is therefore straightforward: a dryer must move air, heat it appropriately, pass it through tumbling fabric, remove moisture, and—if it is a vented design—expel that moist air outside without excessive resistance.
This guide teaches a practical maintenance system rather than one brand’s cleaning ritual. It covers electric and gas vented dryers, condenser dryers, heat-pump dryers, and common all-in-one variations. Because access panels, filters, condensers, moisture sensors, duct specifications, gas components, and reset procedures differ by model, use the manufacturer’s manual as the final authority whenever the guide and your appliance’s instructions differ.
1. Identify What Type of Dryer You Own Before Cleaning It
The maintenance plan changes substantially depending on dryer design.
Conventional vented electric dryer
This dryer heats air electrically, moves it through the drum, and sends warm moist air through an exhaust duct to the exterior. Maintenance centers on the lint screen, exhaust path, drum, accessible lint areas, and electrical connection.
Conventional vented gas dryer
The airflow path is similar, but heat comes from a gas burner. Gas appliances add combustion and fuel-system safety concerns. User maintenance should generally stay on the cleaning and airflow side unless the manual explicitly authorizes a task. Burner, gas valve, connector, ignition, and combustion problems belong with qualified service professionals.
Ventless condenser dryer
A condenser dryer removes moisture from circulating air and collects or drains the condensed water instead of exhausting humid air through an exterior duct. It usually requires cleaning one or more lint filters and maintaining a condenser or heat-exchange area.
Heat-pump dryer
A heat-pump dryer is also typically ventless. ENERGY STAR explains that it recirculates heated air in a closed-loop process and removes moisture through a condenser. It operates at lower temperatures and can be much more energy efficient, but it can have multiple filters, heat-exchanger surfaces, or maintenance prompts that must not be treated like a conventional vented dryer’s duct system.
Washer-dryer combination unit
All-in-one units vary widely. Some are ventless, some use heat-pump technology, and their lint-management systems may be very different from a standalone dryer. Use the exact model manual rather than assuming there is a removable lint screen in the same location as a traditional dryer.
How to verify: Find the model number on the door opening, rear label, control area, or manufacturer’s app, then download the owner’s and installation manuals. Record whether the unit is vented or ventless, electric or gas, and whether it has a user-cleanable condenser or secondary filter.
2. Learn the Dryer’s Airflow Path
You do not need to dismantle the appliance to understand its operating path.
In a typical vented dryer, room air enters the machine, passes across a heat source, moves through tumbling laundry, carries evaporated moisture through the lint-filter area, enters the blower and exhaust system, travels through the duct, and leaves at an exterior hood.
If one part becomes restricted, the entire system changes. The dryer may:
- take longer to dry;
- feel hotter than normal;
- cycle the heater differently;
- leave clothes damp;
- display an airflow warning;
- consume more energy;
- accumulate lint in unintended places.
This is why “the dryer still heats” does not prove the appliance is working correctly. Heat without airflow is not useful drying.
3. Know the Stop-Use Warning Signs
Routine cleaning is a homeowner task. Several symptoms should move you out of routine maintenance and into professional inspection or emergency action.
Stop using the dryer and arrange qualified service if you notice:
- a burning or electrical smell that persists;
- smoke or visible scorching;
- sparks;
- a repeatedly tripping breaker or blowing fuse;
- a damaged power cord, plug, receptacle, or terminal area;
- gas odor around a gas dryer;
- unusual flames or combustion behavior visible where the manufacturer does not identify it as normal;
- the dryer becoming abnormally hot despite a clean screen and known-clear vent;
- a drum that will not turn normally but the motor continues struggling;
- metal-on-metal grinding;
- water leaking from a ventless unit into electrical areas.
If you smell gas, do not continue troubleshooting the appliance. Leave the area and follow your gas utility’s emergency instructions. Do not create sparks by operating switches or plugs if a gas leak is suspected.
4. Unplug Before User-Accessible Cleaning That Reaches Beyond the Lint Screen
Cleaning the lint screen is normally done between loads with the appliance off. For vacuuming around accessible openings, moving the dryer, checking a rear duct, or cleaning parts the manual says to remove, disconnect electrical power first. For a gas dryer, turning off the dryer electrically does not turn off the gas supply; do not manipulate the gas connector unless the manufacturer or a qualified professional’s procedure specifically requires it.
Common mistake: Reaching behind a running dryer to straighten a crushed vent or clear lint. The appliance can move, components can be hot, and electrical or gas connections can be disturbed.
5. Clean the Lint Screen After Every Load
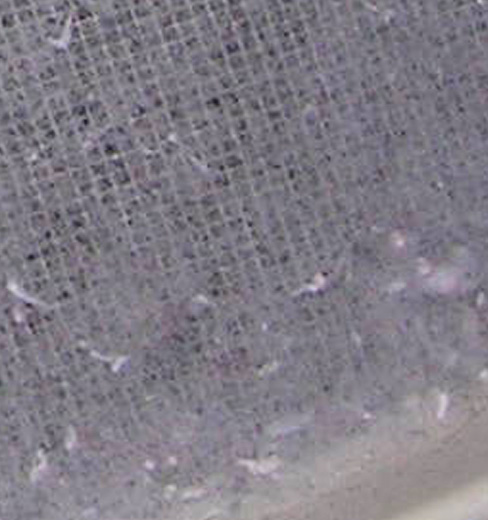 The lint screen is the maintenance point you should see most often. A restricted screen can increase drying time and reduce airflow. Photo: BD2412, Wikimedia Commons, CC BY-SA 3.0.
The U.S. CPSC recommends cleaning the lint screen or filter before or after each load. ENERGY STAR likewise recommends cleaning it after every load for airflow, efficiency, and safety.
Remove the screen using the motion shown in your manual. Peel or roll lint from the mesh by hand and reinstall the screen fully before operating the dryer.
Do not run a conventional dryer without its lint filter. The screen is designed to capture fibers before they travel deeper into the exhaust system.
Success check: Light should be visible through clean mesh, the screen should sit flat in its housing, and lint should not be packed along the edges or handle area.
6. Deep-Clean a Coated Lint Screen When Air No Longer Passes Easily
A lint screen can look clean while being coated with residue. Fabric softeners and dryer sheets can leave a film that reduces airflow through the mesh. ENERGY STAR specifically advises periodically scrubbing a filter when dryer sheets are used; Whirlpool’s maintenance guidance also describes washing a coated screen with warm water, liquid detergent, and a nylon brush, then drying it thoroughly before reinstalling it.
Use your model manual as the final instruction, but a common method is:
- Remove all visible lint.
- Wet both sides of the screen with warm or hot water if the manufacturer permits washing.
- Apply a small amount of mild liquid detergent.
- Gently scrub with a soft nylon brush.
- Rinse thoroughly.
- Dry completely before reinstalling.
Simple test: Some owners notice that water pools on a coated screen instead of passing through the mesh freely. That can be a clue that residue is present, but follow the manufacturer’s cleaning method rather than using harsh solvents.
7. Vacuum the Accessible Lint-Screen Housing Carefully
Lint can fall below the removable screen. If your manual allows cleaning the housing, unplug the dryer and use a narrow vacuum attachment to remove loose lint that is clearly accessible.
Do not force rigid tools deep into the housing. Sensors, seals, ducts, and the blower can be damaged. If a large amount of lint is visible beyond safe reach, professional cleaning may be more appropriate.
Why it matters: The screen catches much of the lint, not necessarily all of it. Maintaining accessible passages helps preserve airflow.
8. Clean the Drum Without Leaving Flammable Residue
The inside drum collects lint dust, dryer-sheet residue, dye transfer, melted substances from forgotten pockets, and occasional marks from zippers or hardware.
For routine cleaning:
- Unplug the dryer.
- Remove loose debris.
- Wipe the drum using the mild cleaner or damp-cloth method allowed by the manual.
- Remove cleaner residue completely.
- Let the interior dry before restoring power.
Avoid leaving solvent, aerosol cleaner, oil, or other flammable residue inside a heated appliance. For ink, gum, wax, adhesive, or melted plastic, use the manufacturer’s stain-removal instructions because the wrong solvent can create a fire or fabric-transfer hazard.
9. Wipe the Door, Seal, and Door Opening
Lint often collects around the door rim and seal. Wipe these areas with a damp cloth when the dryer is cool. Check for torn seals or deformation that may allow air leakage.
On a ventless dryer, door and seal condition can also affect condensation management because the system depends on controlled recirculation.
10. Clean the Area Around and Behind the Dryer
CPSC specifically recommends cleaning behind the dryer because lint can accumulate there. The area also tends to collect paper, socks, dust, pet hair, and dropped laundry products.
Before moving the appliance:
- unplug it;
- protect flooring;
- do not strain the gas connector on a gas model;
- do not pull against a short or rigid duct;
- ask for help if the appliance is heavy or stacked.
Vacuum the floor, wall, baseboards, and accessible exterior surfaces. Keep combustible storage away from the dryer’s heat and airflow areas.
11. Inspect the Exhaust Duct on Vented Dryers
Ventless dryers do not have this system. For a conventional vented dryer, inspect the duct between the appliance and the wall.
Look for:
- crushing;
- sharp kinks;
- disconnected joints;
- excessive sagging;
- visible lint leakage;
- improper material;
- too many tight turns;
- the dryer pushed hard against the duct.
Whirlpool’s current product guidance recommends rigid or flexible metal venting and warns against materials that can collapse or be crushed. Exact diameter, maximum equivalent length, elbow allowances, termination requirements, and connection method belong to your installation manual and local code.
Do not generalize one manufacturer’s 4-inch specification to every dryer worldwide. Many North American dryers use 4-inch metal ducting, but the installation manual for your appliance is the controlling source.
12. Keep the Duct Route as Direct as Practical
Every turn and added length increases resistance. A dryer that vents through a short straight wall path generally has an easier job than one that travels through a long concealed route with several elbows and a roof termination.
If a renovation changes the route, check the dryer’s installation manual for maximum equivalent length. A route that physically fits can still exceed the appliance’s airflow design.
13. Never Intentionally Vent a Conventional Dryer Into the House
A standard vented dryer is designed to discharge moisture—and, for gas dryers, combustion products—according to its approved installation method. Exhausting into an attic, crawlspace, garage, or living area can create moisture and safety problems.
CPSC’s indoor-air guidance specifically asks whether a clothes dryer vents to the outside rather than into attics or crawlspaces. Follow local code and manufacturer instructions for the termination location.
14. Inspect the Exterior Vent Hood While the Dryer Runs
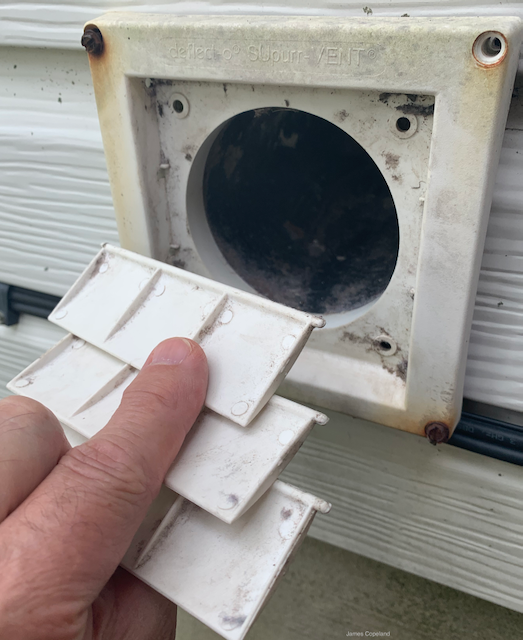 On a conventional vented dryer, the exterior hood is an easy place to check whether exhaust is escaping strongly and whether lint, pests, or debris are restricting the outlet. Photo: Vick648, Wikimedia Commons, CC BY-SA 4.0.
CPSC advises checking the outside vent while the dryer operates to make sure exhaust air is escaping. Whirlpool’s “Check Vent” guidance similarly recommends looking for strong airflow at the hood.
During a normal cycle, go outside and observe from a safe position:
- Do the louvers or flap open?
- Is warm air flowing steadily?
- Is lint packed around the opening?
- Is a bird nest, insect nest, snow, vegetation, or debris blocking the hood?
- Does the flap close after the dryer stops?
A decorative screen installed across the outlet can trap lint; use only an exterior termination type allowed by local code and the dryer/vent manufacturer.
15. Treat Weak Exterior Airflow as a Diagnostic Clue
If the dryer heats but exterior airflow is weak, possible causes include:
- clogged lint screen;
- coated lint-screen mesh;
- crushed transition duct;
- lint buildup deeper in the duct;
- blocked exterior hood;
- excessively long or complex duct routing;
- blower or internal airflow problem.
Do not immediately increase cycle time. Diagnose why moist air is not leaving efficiently.
16. Clean the Full Dryer Vent Periodically
CPSC says to clean dryer vents and exhaust ducts periodically. U.S. fire-safety guidance commonly recommends annual cleaning as a preventive routine, while manufacturers may specify different intervals depending on design and use. Whirlpool, for example, gives a general maintenance suggestion of at least every two years unless the owner’s manual says otherwise, and more often if performance declines.
For a homeowner, the safest interpretation is:
- follow the owner’s manual and local fire-safety requirements;
- do not wait for a fixed date if drying time or airflow worsens;
- clean more frequently for heavy laundry use, long ducts, many elbows, pets, or high-lint fabrics;
- use professional vent cleaning when the route is long, hidden, roof-terminated, difficult to access, or cannot be verified end-to-end.
17. Avoid Vent-Cleaning Methods That Can Damage the Duct
Rotating brushes, rods, vacuums, and air tools can be effective when used correctly, but they can also disconnect poorly secured joints or damage lightweight ductwork. If you do not know the route, material, or access points, professional cleaning is safer than blindly pushing a long tool through the wall.
After any vent cleaning, confirm that all joints are reconnected correctly and exterior airflow is restored before returning the dryer to normal use.
18. Know When Professional Vent Cleaning Is Worth It
Consider professional help if:
- the vent exits through the roof;
- the run crosses multiple floors;
- you cannot reach the full path;
- the duct repeatedly clogs;
- airflow remains weak after accessible cleaning;
- you suspect a disconnected concealed duct;
- the dryer reports repeated airflow warnings;
- there is lint visible inside inaccessible chassis areas;
- you recently purchased a home and have no maintenance history.
Ask the provider how they verify airflow after cleaning rather than judging success only by the amount of lint removed.
19. Diagnose Long Drying Times in the Right Order
Long cycles are one of the best early warning signs because they often appear before a complete failure.
Use this order:
- Clean the lint screen.
- Check for residue on the screen.
- Confirm the load is not oversized.
- Confirm the washer is extracting water effectively.
- Inspect the transition duct for crushing.
- Check exterior airflow.
- Clean the full vent if airflow is restricted.
- Check cycle selection and sensor behavior.
- If the problem remains, arrange appliance diagnosis.
CPSC specifically notes that clothes still damp after a typical cycle or unusually long drying times can indicate a blocked lint screen or exhaust duct.
20. Check the Washer Before Blaming the Dryer
A dryer cannot efficiently remove water that the washer should have spun out first.
After the final spin, laundry should be damp, not dripping. If heavy towels come out unusually wet, possible washer issues include an unbalanced load, low spin-speed selection, drainage trouble, or another washing-machine problem.
On LordAI, the separate guide on cleaning and maintaining a smelly washing machine covers washer-specific maintenance. Keeping the washer and dryer as one system prevents you from compensating for poor washer extraction with excessive dryer time.
21. Do Not Overload the Drum
Drying requires clothes to tumble so hot air can move around wet fabric. A drum packed tightly with towels, bedding, or jeans can reduce circulation even when the vent is perfectly clean.
Separate very heavy items from lightweight fabrics when the manual recommends it. If one item repeatedly wraps into a dense ball—such as a fitted sheet around smaller pieces—pause and redistribute the load.
22. Avoid Underloading When Automatic Sensors Need Fabric Contact
Some moisture-sensing dryers can behave oddly with a tiny load because the items do not contact sensor bars consistently. If one or two garments stop too early on an automatic cycle, use the small-load or timed option recommended by the manual rather than assuming the moisture sensor has failed.
23. Clean Moisture-Sensor Bars Only as the Manual Directs
Many dryers have metal sensor strips inside the drum or near the lint-screen area. Residue from dryer sheets or fabric-care products can interfere with moisture sensing.
Manufacturers often recommend wiping sensor bars periodically with a mild method specified in the manual. Do not sand or aggressively abrade them.
Symptom of a sensor problem: Automatic cycles consistently stop while clothes are damp, even though airflow is good and load size is appropriate.
24. Use Automatic Dry Cycles When They Work Correctly
ENERGY STAR highlights moisture-sensing automatic termination because it can stop the cycle when clothes are dry, preventing unnecessary energy use and reducing wear caused by overdrying.
If you routinely select a 90-minute timed cycle for a load that dries in 50 minutes, the dryer may spend the final 40 minutes heating already-dry fabric.
25. Use Lower Heat When Fabric and Cycle Instructions Allow It
Lower heat generally reduces fabric stress and can improve energy performance. Heat-pump dryers rely on lower-temperature drying by design.
The trade-off is time: lower-temperature cycles can take longer, especially on ventless heat-pump models. Longer time alone is not evidence of a fault if the machine is operating as designed and the load finishes dry without excessive heat.
26. Understand Why Heat-Pump Dryers Can Feel “Slow”
ENERGY STAR explains that heat-pump dryers recirculate air and remove moisture through a condenser instead of exhausting high volumes of heated air outdoors. They operate at lower temperatures and can use substantially less energy than conventional dryers.
A new owner may interpret the gentler temperature and longer cycle as a malfunction. Before troubleshooting, compare actual cycle time and load size with the manual.
27. Maintain Heat-Pump and Condenser Filters on Schedule
Ventless dryers often have more than one filter. Depending on the model, you may need to clean:
- primary door lint filter;
- secondary lint filter;
- plinth or base filter;
- condenser area;
- heat-exchanger face;
- air intake.
Some heat exchangers are user-cleanable; others are self-cleaning or must not be brushed because delicate fins can bend. Follow the exact manual.
28. Empty the Condensate Tank When the Dryer Does Not Drain Directly
Ventless units often collect water in a removable tank unless connected to a drain. A full tank can pause or stop drying.
Empty it at the frequency the manufacturer specifies. Wash or wipe the tank if permitted, check that it seats correctly, and keep any direct drain hose free of kinks.
29. Do Not Apply Vented-Dryer Duct Advice to a Ventless Dryer
This distinction is important enough to repeat. A heat-pump or condenser dryer usually has no exterior exhaust duct to clean. Searching for “dryer vent cleaning” and dismantling a ventless machine in pursuit of a nonexistent duct can damage it.
Use the model’s filter, heat-exchanger, tank, drain, and airflow-maintenance instructions instead.
30. Keep Intake and Room Ventilation Open
Even ventless appliances need room air around the cabinet and unobstructed air inlets. Do not cover vents with baskets, clothing, or stored detergent.
Compact laundry closets may require specific clearance or ventilation openings. Follow the installation manual.
31. Inspect the Power Cord and Receptacle
With the dryer unplugged and cool, inspect visible components without opening electrical panels.
Look for:
- discoloration;
- melted plastic;
- loose plug fit;
- cracked insulation;
- burn marks;
- heat damage near the receptacle.
If any appear, stop using the dryer and have the electrical connection inspected. High-power appliances should not be operated from household extension cords or improvised adapters.
32. Do Not Treat a Repeatedly Tripping Breaker as a Reset Problem
A breaker trips because it detected an abnormal electrical condition or overload. Resetting it over and over without identifying the cause can hide a serious issue.
If the dryer repeatedly trips the breaker, stop use and have the dryer and circuit evaluated by qualified professionals.
33. Give Gas Dryers Additional Respect
Gas dryers combine lint, heat, electrical controls, and fuel-burning equipment. User maintenance should focus on the lint screen, permitted cleaning, exhaust path, and exterior airflow.
Do not remove burner components or adjust gas valves based on a generic online tutorial. If drying is poor after airflow maintenance, ignition is inconsistent, soot appears, or you smell gas, arrange professional service.
34. Keep Carbon Monoxide Protection in Mind With Fuel-Burning Appliances
A properly installed gas dryer is designed to exhaust according to its approved venting system. Because gas combustion can create carbon monoxide, damaged or disconnected venting is not merely an efficiency concern.
Follow local requirements for carbon monoxide alarms and the broader complete home fire-safety plan for household alarm and escape preparation.
35. Watch for a Dryer That Is Hotter Than Normal
An unusually hot cabinet, laundry room, or load can indicate restricted airflow, overload, incorrect installation, sensor problems, or another fault.
Do not judge by touch alone because dryer surfaces normally become warm. Compare against the appliance’s normal behavior.
Stop use if heat is accompanied by a burning smell, smoke, scorched fabric, or repeated safety shutdowns.
36. Treat “AF,” “Check Vent,” and Airflow Warnings as Information, Not Annoyances
On certain Whirlpool models, an AF or “Check Vent” message indicates restricted airflow and can be triggered by a clogged screen or vent, crushed or kinked ducting, or too many turns. Other manufacturers use different names and thresholds.
If the dryer continues running despite the warning, that does not mean the warning can be ignored. Clean the screen, inspect the duct, check the outside hood, and follow model-specific diagnostic instructions.
37. Do Not Clear an Airflow Warning Without Fixing the Restriction
Pressing a button may remove the message from the display, but it does not remove lint from the duct.
After maintenance, verify improvement by:
- stronger exterior airflow;
- normal cycle duration;
- no repeated warning;
- normal cabinet temperature;
- laundry dry at the expected cycle end.
38. Watch the Exterior Hood in Winter
Snow, ice, leaves, or wind-driven debris can obstruct a low exterior termination. Check it after heavy snowfall and periodically during leaf season.
Do not create an improvised cover that prevents the flap from opening. The hood must remain functional while keeping pests and weather out according to the approved design.
39. Check for Pest Nests During Seasonal Inspections
Birds and insects can use exterior vents as nesting spaces. A nest can sharply restrict airflow.
Handle nests in accordance with local wildlife laws, especially when birds or eggs are present. After safe removal, use only a termination design permitted for dryer exhaust; fine screens can trap lint.
40. Remove Flammable Debris From Pockets Before Drying
Check pockets for lighters, batteries, matches, oily rags, solvent-soaked material, and other hazardous items before loading the dryer.
Clothing or fabric contaminated with gasoline, solvents, cooking oils, or other flammable substances can remain dangerous even after washing. Follow the garment-care label, product safety guidance, and dryer manufacturer’s warnings; some contaminated items should not be machine dried at all.
41. Follow Care Labels for Rubber-Backed and Heat-Sensitive Items
Foam, rubber-backed mats, waterproof layers, plastics, adhesives, and certain synthetic materials can be damaged by heat or present special risks. Do not assume that “low heat” makes every material dryer-safe.
Use the care label and appliance manual. Air-dry when required.
42. Avoid Drying Items That Are Dripping Wet
Excess water adds unnecessary cycle time and can stress the dryer. If a garment cannot be spun in the washer because of its construction, follow its care instructions rather than using the dryer as a substitute spin cycle.
43. Clean Pet Hair Before It Becomes a Vent Problem
Pet bedding and blankets can release large amounts of hair and lint. Shake or brush excessive loose hair outdoors when appropriate before washing, clean the lint screen after the load, and inspect the screen housing more often in homes with shedding pets.
Heavy pet-laundry use can justify more frequent vent inspection than a household that dries only a few low-lint loads per week.
44. Level the Dryer to Reduce Noise and Wear
A dryer that rocks can create vibration, move backward into the vent duct, or increase noise. Check that all feet contact the floor and that the appliance is level according to installation instructions.
Do not shim the machine with unstable scraps of material. Use approved leveling feet or a stable installation solution.
45. Investigate New Thumps, Scrapes, and Squeals
Some noises are harmless: buttons and zippers can tap the drum, and shoes may tumble noisily. A persistent metal scrape, grinding, high-pitched squeal, or heavy thump can indicate a roller, bearing, belt, idler, blower, foreign object, or drum-support issue.
Remove the load and check for obvious pocket items or loose objects in the drum. If the noise continues empty, arrange service rather than allowing a failing mechanical part to damage more components.
46. Do Not Spray Lubricant Into a Squealing Dryer
General-purpose lubricant can contaminate clothes, attract lint, reach belts or electrical parts, and create a fire risk. Dryer bearings and rollers require model-specific parts and service procedures.
47. Clean the Control Panel Gently
Use a slightly damp cloth or manufacturer-approved cleaner. Do not spray liquid directly into electronic controls, knobs, vents, or seams.
Touchscreens and printed labels can be damaged by abrasive cleaners or solvents.
48. Keep Laundry Products From Spilling Onto the Dryer
Liquid detergent, bleach, stain remover, and fabric softener can damage paint or plastic if left on surfaces. Wipe spills promptly according to the appliance’s finish-care instructions.
Do not store heavy or leak-prone containers where they can fall into the space behind the machine or onto cords and duct connections.
49. Build a Maintenance Routine Instead of Waiting for Failure
A simple schedule is easier than remembering dozens of tasks.
| Frequency | Task | Applies to |
|---|---|---|
| Every load | Clean lint filter; check pockets | Most dryers with accessible filters |
| Monthly | Inspect screen residue, door seal, area around dryer, exterior hood | Vented dryers; adapt for ventless models |
| Every few months | Wipe drum/sensors if manual recommends; vacuum accessible lint | Model dependent |
| Per manual | Clean secondary filters, condenser/heat exchanger, water tank | Ventless/heat-pump dryers |
| At least periodically; often annually for fire prevention | Inspect/clean full exhaust duct and verify airflow | Conventional vented dryers |
| Any time performance changes | Diagnose airflow before extending dry time | All dryers |
50. Use Drying Time as a Maintenance Metric
You do not need special sensors to notice performance drift.
Choose one repeatable load—perhaps six bath towels—and notice roughly how long it takes under the same washer spin and dryer cycle. If the same load gradually moves from 50 minutes to 80 minutes, investigate.
This is more useful than waiting until the dryer “stops working.”
51. Use Exterior Airflow as a Second Metric
For vented dryers, periodically observe the exterior hood during a normal load. Strong airflow and fully opening flaps become your baseline.
If the hood barely opens months later, something changed. Check the screen, duct, hood, and internal airflow path before assuming the heater is weak.
52. Use Energy Consumption as a Third Clue When You Have Smart-Meter Data
A dryer that suddenly needs two cycles for every load may increase household electricity or gas use. If your utility or smart plug provides compatible appliance-level energy data, a rise in runtime can reinforce the need for maintenance.
Do not plug a high-power dryer into an ordinary consumer smart plug unless that device is explicitly rated and approved for the dryer circuit.
53. Worked Example: Towels Now Need Two Cycles
A family reports that towels used to dry in one automatic cycle but now require a second cycle. The dryer still feels hot.
Step 1: Clean the lint screen.
Step 2: Deep-clean the screen because dryer sheets are used regularly.
Step 3: Check whether the washer’s final spin leaves towels unusually wet.
Step 4: Inspect the transition duct and discover the dryer has been pushed backward, flattening the flexible metal duct.
Step 5: Correct the installation using the approved duct arrangement.
Verification: Exterior airflow increases and towels return to one cycle.
The key lesson is that a hot dryer can still have an airflow problem.
54. Worked Example: The Dryer Shows “Check Vent” but Clothes Eventually Dry
A homeowner ignores a “Check Vent” message because the dryer still finishes after 90 minutes.
Better response: Treat the warning as a restriction indicator. Clean the lint screen, inspect the duct for crushing, check exterior airflow, and clean the full vent if needed. Whirlpool notes that some models continue operating even with the warning, so “it still runs” is not evidence that airflow is acceptable.
55. Worked Example: Exterior Vent Flap Barely Moves
The lint screen is clean, but the outside vent barely opens.
Possible causes: hidden duct blockage, crushed transition duct, clogged hood, excessive duct length, disconnected internal path, or blower trouble.
Action: Unplug the dryer, inspect accessible duct sections, and arrange full-path cleaning or service if the route cannot be verified.
Do not: Run hotter cycles in an attempt to “blow the lint out.”
56. Worked Example: New Heat-Pump Dryer Takes Longer Than the Old Dryer
A household replaces a conventional vented dryer with a heat-pump model and worries because a cotton load takes longer.
Correct interpretation: Heat-pump dryers operate at lower temperatures and recirculate heat for efficiency. Compare cycle duration with the manufacturer’s expected range and load size before diagnosing a fault.
Maintenance check: Clean all listed filters, empty the condensate tank if used, keep the heat-exchanger area maintained as instructed, and make sure the room’s required clearances are open.
57. Worked Example: Dryer Smells Hot After Moving House
The dryer worked normally before a move. In the new house, the cabinet smells unusually hot and cycles are longer.
Step 1: Stop and inspect the new installation.
Step 2: The dryer has been connected to a long duct with several elbows, and the transition duct is sharply bent.
Step 3: Compare the route with the installation manual’s allowed equivalent length and duct requirements.
Step 4: Have the vent corrected by a qualified installer.
Moving an appliance can introduce an installation problem even when the appliance itself is healthy.
58. Troubleshooting: Clothes Are Hot but Still Damp
Heat is present, so begin with airflow and load conditions:
- clean screen;
- check screen coating;
- reduce load size;
- check washer extraction;
- inspect duct and exterior hood;
- check moisture sensor behavior.
If airflow is strong and loads are appropriate, professional diagnosis may be needed.
59. Troubleshooting: Clothes Are Cool and Damp
Possible causes include incorrect cycle selection, heating-system failure, gas ignition issue, power-supply problem, or a heat-pump system fault.
Check simple user settings and power first. Do not open heater, burner, or high-voltage components. Arrange service if the appliance does not generate normal heat.
60. Troubleshooting: Dryer Stops Before Clothes Are Dry
Check:
- automatic moisture-sensor cycle with a very small load;
- dirty moisture-sensor bars;
- full condensate tank on a ventless model;
- airflow warning;
- overheating safety shutdown;
- door-latch problems;
- power interruptions.
Test using a normal, properly sized load before concluding the control board is defective.
61. Troubleshooting: Dryer Runs but Takes Much Longer in Winter
Inspect the exterior hood for snow or ice and consider whether the vent passes through a very cold space where condensation may be affecting the route. Check for strong airflow.
Do not alter insulation or vent routing without confirming fire and installation requirements.
62. Troubleshooting: Lint Appears Around the Laundry Room
Lint outside the dryer can suggest:
- poorly seated lint screen;
- damaged filter;
- disconnected exhaust duct;
- leaking duct joint;
- overfilled lint screen;
- door-seal problem.
Unplug the dryer and inspect visible connections. A disconnected exhaust duct should be corrected before further use.
63. Troubleshooting: The Laundry Room Becomes Humid
With a conventional vented dryer, increased room humidity can suggest an exhaust leak or disconnected duct. Stop and inspect rather than accepting the humidity as normal.
Ventless condenser dryers can release some heat into the room, but they should manage water according to their design. Excess condensation or water leakage deserves model-specific troubleshooting.
64. Troubleshooting: The Dryer Vibrates After You Clean Behind It
Moving the machine may have changed its level or feet position. Check that the dryer is stable and not touching the washer, wall, shelf, or vent pipe.
Also verify that the duct is not transmitting vibration into the wall.
65. A 15-Minute Monthly Dryer Check
- Unplug the dryer if you will move or reach behind it.
- Inspect the lint screen for residue or damage.
- Vacuum accessible lint around the screen opening.
- Wipe the door, seal, and control surface.
- Check behind and under the dryer for lint and dropped items.
- Inspect the visible duct for crushing.
- Restore power and run a normal load.
- Check the exterior hood for strong airflow if the dryer is vented.
- Note whether dry time has increased.
66. An Annual Vented-Dryer Safety Review
- Clean or professionally clean the full exhaust path based on fire-safety guidance, use, and the manual.
- Inspect duct material and connections.
- Check exterior termination.
- Inspect cord and receptacle visually.
- Check dryer level.
- Deep-clean the lint screen.
- Clean accessible lint behind the appliance.
- Review manufacturer maintenance bulletins.
- Verify smoke alarms and the household fire-safety plan.
67. A Ventless-Dryer Annual Review
- Clean all filters according to the manual.
- Inspect the condenser or heat exchanger only in the way authorized by the manufacturer.
- Clean or inspect condensate tank and drain path.
- Check air inlets and clearances.
- Review cycle times for performance drift.
- Inspect door seal.
- Check appliance level.
- Arrange service if filters are clean but performance has deteriorated significantly.
68. What Renters Should Check
If a dryer belongs to the landlord, clarify who is responsible for duct cleaning. You can still clean the lint screen every load and report:
- slow drying;
- weak exterior airflow;
- airflow warnings;
- burning smell;
- damaged duct;
- gas odor;
- electrical damage.
Do not open landlord-owned appliance panels or alter building ducts without permission.
69. What New Homeowners Should Do
When purchasing a home, assume the dryer vent’s cleaning history is unknown unless documented.
Identify the route and termination, inspect visible duct material, verify exterior airflow, and consider professional cleaning before heavy use—especially for long concealed runs.
This is also a good time to make sure the dryer is included in your broader home-maintenance records.
70. What to Tell a Dryer Technician
Useful information includes:
- model and serial number;
- electric, gas, condenser, or heat-pump type;
- exact symptom;
- when the problem started;
- cycle and load type;
- whether the lint screen is clean;
- when the vent was last cleaned;
- whether exterior airflow is strong;
- any error message;
- recent installation or moving work;
- sounds or odors;
- breaker or gas issues.
This helps distinguish appliance failure from installation or airflow problems.
71. Dryer Maintenance Checklist
- I know whether my dryer is vented or ventless.
- I have the correct owner and installation manuals.
- I clean the lint screen after every load.
- I deep-clean a coated lint screen as the manual permits.
- I do not run the dryer without its lint filter.
- I keep the area behind and around the dryer free of lint.
- I check the visible duct for crushing or kinks.
- I confirm the exterior hood opens during operation.
- I clean or professionally clean the exhaust path periodically and do not wait for serious restriction.
- I maintain ventless filters, condenser/heat exchanger, tank, and drain according to the manual.
- I do not vent a conventional dryer into living spaces, attics, or crawlspaces.
- I do not use ordinary extension cords for a dryer.
- I do not repeatedly reset a tripping breaker.
- I stop using the dryer for smoke, burning smell, scorching, sparks, or gas odor.
- I check pockets for lighters and hazardous items.
- I follow fabric care labels.
- I investigate longer drying times instead of simply adding more time.
- I know what normal exterior airflow looks like.
- I keep records of vent cleaning and service.
Frequently Asked Questions
How often should I clean a dryer lint filter?
Clean the accessible lint screen before or after every load, following the dryer’s manual. CPSC and ENERGY STAR both emphasize this frequent cleaning because a restricted filter reduces airflow and can increase drying time.
How often should a dryer vent be cleaned?
There is no single interval that fits every installation. CPSC says vents and ducts should be cleaned periodically, U.S. fire-safety guidance commonly uses annual cleaning as a practical preventive baseline, and manufacturers may publish their own intervals. Long, complex, heavily used, or repeatedly restricted vents may need more frequent cleaning.
How do I know if my dryer vent is clogged?
Common clues include longer drying times, damp clothes after a normal cycle, an airflow warning, unusual heat, weak airflow at the exterior hood, or a hood flap that barely opens. These signs are not exclusive to a clog, so verify the entire airflow path.
Should the outside dryer vent blow strongly?
A conventional vented dryer should produce obvious airflow at the exterior hood during operation. Weak flow suggests restriction, an installation problem, or an appliance airflow fault. Compare with the manual and the system’s normal baseline.
Can I use foil duct behind a dryer?
Use only duct materials and transition connectors allowed by the appliance’s installation instructions and local code. Many manufacturers recommend metal venting and warn against materials that crush or collapse easily. Do not assume a product sold in a hardware store is approved for every dryer installation.
Why is my dryer hot but my clothes still wet?
Heat without enough airflow cannot remove moisture efficiently. Start with the lint screen, screen residue, load size, washer spin, transition duct, exterior hood, and full vent path. If airflow is normal, the dryer may need service.
Why does my new heat-pump dryer take longer?
Heat-pump dryers often use lower temperatures and recirculate heat, so cycles may be longer than a conventional high-heat vented dryer. Compare actual performance with the manufacturer’s expectations and keep all filters and heat-exchange surfaces maintained.
Do heat-pump dryers need a dryer vent cleaned?
Most residential heat-pump dryers are ventless and therefore do not use the same exterior exhaust duct as conventional dryers. They still need regular filter, condenser or heat-exchanger, tank, drain, and air-path maintenance according to the model manual.
Can I clean inside the dryer cabinet myself?
Only if the manufacturer provides a user-service procedure and you are qualified to follow it. CPSC notes that a qualified service person may need to clean lint accumulation inside the dryer chassis. Internal electrical, heating, gas, and mechanical parts create hazards that routine household cleaning does not.
What is the biggest dryer-maintenance mistake?
The biggest mistake is treating longer drying time as a request for a longer cycle instead of a symptom. A dryer that suddenly needs much more time may have restricted airflow, a coated screen, installation trouble, poor washer extraction, or a mechanical fault. Find the cause before normalizing the extra runtime.
Conclusion: Protect Airflow Before You Chase Heat
The best dryer-maintenance habit is simple: think about airflow before heat. A dryer can generate plenty of heat and still perform badly if lint, a crushed duct, a blocked hood, a coated screen, an overloaded drum, or an unmaintained heat exchanger prevents moisture from moving where it should.
Clean the lint filter every load. Learn what normal exterior airflow looks like if your dryer is vented. Inspect accessible ducting and the area behind the appliance. Maintain the entire exhaust path on a preventive schedule instead of waiting for a warning. If you own a condenser or heat-pump dryer, follow its filter, heat-exchanger, water-tank, and drain routine rather than applying conventional vent advice.
The most important error to avoid is ignoring a change in performance. Longer cycles, weak airflow, unusual heat, recurring “Check Vent” messages, and persistent dampness are diagnostic clues. Address them early.
Your first practical step is to clean the lint filter, then run one normal load and walk outside to observe the exhaust hood if you own a vented dryer. That two-minute check gives you a baseline for the airflow your dryer should produce when the system is healthy.
Sources and Further Reading
- U.S. Consumer Product Safety Commission — Overheated Clothes Dryers Can Cause Fires
- CPSC Safety Alert 5022 — Overheated Clothes Dryers Can Cause Fires
- ENERGY STAR — Clothes Dryers
- ENERGY STAR — Heat Pump Dryers
- Whirlpool Product Help — How to Check Venting
- Whirlpool — How to Clean a Dryer
- Whirlpool Product Help — AF or Check Vent
- CPSC — Biological Pollutants in Your Home
Image Credits
- “Whirlpool Cabrio Dryer.jpg” — Baron Maddock, Wikimedia Commons, CC BY 4.0.
- “Dryer lint screen.jpg” — BD2412, Wikimedia Commons, CC BY-SA 3.0.
- “Home clothes dryer outside vent showing 3 flaps back side.png” — Vick648, Wikimedia Commons, CC BY-SA 4.0.