

 A reliable water-saving plan starts with measurement. Digital water meter photo by Aliva Sahoo via Wikimedia Commons, CC BY-SA 4.0.
A home can waste water for months without producing a dramatic puddle. A toilet valve can leak silently, an irrigation line can discharge underground, a pressure problem can shorten the life of fittings, and a household can develop expensive habits simply because nobody has compared bills, meter readings, fixture flow, and daily routines. The solution is not to buy every “eco” product on the market. The solution is to build a measured, prioritized water-management system for the entire property.
This guide explains how to create that system step by step. It is designed for homeowners, renters, landlords, and first-time property buyers who want to reduce avoidable water use without making the home uncomfortable or turning daily life into a collection of restrictions. You will learn how to establish a baseline, detect hidden leaks, evaluate toilets and faucets, reduce hot-water waste, improve laundry and kitchen routines, manage outdoor irrigation, select monitoring devices, and rank projects by urgency, cost, and expected benefit.
The article also treats water efficiency as a home-protection issue. Leaks do more than increase a utility bill. They can damage cabinets, flooring, drywall, insulation, electrical systems, foundations, and personal property. Water that is inexpensive at the meter can become very expensive after it enters the wrong part of the building. A useful plan therefore balances four goals: lower consumption, lower energy use, safer plumbing, and faster leak detection.
Quick Answer: The Best Order for Reducing Home Water Waste
For most homes, the strongest order of work is:
- Measure normal use. Collect bills and identify the household’s seasonal baseline.
- Look for active leaks. Use the meter, fixture checks, and moisture inspection before buying upgrades.
- Fix toilets, faucets, valves, and supply lines. Small failures are often inexpensive to correct and can run continuously.
- Reduce hot-water waste. Shorter delivery paths, correct temperatures, efficient fixtures, and repaired leaks can lower both water and energy use.
- Improve appliance routines. Full loads, correct settings, and maintenance matter more than many people expect.
- Control outdoor use. Adjust schedules to climate, soil, plant needs, and rainfall rather than using a fixed timer year-round.
- Add monitoring where the risk justifies it. Leak sensors and flow monitors are most valuable near high-risk equipment and in frequently vacant properties.
- Measure again. Compare usage after each change so that savings are verified rather than assumed.
This order prevents a common mistake: installing expensive products while a hidden leak continues to waste water. It also keeps the plan practical. The first projects should usually be low-cost, high-confidence actions that solve verified problems.
Before You Begin: Safety, Scope, and Basic Tools
A visual home water audit is suitable for many residents, but some work should be left to qualified professionals. Do not open walls without understanding electrical and structural risks, work on a pressurized system without knowing how to isolate it, modify a water heater without following manufacturer instructions, enter unsafe crawl spaces, or attempt repairs involving contaminated water, damaged gas equipment, or active electrical hazards. A leak near an electrical panel, outlet, appliance connection, or energized pump requires special caution.
Stop and seek professional help when you see a rapidly spreading leak, a ceiling that is bulging, sewage backup, a damaged main shutoff, water around electrical equipment, unexplained low pressure throughout the home, repeated pipe failures, signs of frozen or burst pipes, or moisture that appears to be entering from the foundation or roof. The purpose of a DIY audit is to identify and prioritize problems, not to take unnecessary risks.
Gather these basic tools:
- At least 12 months of water and sewer bills.
- A notebook, spreadsheet, or home-maintenance app.
- A flashlight and phone camera.
- Paper towels or dry tissue for checking fittings.
- Food coloring for a toilet leak test.
- A bucket with volume markings and a timer.
- A small adjustable wrench and screwdriver set for simple, permitted maintenance.
- A room humidity meter if moisture is a concern.
- Removable labels or painter’s tape for marking shutoff valves and problem areas.
Part 1: Establish Your Water-Use Baseline
Step 1: Collect 12 to 24 Months of Water Bills
Download at least one full year of bills; two years is better. Record the billing period, number of billing days, total water use, sewer charges, fixed service fees, rate tiers, seasonal surcharges, and any notes from the utility. Do not compare only the currency total because rates can change. Compare actual consumption in gallons, cubic feet, cubic meters, liters, or the unit used by your provider.
Normalize the data by dividing consumption by the number of billing days. A 35-day bill should not be compared directly with a 28-day bill. Also note household changes such as guests, a new baby, remote work, a garden expansion, a pool refill, a tenant change, a broken appliance, or a period when the property was vacant.
Look for three patterns. First, a steady increase may indicate changing habits or a slowly developing leak. Second, a sudden jump may indicate a major failure or outdoor-use event. Third, unusually high winter or rainy-season use can reveal leaks because irrigation and outdoor demand should be lower.
Step 2: Understand the Rate Structure
Some utilities charge a flat rate per unit. Others use tiered pricing, seasonal pricing, drought surcharges, separate sewer calculations, or minimum monthly charges. Your strategy should reflect the bill. Under tiered pricing, avoiding the highest usage block can create larger savings than the same reduction in a lower block. Under sewer billing, reducing indoor water use may lower both water and wastewater charges, while some outdoor irrigation may be treated differently.
Separate fixed charges from variable charges. A project can reduce consumption without reducing the entire bill because service fees remain. This distinction is important when calculating payback. A seller who claims that a device will reduce the “water bill by 50 percent” may be ignoring fixed charges and the household’s actual usage profile.
Step 3: Calculate a Daily and Per-Person Baseline
Divide the household’s total use by billing days to find average daily use. Then divide by the number of regular occupants. This creates a practical benchmark for your own home. The goal is not to compete with another household whose climate, fixtures, garden, work schedule, or family size is different. The goal is to identify changes within your property.
Create separate estimates for indoor and outdoor use where possible. Mild or rainy months often provide a rough indoor baseline. The difference between that baseline and hot-season consumption can approximate irrigation, pool, or cooling-related demand. This estimate will not be perfect, but it helps you direct attention to the area with the greatest opportunity.
Step 4: Create a Water-Use Map of the Property
Sketch each floor and the outdoor areas. Mark the main water meter, main shutoff, fixture shutoffs, water heater, toilets, sinks, showers, tubs, washing machine, dishwasher, refrigerator water line, water filters, humidifiers, irrigation valves, hose bibs, pool equipment, and any pumps or tanks. Mark visible stains, musty areas, loose flooring, cabinet swelling, or places where plumbing has failed before.
Use a simple code: red for active leaks, orange for high-risk equipment, blue for high consumption, green for maintenance completed, and a star for emergency shutoffs. This map becomes the foundation of your plan. It also helps family members, tenants, or property managers respond quickly during a leak.
Step 5: Locate and Test the Main Shutoff Valve
Everyone responsible for the property should know where the main shutoff is located. It may be inside near the point of entry, in a basement, in a utility room, or outside near the meter. Label it clearly. Do not force a corroded or stuck valve. If it does not operate smoothly, schedule replacement before an emergency occurs.
Also identify fixture-level shutoffs under sinks, behind toilets, and near appliances. A working local valve can stop a small leak without shutting water off to the entire home. Turn valves gently and only as needed. Repeatedly operating old, fragile valves can cause failure, so use judgment and seek professional help when corrosion or leakage is visible.
Part 2: Find Hidden and Visible Leaks
Step 6: Perform a Two-Hour Meter Test
Choose a period when nobody will use water. Turn off faucets, appliances, irrigation, ice makers, water treatment cycles, and any automatic equipment that could draw water. Record the meter reading or photograph it. Wait two hours and read it again. Any unexplained movement suggests water is flowing somewhere.
Some meters include a small leak indicator that moves with very low flow. A digital meter may show current flow or an alert. Confirm how your model works before interpreting it. If the meter changes, isolate sections of the home one at a time. Close fixture shutoffs or irrigation valves carefully, then repeat the observation. The goal is to narrow the source without damaging old valves.
 A visible drip is easy to notice, but silent leaks can waste far more. Photo by Angelsharum via Wikimedia Commons, CC BY-SA 3.0.
Step 7: Inspect Every Faucet, Valve, and Pipe Connection
Use a dry paper towel around faucet bases, supply connections, shutoff valves, traps, filter housings, and exposed joints. A tiny amount of moisture may be easier to see on paper than on metal. Look for mineral deposits, green corrosion, rust, swollen wood, peeling cabinet surfaces, or a musty smell. These signs may remain after a leak dries, so distinguish current moisture from old damage.
Watch the fixture while it is running and after it is turned off. Some leaks appear only under pressure, while others occur when water drains. Check pull-out faucet hoses, sprayer connections, and the underside of sink decks. A drip that falls inside a cabinet can remain hidden behind stored items for a long time.
Step 8: Test Toilets for Silent Leakage
Toilets are a common source of continuous water loss. Add a few drops of food coloring to the tank without flushing. Wait about ten minutes. If color appears in the bowl, water is passing from the tank through the flush valve or another component. Flush afterward to prevent staining.
Listen for periodic refilling, hissing, or water movement when the toilet has not been used. Check the water level, flapper or seal, fill valve, overflow tube, chain length, and handle operation. A chain that is too tight can prevent the flapper from closing. A water level set too high can spill into the overflow tube. Replace components with compatible parts rather than forcing a generic part to fit.
 Understanding the parts inside a toilet tank makes silent leak diagnosis easier. Diagram by Mcgill via Wikimedia Commons, CC BY-SA 2.5.
Step 9: Check Appliance Supply Lines and Drain Connections
Inspect the washing machine, dishwasher, refrigerator ice maker, water dispenser, coffee system, humidifier, and any under-sink treatment equipment. Flexible supply lines can fail from age, kinking, corrosion, poor installation, vibration, or pressure problems. Look behind appliances with a flashlight without pulling them unsafely or damaging flooring.
Check both supply and drain paths. A dishwasher can leak at the inlet, pump, door seal, or drain hose. A washing machine can leak only during fill, agitation, drain, or spin. Observe a complete cycle when investigating. Replace cracked or bulging hoses promptly, and follow the appliance manufacturer’s requirements for materials, routing, and service intervals.
Step 10: Inspect Walls, Ceilings, Floors, and Cabinets for Moisture Clues
Water often travels before it becomes visible. A ceiling stain may originate several feet away. Look for discoloration, bubbling paint, soft drywall, loose tiles, warped flooring, swollen baseboards, cabinet delamination, mold-like growth, or a persistent earthy odor. Compare the area during and after fixture use, rainfall, irrigation, and appliance operation.
Do not assume every stain is a plumbing leak. Roof leaks, condensation, exterior drainage, foundation moisture, and HVAC systems can produce similar symptoms. Document timing and conditions. A moisture meter or thermal camera can help, but it does not identify the source by itself. Use tools as evidence, not as a substitute for diagnosis.
Step 11: Check Outdoor Fixtures and Underground Lines
Inspect hose bibs, outdoor sinks, irrigation valves, backflow devices, pool equipment, fountains, and exposed pipes. Look for wet soil, unusually green patches, erosion, algae, insects gathering around moisture, or a meter that moves when indoor use is stopped. An underground leak may not create a visible puddle if the soil drains quickly.
Turn irrigation zones on one at a time. Watch for broken heads, misting caused by excessive pressure, water spraying onto pavement, clogged emitters, tilted heads, bubbling soil, or zones that continue running after they should stop. Record each defect before making schedule changes. Reducing runtime will not fix a broken line.
Part 3: Improve Fixtures Without Sacrificing Performance
Step 12: Measure Faucet and Shower Flow
Place a marked bucket under the fixture and run water for a timed interval, such as ten seconds. Convert the collected volume into a per-minute rate. Repeat at normal pressure and the setting people actually use. This test identifies high-flow fixtures and also reveals weak performance caused by clogged aerators or pressure problems.
Do not replace a fixture only because it is old. A quality faucet with a damaged aerator may need a small part. Conversely, a fixture that is uncomfortable may cause users to run water longer, eliminating the expected savings. Select products that balance flow, spray pattern, pressure, accessibility, cleaning, and local plumbing requirements.
Step 13: Install Efficient Faucet Aerators Where Appropriate
Aerators mix air with water and shape the stream. They are inexpensive and easy to compare. Choose the correct thread type, flow rating, and application. A bathroom sink may tolerate a lower flow than a kitchen sink used to fill large pots. Utility sinks and medical or commercial uses may have different requirements.
Remove mineral deposits before deciding that the faucet is defective. Soak removable parts in an appropriate descaling solution, rinse thoroughly, and replace damaged screens or seals. Do not use aggressive chemicals that can damage finishes or contaminate drinking-water components.
Step 14: Upgrade Showerheads Based on Real Use
Efficient showerheads can reduce both water and water-heating energy, but performance matters. Evaluate spray coverage, pressure, pause controls, cleaning needs, and compatibility with the plumbing system. A product that feels weak may cause longer showers. A well-designed lower-flow model can feel strong because of its spray pattern.
Check for leaks at the arm and connection. Use the correct sealing method and avoid overtightening. Mineral buildup can distort spray and increase the time required to rinse. Clean or replace clogged components according to the manufacturer’s instructions.
 Efficient showerheads can reduce water and hot-water demand when the spray remains comfortable. Photo by Emily Hayflick via Wikimedia Commons, CC BY-SA 3.0.
Step 15: Evaluate Toilet Replacement Carefully
Repair is often the first step, but replacement can make sense when a toilet is inefficient, cracked, unstable, repeatedly clogging, difficult to repair, or already being removed during renovation. Compare independently certified models, bowl performance, flush design, rough-in dimensions, height, accessibility, seat compatibility, and local rebate programs.
A high-efficiency label does not guarantee a good installation. The flange, seal, floor condition, shutoff valve, supply line, and drain must be suitable. A rocking toilet can damage the seal and create a hidden leak. Correct the support and installation rather than using excessive caulk to hide movement.
Step 16: Repair Dripping Faucets and Running Fixtures Promptly
Identify the faucet type before buying parts. Compression, cartridge, ceramic-disc, and ball-type fixtures use different components. Turn off the local supply, verify that the water is isolated, protect the drain, and arrange parts in order. Use the manufacturer’s diagram where available.
A recurring leak may indicate more than a worn washer. A damaged valve seat, incorrect cartridge, debris, corrosion, high pressure, or poor installation can cause repeated failure. When the same fixture needs frequent repairs, investigate the underlying cause instead of replacing small parts indefinitely.
Part 4: Reduce Hot-Water Waste and Energy Use
Step 17: Time How Long Hot Water Takes to Arrive
At each major fixture, start a timer when the hot tap is opened and stop when useful hot water arrives. Measure how much water is discharged during the wait. Long delays may result from long pipe runs, oversized pipes, poor insulation, a failed recirculation system, low flow, or a water heater located far from the fixture.
Collect the initial cool water in a container for cleaning or plants when practical, but do not treat this as the primary solution. The stronger solution is to reduce the wait through system design, pipe insulation, demand-controlled recirculation, point-of-use equipment where appropriate, or fixture planning during renovation.
Step 18: Review Water-Heater Temperature and Maintenance
Do not change water-heater settings casually. The correct temperature depends on the equipment, plumbing design, local guidance, household vulnerability, appliance needs, scald risk, and microbial control. Follow manufacturer instructions and qualified local advice. Measure delivery temperature at the fixture rather than trusting a dial that may be inaccurate.
Inspect for leaks, corrosion, damaged venting, error codes, unusual sounds, and water around the base. A temperature-and-pressure relief valve is a safety device and must not be capped or modified. Sediment, anode condition, and maintenance requirements vary by heater type and water quality.
Step 19: Insulate Accessible Hot-Water Pipes Correctly
Pipe insulation can reduce heat loss and shorten the wait for hot water, especially near the heater and on long exposed runs. Use material rated for the pipe temperature and location. Maintain required clearances from flues, burners, electrical components, and heat sources. Do not cover valves, labels, unions, or service points that must remain visible.
Insulation does not solve every delay. If the pipe is excessively long or oversized, the volume of standing water may remain the main problem. During renovation, route hot-water lines efficiently and avoid unnecessary loops.
Step 20: Control Recirculation Instead of Running It Continuously
A hot-water recirculation loop improves convenience but can waste energy if it runs all day and night. Heat is continuously lost from the piping, causing the heater to cycle. Use a timer, occupancy control, demand button, temperature control, or smart schedule that matches actual use, provided it is compatible with the system.
Insulate recirculation lines and confirm check valves, pumps, and controls are working. A poorly balanced system can create temperature problems or unintended flow. Complex systems should be evaluated by a qualified plumber.
Part 5: Use Appliances More Efficiently
Step 21: Optimize Laundry Practices
Run full loads when appropriate, select the correct water level, and use lower-temperature cycles for clothing that does not require hot washing. Follow garment care and sanitation needs. High-efficiency machines depend on correct detergent type and quantity; excess detergent can create residue, odors, extra rinsing, and poor performance.
Inspect fill hoses, drain hoses, door seals, filters, and the floor beneath the machine. Leave appropriate ventilation after use to reduce moisture buildup. A machine that repeatedly adds water, fails to spin effectively, or requires extra rinse cycles may need maintenance.
Step 22: Improve Dishwasher and Kitchen Habits
Scrape food into compost or waste rather than rinsing every dish under a running tap. Most modern dishwashers are designed to handle normal soil when loaded correctly. Run full loads without blocking spray arms or detergent access. Use eco, sensor, or air-dry settings when they produce acceptable results.
Repair leaking faucets and avoid thawing food under running water. Keep a pitcher of drinking water in the refrigerator instead of running the tap until it becomes cold. Wash produce in a basin when suitable, then reuse the water for non-edible plants if food-safety conditions allow.
Part 6: Manage Outdoor Water Use
Step 23: Audit Irrigation Zone by Zone
Run each zone while observing it. Check for broken heads, clogged nozzles, overspray, runoff, sunken heads, mismatched nozzles, blocked spray patterns, and pressure problems. Place identical containers across the zone for a simple catch-cup test. Large differences show that some areas receive much more water than others.
Repair hardware before changing the schedule. A shorter runtime does not correct poor distribution. Group plants with similar needs, separate lawn from shrubs, and avoid mixing equipment types with very different application rates in the same zone.
Step 24: Replace Fixed Schedules With Weather- or Soil-Based Decisions
A clock-based controller often repeats the same schedule regardless of rain, temperature, wind, season, or plant growth. Adjust the program regularly. Weather-based controllers use local conditions to estimate need, while soil-moisture systems prevent watering when the soil is already wet. Both require correct installation and programming.
Water deeply enough for the root zone but not so long that water runs off. Clay, sand, slopes, compacted soil, mulch, shade, and plant type change the correct schedule. Use cycle-and-soak programming on slopes or slow-absorbing soil. Follow local watering restrictions and drought rules.
Step 25: Use Drip Irrigation and Mulch Where They Fit
Drip irrigation delivers water close to plant roots and can reduce evaporation and overspray. It is useful for many beds, shrubs, and containers, but it requires filtration, pressure regulation, flushing, inspection, and emitter placement. A hidden broken line can waste water, so do not assume drip systems are automatically efficient.
Mulch can reduce evaporation, moderate soil temperature, and suppress weeds. Keep it away from trunks, stems, building materials, and areas where it could trap moisture against the structure. Choose plant species suited to the climate and site rather than trying to maintain water-intensive plants in unsuitable conditions.
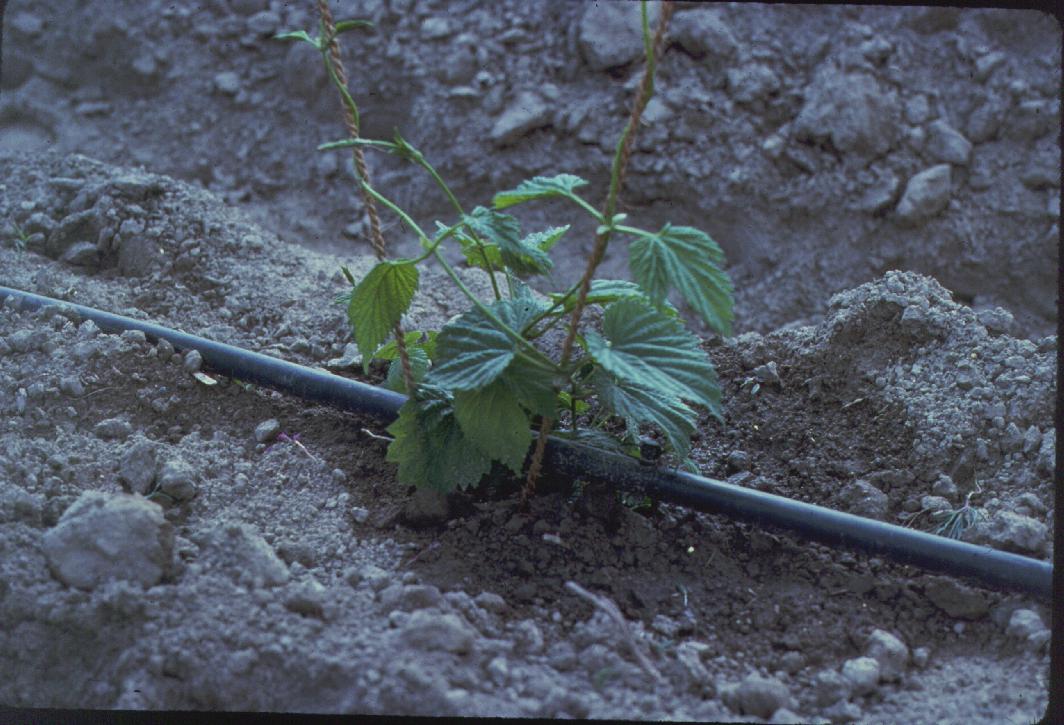 Drip irrigation can reduce evaporation and runoff when it is designed, maintained, and monitored correctly. USDA image via Wikimedia Commons, public domain.
Part 7: Add Leak Detection and Smart Monitoring
Step 26: Place Simple Leak Sensors at High-Risk Locations
Small moisture alarms can provide early warning near washing machines, water heaters, dishwashers, refrigerators, sinks, toilets, HVAC drain pans, sump systems, and basement equipment. Place the sensor where water is likely to travel first, not where it is convenient but unlikely to get wet.
Test batteries and alerts regularly. A disconnected sensor creates false confidence. Connected models should use unique passwords, current firmware, and multifactor authentication where available. Confirm that notifications reach more than one responsible person when the property is frequently vacant.
 Low-cost water detectors can provide early warning near high-risk equipment. Photo by Pani003 via Wikimedia Commons, CC BY-SA 4.0.
Step 27: Decide Whether a Whole-Home Flow Monitor Is Worth the Cost
Whole-home monitors measure flow patterns and may identify unusual use, continuous low flow, burst-pipe events, or irrigation problems. Some models can automatically close a valve. They are especially valuable in second homes, rental properties, large homes, properties with a history of leaks, or homes that are frequently vacant.
Compare pipe compatibility, installation requirements, power and internet dependence, alert quality, false-alarm handling, shutoff behavior, insurance implications, maintenance, warranty, and access for manual control. Automatic shutoff is powerful but must be configured carefully. A device should not block essential systems or create risk during freezing, fire protection, medical use, or other special conditions.
How to Rank Water-Saving Projects
Create a master list and assign each project four scores:
| Factor | Question | Score |
|---|---|---|
| Urgency | Could delay cause major water damage, contamination, or loss of service? | 1 low to 5 immediate |
| Expected savings | How much continuous or repeated water use can be reduced? | 1 small to 5 major |
| Cost | Can the issue be corrected with maintenance money or does it require capital? | 1 expensive to 5 low-cost |
| Confidence | Is the problem verified by meter data, testing, or visible evidence? | 1 uncertain to 5 verified |
Urgent damage risks come first even when water savings are small. Next, prioritize low-cost, high-confidence actions such as toilet repairs, faucet repairs, failed supply-line replacement, irrigation fixes, and schedule corrections. Capital projects should be based on measured use and realistic assumptions.
A 30-Day Home Water-Saving Action Plan
Days 1–3: Build the Baseline
- Download 12 to 24 months of bills.
- Normalize use by billing days.
- Calculate daily and per-person consumption.
- Identify seasonal and unexplained increases.
- Map every fixture, appliance, valve, and outdoor system.
Days 4–7: Find Active Leaks
- Perform a two-hour meter test.
- Test every toilet with food coloring.
- Inspect sinks, cabinets, supply lines, and appliance connections.
- Run irrigation zones and document defects.
- Escalate any electrical, structural, sewage, or rapidly spreading water issue.
Week 2: Complete Low-Cost Repairs
- Replace compatible toilet seals, flappers, or fill components.
- Repair dripping faucets and leaking valves.
- Replace damaged supply hoses.
- Clean or replace aerators and showerheads where justified.
- Correct irrigation overspray, broken heads, and schedule errors.
Week 3: Improve Hot Water and Appliances
- Measure hot-water wait times.
- Insulate accessible hot-water pipes safely.
- Review recirculation controls.
- Optimize laundry and dishwasher settings.
- Investigate unusually long fill, rinse, or drain cycles.
Week 4: Add Monitoring and Verify Results
- Place leak sensors near high-risk equipment.
- Evaluate a whole-home flow monitor if the property risk justifies it.
- Read the meter at the same time each day for one week.
- Compare the next bill with weather, occupancy, and previous use.
- Schedule three-month and annual maintenance reviews.
Home Water-Saving Priority Matrix
| Finding | Priority | First Action | Professional Help? |
|---|---|---|---|
| Rapid leak or ceiling bulge | Emergency | Shut off water safely and protect occupants | Yes |
| Water near electrical equipment | Emergency | Avoid contact and isolate hazards | Yes, immediately |
| Meter moves during a no-use period | High | Isolate indoor, outdoor, and appliance branches | Often |
| Toilet dye appears in bowl | High-value low-cost | Inspect seal, flapper, fill valve, and water level | Usually no |
| Washing-machine hose is bulging | High | Stop use and replace with approved hose | Maybe |
| Outdoor zone has broken heads | High | Repair hardware before reducing runtime | Maybe |
| Hot water takes a long time to arrive | Investigate | Measure delay, volume, pipe route, and controls | Often helpful |
| No leak history but property is vacant often | Preventive | Add sensors or flow monitoring | Installation may require a pro |
Common Mistakes That Reduce Water-Saving Results
Buying Fixtures Before Finding Leaks
A new faucet cannot offset a toilet that runs continuously or an irrigation line that leaks underground. Test the meter and inspect the system first.
Comparing Bills Without Comparing Consumption
Rates, fixed fees, sewer charges, and billing days change. Track units of water and normalized daily use.
Reducing Pressure Without Diagnosing the System
Excessive pressure can damage plumbing, but low pressure can also result from restrictions, failing valves, leaks, or utility conditions. Measure and diagnose before adjusting regulators.
Installing Ultra-Low-Flow Products That People Dislike
Poor performance can lead to longer use, double flushing, or removal of the product. Select independently tested fixtures that match the application.
Ignoring Outdoor Water Because It Is Seasonal
Seasonal irrigation can dominate annual consumption. A short period of overwatering may erase months of indoor savings.
Using Smart Devices Without Maintaining Them
Dead batteries, disconnected Wi-Fi, stuck valves, and ignored alerts create false confidence. Test the complete alert and shutoff path regularly.
Assuming Every Damp Area Is a Plumbing Leak
Roofing, condensation, drainage, HVAC, and foundation moisture can imitate plumbing failures. Track timing and conditions before opening walls.
Estimating Savings From Marketing Claims Alone
Actual results depend on starting flow, household behavior, rates, climate, installation, and maintenance. Verify changes with meter data.
Writer’s Opinion
The strongest water-saving plan is not built around guilt. It is built around evidence. Households should not be told to accept poor hygiene, uncomfortable showers, damaged landscaping, or constant inconvenience in the name of efficiency. The real target is waste: water that runs without serving a useful purpose, water that leaks into hidden spaces, water that is heated and then lost while waiting at a distant fixture, and irrigation that falls on pavement or runs after rainfall.
I believe leak detection deserves the highest priority because it protects both the bill and the building. A small sensor under a washing machine may never reduce normal consumption, yet it can prevent a major loss. The financial value of water management therefore cannot be calculated only in gallons. It includes avoided repairs, avoided mold remediation, preserved flooring, reduced downtime, and faster emergency response.
Measurement is equally important. Many people make several changes at once and then cannot tell which one worked. A better approach is to record the baseline, fix verified problems, and review the meter after each stage. This method turns home maintenance into a repeatable management process rather than a collection of guesses.
Finally, category organization matters for a useful content site just as system organization matters for a house. This article belongs in the existing broad Home Improvement category rather than creating another narrow category such as “Water Bills,” “Plumbing Tips,” or “Conservation.” A broad, consistent category makes it easier for readers and search engines to understand the site’s structure while tags handle the specific topic.
Frequently Asked Questions
How much water can a household leak waste?
The amount varies from a slow drip to a major continuous flow. Official water-efficiency programs warn that ordinary household leaks can waste thousands of gallons per year. The exact amount in your home should be measured through bills, meter tests, and fixture diagnosis rather than estimated from a generic example.
What is the fastest way to check for a hidden leak?
Perform a no-use meter test. Turn off all water-using fixtures and automatic equipment, record the meter, wait, and compare. Confirm that irrigation, ice makers, treatment systems, and appliances are not operating during the test.
Why does my toilet refill when nobody has used it?
Water is probably leaking from the tank into the bowl or the fill system is losing pressure. Test with food coloring and inspect the flapper, seal, chain, fill valve, and overflow level.
Should I replace every faucet with a low-flow model?
No. Measure current flow and evaluate the application. An inexpensive aerator may improve an existing faucet. Kitchens, utility sinks, and accessibility needs can require different performance.
Do efficient showerheads reduce water pressure?
They reduce flow, but a well-designed model can maintain a satisfying spray. Poor performance may also be caused by mineral buildup, a clogged screen, low supply pressure, or a failing valve.
Is drip irrigation always more efficient than sprinklers?
No system is efficient when it is broken or poorly scheduled. Drip irrigation can reduce evaporation and overspray, but leaks, clogged emitters, incorrect pressure, and hidden damage can waste water.
Are smart leak detectors worth buying?
They are most valuable where a leak could cause expensive damage or go unnoticed: water heaters, washing machines, second homes, rental properties, basements, and frequently vacant buildings.
Can a whole-home shutoff device close water by mistake?
Yes. Systems use rules and learned patterns, so unusual legitimate use can trigger alerts or shutoff. Review configuration, manual override, essential equipment, and failure behavior before installation.
Does reducing hot-water use also save energy?
Usually, because less water must be heated. Savings depend on the water heater, energy price, fixture use, pipe losses, and household behavior.
How often should I perform a home water audit?
Review bills monthly, test toilets and visible connections several times per year, inspect high-risk hoses and equipment at least annually, and repeat a full audit after unexplained usage changes, renovation, tenant turnover, freezing weather, or a plumbing repair.
What should renters do when they find a leak?
Document the issue with photos, meter readings, dates, and written notice. Use emergency procedures for active damage and follow the lease and local requirements. Do not perform unauthorized repairs that could worsen the problem.
How soon should I verify savings after repairs?
Check the meter immediately after leak repairs. Review daily or weekly use for the first month, then compare a full billing period with similar occupancy and weather.
Final Home Water-Saving Checklist
- At least 12 months of bills collected.
- Usage normalized by billing days.
- Daily and per-person baseline calculated.
- Main and fixture shutoffs located and labeled.
- Two-hour meter test completed.
- Every toilet tested for silent leakage.
- Faucets, valves, traps, and supply lines inspected.
- Appliance fill and drain connections checked.
- Walls, ceilings, floors, and cabinets inspected for moisture clues.
- Outdoor fixtures and irrigation zones tested.
- Faucet and shower flows measured.
- Efficient fixtures selected for performance, not marketing alone.
- Hot-water wait times measured.
- Water-heater condition and controls reviewed safely.
- Accessible hot-water pipes evaluated for insulation.
- Recirculation schedules matched to actual use.
- Laundry and dishwasher routines optimized.
- Irrigation schedules adjusted to weather, soil, and plant needs.
- Drip lines and emitters inspected, not assumed efficient.
- Leak sensors placed near high-risk equipment.
- Whole-home monitoring evaluated based on property risk.
- Projects ranked by urgency, savings, cost, and confidence.
- Results verified with meter readings and future bills.
Conclusion
A professional-quality home water-saving plan begins with measurement and leak detection. Collect bills, understand the rate structure, map the plumbing, test the meter, inspect every fixture, and document outdoor systems. Repair verified leaks before purchasing upgrades. Then improve fixtures, hot-water delivery, appliances, irrigation, and monitoring in a logical order.
The greatest savings often come from simple actions: repairing a toilet seal, replacing a damaged hose, correcting an irrigation schedule, cleaning an aerator, controlling a recirculation pump, or responding to a leak alert before damage spreads. Larger projects should be supported by data, compatible with the property, and evaluated by total lifecycle value rather than a promotional claim.
After each change, measure again. A lower bill is useful, but consumption data, leak-free meter tests, shorter hot-water delays, improved fixture performance, and reduced outdoor runoff provide stronger evidence. This repeatable process can lower costs, protect the building, and make water use more resilient without sacrificing comfort.