

Quick answer: learning to touch type is not mainly about forcing your fingers to move faster. It is about building a reliable map between each key and a consistent finger movement, reducing the need to look down, and practicing at a pace where accuracy stays high enough for good habits to become automatic. A strong training plan therefore starts with a baseline, uses short focused sessions, adds keys and patterns gradually, separates accuracy work from speed work, and measures progress with the same kind of test over time.
If you currently type with two or three fingers, look at the keyboard often, or feel stuck at the same speed, you do not need a special keyboard or a “secret” shortcut. You need a practice system that gives your brain and hands repeatable problems at the right difficulty. This guide shows how to build that system from the beginning, how to fix common plateaus, and how to transfer practice speed into real writing, email, coding, schoolwork, or data entry.
Learn touch typing with a practical system for accuracy, speed, finger placement, practice design, progress tracking, and real-world transfer without reinforcing bad habits.]
What touch typing actually means
Touch typing means entering text while relying primarily on learned finger movements and the feel of the keyboard rather than visually searching for each key. The goal is not to keep your eyes rigidly fixed on the screen every second. The practical goal is to make key location automatic enough that looking down is no longer necessary for ordinary text.
That distinction matters because beginners often set the wrong target. They try to “never look at the keyboard” before they have learned where the keys are, then become frustrated and slow. A better approach is to use deliberate, limited visual checking during the earliest learning stage, then remove that support as soon as each key group becomes familiar. You are training a motor pattern, not taking a test of willpower.
Research on typing skill supports the idea that structured practice matters. A study of everyday typists found that typing experience was related to performance, but higher performance was also associated with past typing instruction and with intentionally trying to type quickly during normal use. Other typing research shows a real speed–accuracy trade-off: people can choose to type faster, but errors tend to rise when they push beyond comfortable control. The lesson is simple: speed is trainable, but speed practice works best when it is built on stable technique rather than random rushing.
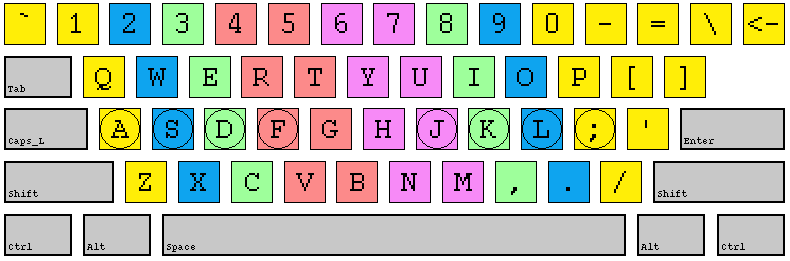 Traditional touch-typing finger zones on a QWERTY keyboard. Image from KTouch, available on Wikimedia Commons under the GNU GPL.
Step 1: Measure your real starting point
Before changing your technique, take a baseline. Without one, you will judge progress by mood: one good session feels like a breakthrough, one difficult paragraph feels like failure. A baseline gives you an objective reference.
Use a three- to five-minute typing test with ordinary prose. Avoid a one-line sprint because short tests are heavily affected by luck, memorization, and a fast opening. Record at least four numbers: gross words per minute, adjusted or net words per minute if the tool provides it, accuracy percentage, and the number or type of errors. Also note whether you looked at the keyboard and which letters slowed you down.
Do not take five tests in a row and keep only the highest result. That measures your best lucky attempt, not your working ability. Take two tests with a short rest between them and use the average. If the results differ dramatically, take a third and use the middle result.
Your baseline should also include a short real-world sample. Open a blank document and write 200 to 300 words about something familiar without copying from another screen. Copy typing and composition are different tasks. During real writing, your brain must generate language while your fingers type it. A person who scores well on a copying test can still feel slow when writing emails or reports. Keep both measurements so you can see whether practice transfers into useful work.
Success check: you should finish this step with a written record such as “38 WPM, 92% accuracy, frequent mistakes on R/T/Y and punctuation, looked down about six times.” That is much more useful than “I type slowly.”
Step 2: Set an accuracy floor before chasing speed
Typing speed is attractive because it is easy to compare, but accuracy determines whether the speed is useful. If you type 70 words per minute while constantly backspacing, rereading, and correcting, your effective output may be lower than someone who types 50 words per minute cleanly.
Choose an accuracy floor for normal practice. For many learners, 95% is a useful minimum during drills, and 97% or higher is a better target once the keyboard layout is familiar. This is not a universal law. The important point is to create a boundary that stops you from turning every exercise into a race.
When accuracy falls below your floor, do not simply restart the same test and try harder. Identify why it failed. Were you guessing key positions? Moving one finger across too many keys? Pressing two keys with one motion? Losing rhythm on capital letters? Rushing common endings such as “-tion” or “-ing”? Each cause suggests a different drill.
Research on prolonged data-entry work has found that accuracy can decline even while response time improves, illustrating the classic speed–accuracy trade-off. This is one reason marathon sessions can be misleading. You may feel faster near the end while quietly making more mistakes. Short sessions with explicit accuracy checks usually make progress easier to interpret.
A practical rule is: accuracy practice builds the road; speed practice teaches you to drive faster on it. If the road is full of missing sections, pressing the accelerator does not solve the problem.
Step 3: Learn a consistent finger map
Traditional QWERTY touch typing assigns the left hand to A, S, D, F and the right hand to J, K, L, and semicolon as the home row. The index fingers handle more columns than the other fingers, and the thumbs usually share responsibility for the space bar. The raised marks on F and J help you relocate your hands without looking.
You do not need to treat the map as sacred. People have different hand sizes, injuries, keyboards, and layouts. But beginners benefit greatly from consistency. If you press C with your left index finger one time, your left middle finger the next, and your right hand occasionally, the brain receives several competing movement patterns for the same key. A consistent assignment reduces that ambiguity.
Start with home-row keys and short combinations rather than the full alphabet. Practice “asdf jkl;” slowly, then alternate hands with patterns such as “fj dk sl a;”. Next add E and I, then R and U, then nearby keys. The exact order matters less than keeping each new set small enough that you can remember the finger assignment without constant visual searching.
When a key repeatedly causes trouble, say its letter quietly or mentally as you press it with the intended finger. This links the visual symbol, language label, and movement. After several correct repetitions, remove the verbal cue.
Common mistake: stretching the index finger to do almost everything. This may feel faster at first because the index fingers are strong and easy to control, but it creates unnecessary travel and makes higher speeds harder. If you notice one finger “rescuing” the others, slow down and rebuild the weak key with its assigned finger.
Step 4: Stop looking down in stages, not all at once
Many tutorials tell learners to cover the keyboard immediately. That works for some people, but it can also create a frustrating cycle of guessing, errors, and tension. A staged method is usually more practical.
First, learn a small group of keys while allowing brief checks. Second, practice those keys while looking at an on-screen keyboard diagram instead of the physical keyboard. Third, remove the diagram and type short words from memory. Fourth, mix those keys with previously mastered groups.
If you must look down, do it deliberately. Stop typing, locate the key, return your eyes to the screen, then press it. Avoid moving your eyes and fingers at the same time in a frantic search. The pause may feel slow, but it teaches a cleaner sequence: retrieve location, move, press. Over time, the retrieval step becomes automatic.
You can also use a simple physical cue. Place a light cloth over your hands or slide the keyboard slightly under the desk edge once you know most letters. Do not use a cover if it forces your wrists into an awkward posture or prevents you from seeing modifier keys you have not learned yet.
A useful milestone is not “I never look down.” It is “I can type a normal paragraph while only looking down for unusual symbols or a temporary loss of position.” Once you reach that stage, the remaining visual checks usually disappear naturally with practice.
Step 5: Build rhythm before maximum speed
Fast typists often look smooth rather than frantic. The reason is that efficient typing depends on predictable transitions between keys. Beginners commonly type in bursts: three fast letters, a pause, one correction, another burst. Average WPM may improve, but the motion pattern remains unstable.
Practice rhythm by typing below your maximum speed. Choose a simple paragraph and aim for even spacing between keystrokes. If a difficult word appears, allow the whole pace to slow slightly instead of rushing the easy letters and slamming into the hard sequence.
A metronome can help some learners, although it is optional. Set a comfortable tempo and type one character or one small unit per beat. The objective is not musical precision; it is to notice irregular hesitations. Once the passage feels smooth, raise the pace a little.
You can also practice “rolling” common letter groups. English contains frequent sequences such as “th,” “he,” “ing,” “ion,” “ent,” and “er.” Instead of experiencing each character as an isolated command, your nervous system can learn these sequences as familiar movement chunks. Typing research describes hierarchical control in which words and keystrokes are coordinated at different levels. In practical terms, experienced typing becomes less like issuing one conscious instruction per letter and more like releasing practiced sequences.
Do not deliberately memorize thousands of letter combinations. Simply expose yourself to realistic text and occasionally isolate combinations that repeatedly break your rhythm.
Step 6: Use short, high-quality practice sessions
A 15-minute focused session is usually more useful than an hour of distracted typing. The reason is not that 15 minutes is magical. It is that attention, posture, and accuracy tend to deteriorate during long repetitive work, while shorter sessions make it easier to target one problem.
A practical daily session can look like this:
- 2 minutes: relaxed home-row warm-up and easy words.
- 5 minutes: targeted practice on weak keys or patterns.
- 5 minutes: normal prose at controlled speed.
- 2 minutes: short speed challenge.
- 1 minute: record result and note one problem for tomorrow.
If you want more practice, do a second session later in the day rather than automatically doubling the first. Spacing sessions also gives you repeated opportunities to retrieve the key map after a break instead of depending only on short-term familiarity from the previous minute.
Do not spend the whole session on a single typing test website. Tests are useful for measurement, but constantly retesting can turn training into score chasing. Use drills to improve a skill, then use tests to measure whether the skill changed.
If progress stalls: reduce the session difficulty for three or four days. High-quality repetitions often restore control better than repeatedly attempting your record speed.
Step 7: Create a weakness list instead of practicing everything equally
Once you know the keyboard, the fastest improvement often comes from fixing specific bottlenecks. Two typists at 45 WPM may have completely different limitations. One may struggle with the top row; another may type letters quickly but lose time on punctuation and capitals.
Keep a weakness list with no more than five items. Examples include “B and V confusion,” “right pinky weak,” “numbers,” “apostrophes,” or “capital letters after punctuation.” At the end of each session, add or remove items based on actual errors.
Then create micro-drills. If B and V are the problem, practice realistic words such as “above,” “available,” “variable,” “obvious,” and “behavior,” not only meaningless strings. If the right pinky is weak, use words that include P, semicolon, apostrophe, and slash in context. If capitals slow you down, practice short sentences with names and proper nouns rather than typing endless isolated uppercase letters.
The test of a useful drill is transfer. After practicing a weakness for two or three minutes, return to a normal paragraph and see whether the same error declines. If it does not, the drill may be too artificial or the difficulty may be elsewhere.
Do not confuse rare mistakes with bottlenecks. Missing an unusual symbol once is not a reason to spend a week practicing it. Focus on errors that are frequent, costly, or relevant to your real work.
Step 8: Separate “accuracy days” from “speed intervals”
Trying to maximize speed and accuracy simultaneously can make practice confusing. A cleaner system is to give different blocks different goals.
During an accuracy block, type at a comfortable pace and aim for near-clean text. Stop after a mistake, identify the movement that caused it, type the word correctly three times, and continue. The purpose is to improve control.
During a speed interval, use an easy passage for 30 to 60 seconds and intentionally type faster than your normal pace. Accept a modest increase in errors, then rest and repeat. The purpose is to experience a higher movement rate without requiring that pace to be sustainable yet.
After three or four speed intervals, finish with a controlled paragraph. This “return to form” matters. You want the nervous system to remember that speed is optional but technique remains the default.
Avoid speed intervals if your accuracy collapses completely or your hands become tense. There is no benefit in rehearsing random key mashing. A useful speed interval should feel challenging but recognizable as your normal technique performed faster.
Track speed-block records separately from sustained WPM. A 60-second personal best is motivating, but it does not mean you can type at that speed for an hour. Keeping separate categories prevents unrealistic expectations.
Step 9: Practice real words, sentences, and your own vocabulary
Generic typing exercises are valuable at the beginning because they balance letters and expose weak keys. Later, your training should increasingly resemble what you actually type.
A programmer may need brackets, underscores, camelCase, numbers, and command-line punctuation. A student may type long prose with citations. A customer-support worker may repeatedly type names, email addresses, dates, and standard phrases. A multilingual writer may need accented characters or switch keyboard layouts.
Create a custom practice file from non-confidential material in your own field. Remove private names, passwords, account numbers, or proprietary text. Then practice that vocabulary. Familiarity with domain-specific patterns can reduce pauses that generic prose never addresses.
Also include composition practice. Set a timer for ten minutes and write from your own thoughts without editing every sentence. This exposes a different bottleneck: sometimes your fingers are fast enough, but you pause because you are deciding what to say. That is a writing-process issue, not a typing-speed issue. Distinguishing the two prevents you from blaming the keyboard for every slowdown.
For copy practice, use material that is slightly below your reading difficulty. You should not be struggling to understand the sentence while simultaneously training finger movement.
Step 10: Learn Shift, Backspace, Enter, and punctuation deliberately
Learners often master letters first and assume punctuation will “just come.” That creates a plateau because real text contains capitals, apostrophes, commas, quotation marks, numbers, parentheses, and line breaks. These keys interrupt rhythm if they remain visually searched actions.
Practice opposite-hand Shift use: when typing a capital letter with the left hand, use the right Shift key; when typing a capital with the right hand, use the left Shift key. This reduces awkward same-hand stretching. If your physical keyboard makes one Shift key substantially easier, you can adapt, but consistency still matters.
Do not make Backspace the busiest key on your keyboard. Correct mistakes, but pay attention to why they happened. If you automatically erase every error without noticing it, you lose useful feedback. During training, briefly register the incorrect movement before fixing it.
For punctuation, use sentence drills instead of isolated symbols. Example: “Yes, I can finish by 3:30 p.m.; however, I need the file first.” One sentence can practice comma, colon, period, semicolon, capitals, and numbers in a natural sequence.
When a symbol is rare in your normal work, it does not need equal practice time. Prioritize frequency and relevance.
Step 11: Use the number row without sacrificing letter technique
The number row is difficult because the fingers travel farther from home position and because many people instinctively look down. Start by learning 1 through 5 with the left hand and 6 through 0 with the right according to your chosen finger map. Practice short groups slowly.
Then use realistic data: dates, prices, times, percentages, addresses, and version numbers. Examples such as “2026-08-09,” “14.75%,” “$39.95,” and “10:30” teach transitions between numbers and punctuation.
If your work involves heavy numeric entry, a numeric keypad is effectively a separate skill. Learn it as its own layout rather than mixing it into the number-row drill. A ten-key user should practice stable hand placement, the raised marker on 5, and common number formats.
Do not force touch typing of the number row if a temporary task requires absolute accuracy and you have not learned it yet. In real work, accuracy comes first. Continue training separately until the skill is dependable enough to use without visual checking.
Step 12: Keep your hands relaxed and your workstation neutral
Typing practice should not be an endurance contest. Excess force, raised shoulders, bent wrists, and a clenched posture make long sessions uncomfortable and can distract from technique. Research on typing pace has found that pushing toward maximum pace can increase keying force, muscle activity, and subjective discomfort.
Place the keyboard so your shoulders can remain relaxed and your elbows are comfortably near your sides. Keep wrists relatively neutral rather than sharply bent upward or sideways. The exact setup depends on your body and equipment; a posture that feels neutral is more useful than copying a photograph mechanically.
Use light key pressure. Modern keyboards do not require you to hammer each key to make it register. Try typing one paragraph as quietly as possible without missing characters. This exercise often reveals unnecessary force.
Take breaks during long computer sessions. Practice itself is not improved by continuing through increasing discomfort. If typing causes persistent pain, numbness, weakness, or tingling, stop treating the issue as a training problem and seek appropriate professional guidance.
 An example of a split ergonomic keyboard. Photo by Kare_Products, Wikimedia Commons, CC BY 2.0.
Step 13: Choose the keyboard you can practice on consistently
Mechanical switches, low-profile laptop keys, ergonomic boards, and compact layouts can all support fast typing. The best training keyboard is usually the one you will use frequently and comfortably.
Do not assume an expensive keyboard automatically increases WPM. Skilled typing depends heavily on learned interaction with the physical keyboard. Research comparing normal and altered keyboard conditions has shown that changing physical feedback can disrupt first-keystroke time, inter-keystroke timing, and errors. This helps explain why even experienced typists sometimes feel slow on an unfamiliar board.
If you switch keyboards often, give yourself a short adaptation period. Key spacing, travel, modifier placement, and tactile feedback can all change your movement timing. A small decline during the first session does not mean the new keyboard is objectively worse.
When evaluating a keyboard, test it with a sustained 10-minute task, not only a one-minute speed test. Notice accuracy, comfort, modifier access, and whether you overreach for common keys. Research on key spacing has found that unusually tight spacing can reduce productivity and usability in some users, which is another reason to judge a keyboard by fit rather than appearance.
If a standard keyboard is comfortable, there is no requirement to buy an ergonomic model simply to learn touch typing.
Step 14: Build a 30-day training plan
A month is long enough to create noticeable improvement for many learners but short enough to maintain focus. The objective is not to promise a specific WPM increase. People begin at different levels and improve at different rates. The objective is to create a repeatable progression.
Days 1–5: establish the map
Take your baseline, learn home-row positioning, and practice a small group of letters each day. Keep sessions short and accuracy high. End with two minutes of ordinary prose using only the keys you know plus visual support when necessary.
Days 6–10: complete the alphabet
Add remaining rows and begin typing common words. Reduce visual checking. Start a weakness list. Do not worry if WPM temporarily drops; changing from hunt-and-peck to consistent finger assignments can make you slower before it makes you faster.
Days 11–15: build sentence rhythm
Use full sentences, capitals, commas, periods, apostrophes, and question marks. Add one short speed interval per session but keep most work controlled.
Days 16–20: target weak transitions
Analyze errors and create micro-drills. Include number-row practice if it is relevant to your work. Begin five-minute real-world writing sessions.
Days 21–25: increase sustained speed
Type longer passages for five to ten minutes. Aim for stable accuracy across the whole passage rather than a fast opening. Add two or three 45-second speed intervals.
Days 26–30: transfer and retest
Use your normal emails, notes, essays, code, or reports as practice. On day 30, repeat the same baseline test format you used on day 1. Compare speed, accuracy, keyboard glances, and error patterns.
Step 15: Track progress without becoming obsessed with WPM
A simple spreadsheet or notebook is enough. Record date, test duration, WPM, accuracy, practice focus, and one short note. Over time, look at weekly averages rather than individual peaks.
Why weekly averages? Typing performance changes with sleep, familiarity with the passage, keyboard choice, stress, and task difficulty. A single result contains noise. A trend is more informative.
Also track “clean streaks”: how long you can type before an error. A learner may stay at 45 WPM for two weeks while clean streaks improve from 20 words to 100 words. That is real progress and often precedes a speed increase.
Another useful metric is glance frequency. Put a small mark on paper every time you notice yourself looking down during a five-minute sample. If glances drop from 15 to 3 while WPM stays the same, your underlying skill is becoming more automatic.
Finally, measure real output. Once a week, write for ten minutes from your own thoughts and count the usable words after basic corrections. This tells you whether benchmark improvement is transferring into actual work.
Step 16: Fix the most common typing plateaus
Plateau: “I am accurate but cannot get faster.”
Your normal pace may have become too comfortable. Add short speed intervals using easy text. The goal is to expose your hands to a slightly faster rhythm, then return to controlled typing. Do not turn every session into a maximum-speed test.
Plateau: “I am fast but make too many mistakes.”
Lower your pace for several days and use error-triggered drills. Require a high accuracy floor before increasing speed again. Pay special attention to repeated errors; they often reveal a movement habit rather than random carelessness.
Plateau: “I still look down.”
Reduce the problem to a few keys. Practice them with an on-screen map, then without it. Covering the entire keyboard before the uncertain keys are learned can create guessing rather than memory.
Plateau: “My left or right hand is much weaker.”
Use one-hand word lists for short periods, then immediately return to two-handed prose. You are not trying to type whole documents with one hand; you are giving the weaker hand extra repetitions.
Plateau: “I score well on tests but feel slow at work.”
Your benchmark may not resemble your work. Add domain-specific vocabulary, punctuation, shortcuts, and composition tasks. Transfer must be trained.
Step 17: Learn keyboard shortcuts after your core typing is stable
Shortcuts do not increase letter-entry speed, but they reduce time spent moving between keyboard and mouse. Common shortcuts for copy, paste, undo, save, search, tab switching, and word navigation can improve overall workflow.
Learn shortcuts in context. Pick two that solve frequent actions in your daily work and use them for a week. Once they are automatic, add two more. Trying to memorize a list of fifty shortcuts at once usually produces recognition without real use.
For text editing, learn word-level and line-level navigation available in your operating system or application. Correcting an error by moving one word with the keyboard can be faster and less disruptive than reaching for the mouse.
Do not confuse shortcut fluency with touch typing. They are complementary skills. If a shortcut requires an awkward stretch that disrupts your hands, use the version or method that fits your hardware.
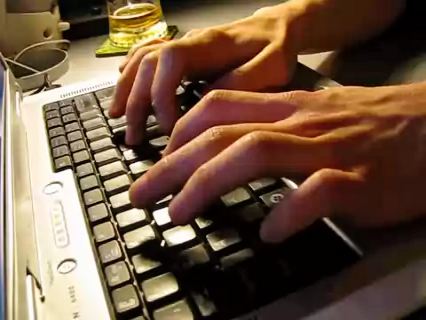 Hands typing on a laptop keyboard. Wikimedia Commons, CC BY-SA 3.0 / GFDL.
Step 18: Practice typing from audio, thought, and visual text
Copying text from a screen trains visual-to-motor transcription. Real work may demand other pathways. A meeting note-taker listens and types. A writer thinks and types. A data-entry worker looks between records and a form.
Add one alternative practice mode each week. For audio, play a clear recording at a manageable speed and type a short summary rather than a verbatim transcript. This trains listening and typing without turning the session into a memory test.
For thought-to-text practice, use a five-minute freewrite. Choose a familiar topic and keep moving without editing every sentence. If you pause, notice whether you are searching for words or keys. This separates language planning from motor skill.
For visual transcription, place the source text next to your screen or use split-screen mode so your eyes travel less. Practice reading a few words ahead instead of one letter at a time. Experienced typing becomes more efficient when the next unit is prepared before the current one is fully finished.
These modes make your training more robust. A skill that works only on one benchmark passage is not yet a flexible working skill.
Step 19: Use typing software intelligently
A typing tutor can provide structured lessons, immediate error feedback, and statistics. A speed-test site can provide standardized passages and competition. A plain text editor can provide real composition practice. You do not need one platform to do everything.
When choosing a tutor, look for features that expose weak keys and allow you to control difficulty. Avoid software that encourages constant racing before you have a stable key map. If a tool uses generated nonsense strings, combine it with real-language practice so your rhythm transfers to words and sentences.
If a website shows a public leaderboard, treat it as entertainment. Different platforms calculate WPM and errors differently, and very short tests can produce inflated scores. Compare yourself primarily against your own previous tests under similar conditions.
Privacy also matters. Do not paste confidential work material into a public typing service. Use generic text or a local document for sensitive vocabulary.
Step 20: Know when to change your technique—and when not to
Once you type comfortably and accurately, you may notice that your natural technique differs slightly from textbook touch typing. Some skilled typists use unconventional fingers for certain keys while still maintaining high speed and low visual dependence. The purpose of a standard finger map is to give learners a stable starting system, not to police every movement forever.
Change a habit when it creates a measurable problem: repeated errors, excessive travel, discomfort, inability to reach a needed key, or a speed bottleneck. Do not rebuild your entire technique simply because someone online says a particular finger assignment is theoretically ideal.
If you decide to change one movement, isolate that key or pattern and practice it slowly for several days. Expect a temporary speed decrease. Trying to replace five established habits simultaneously makes it difficult to tell which change helps.
How to test whether your typing skill is truly improving
At the end of each week, run a four-part check:
- Three-minute copy test: measures controlled speed and accuracy.
- Ten-minute sustained copy: measures whether performance holds beyond a sprint.
- Five-minute freewrite: measures real composition flow.
- One-minute weak-key drill: measures the specific bottleneck you are currently training.
If the short test improves but sustained typing does not, endurance or accuracy may be limiting you. If copy speed improves but freewriting does not, composition may be the bottleneck. If your weak-key drill improves but normal prose still shows the same error, the drill has not transferred yet.
This diagnostic approach prevents random practice. Every result tells you what to do next.
What to do if switching to touch typing makes you slower
This is normal. Hunt-and-peck typists often have years of practice with their existing method. A new finger map is initially less automatic, so your speed can drop sharply even though the new system has better long-term potential.
Do not switch back and forth within the same sentence. Use touch typing during dedicated practice and low-pressure tasks first. For urgent work, use the method that lets you complete the task accurately. Gradually expand touch typing into everyday use as it catches up.
A useful transition rule is to compare accuracy before speed. If touch typing is slower but already more accurate and requires fewer keyboard glances, it is developing in the right direction. Continue until speed rises.
If your speed remains extremely low after several weeks, inspect the basics. You may be practicing too little, changing finger assignments frequently, avoiding difficult keys, or using exercises that are too hard. Simplify the system and rebuild consistency.
How fast should you expect to type?
There is no single WPM target that every person needs. Useful speed depends on your work. A novelist, programmer, transcriptionist, customer-service representative, and occasional email user have different demands.
Instead of chasing an arbitrary internet benchmark, define a functional target. For example: “I want to type normal emails without looking down,” “I want to write notes fast enough to keep up with meetings,” or “I want to code without pausing to locate brackets.” These targets connect practice to a real outcome.
Once you meet the functional target, additional speed is optional. Faster typing can be satisfying, but productivity is also limited by reading, thinking, decision-making, editing, and communication skill. At some point, improving those abilities may matter more than adding another five WPM.
A practical weekly routine after the first month
After the initial learning phase, you do not need formal drills every day forever. A maintenance schedule can be compact:
- Monday: 10 minutes of accuracy-focused prose.
- Tuesday: normal work only; note repeated errors.
- Wednesday: 5 minutes of weak-key drills plus three short speed intervals.
- Thursday: domain-specific text or code practice.
- Friday: sustained 10-minute typing sample.
- Weekend: optional benchmark and review of weekly averages.
If your typing is improving naturally through daily work, reduce formal practice. If a plateau appears, temporarily increase targeted drills. Training should solve a problem, not become a ritual you are afraid to stop.
Frequently asked questions
Is it necessary to use all ten fingers?
No rule says every successful typist must use an identical ten-finger technique. However, beginners usually benefit from distributing work across the fingers because it reduces travel and gives each key a predictable movement. Start with a standard map, then make evidence-based adjustments if a specific movement causes a problem.
Should I learn Dvorak, Colemak, or another layout instead of QWERTY?
Alternative layouts can be legitimate choices, but changing layouts adds a second learning project. If your immediate goal is to become fluent on the keyboards you already use at work, school, shared computers, or public devices, improving technique on your current layout is often more practical. If you have a strong reason to change layouts, treat the transition as a separate decision and consider compatibility with your environment.
Is typing practice useful for children?
Keyboarding can be an important educational skill, but instruction should be age-appropriate and should not be treated as a universal replacement for handwriting. Research in school-age populations shows that handwriting and keyboarding involve partly distinct skills, and the relationship between them is not simple. The practical goal is to develop useful keyboard fluency while preserving other writing abilities required by the learner’s curriculum and needs.
Why do I type faster when copying than when writing my own ideas?
Copying provides the words for you. Composition requires idea generation, vocabulary selection, sentence planning, and editing in addition to key entry. Your fingers may not be the bottleneck. Measure both tasks separately so you can improve the correct skill.
Should I correct every typo immediately?
During accuracy practice, usually yes, but notice the cause before erasing it. During a short speed interval, you may choose to continue so one mistake does not break rhythm. In real work, correct errors according to the task. The important point is not to let repeated mistakes pass unnoticed in training.
Can an ergonomic keyboard make me type faster?
It might improve comfort or fit for some users, but it is not a guaranteed speed upgrade. Any unfamiliar keyboard can temporarily slow you down while you adapt to spacing, travel, and layout. Evaluate comfort, accuracy, and sustained performance rather than assuming a particular shape is automatically faster.
How long should a daily session be?
Start with about 10 to 20 minutes of deliberate practice. If attention and accuracy remain strong, you can do more, preferably in a separate session. Stop or take a break if your technique becomes tense, sloppy, or uncomfortable.
What is the biggest mistake beginners make?
Trying to set a speed record before the key map is stable. This reinforces guessing and excessive correction. Build consistent finger assignments and high accuracy first, then add controlled speed work.
Final checklist: a typing system that actually improves
- Measure a baseline with both copy typing and real composition.
- Choose an accuracy floor and slow down when you fall below it.
- Use consistent finger assignments while learning the keyboard.
- Reduce keyboard glances gradually.
- Practice rhythm, not only bursts of maximum speed.
- Use short sessions with one clear focus.
- Keep a weakness list and build drills around repeated errors.
- Separate accuracy practice from short speed intervals.
- Include punctuation, numbers, capitals, and shortcuts that matter in your work.
- Practice on realistic vocabulary and tasks.
- Keep your hands relaxed and stop if discomfort becomes persistent.
- Track weekly trends rather than obsessing over one personal-best score.
- Retest sustained typing and real writing, not only one-minute sprints.
Conclusion
Touch typing becomes useful when the keyboard stops demanding so much attention. The first step is not to type faster; it is to make each common key movement predictable. Once that map is stable, speed comes from smoother transitions, better rhythm, targeted work on bottlenecks, and repeated exposure to the kind of text you actually produce.
Start today with a baseline and one 15-minute session. Do not change ten things at once. Pick the most obvious weakness, practice it accurately, and measure again after a week. The mistake to avoid is turning every practice session into a race. A reliable typist who can speed up has more room to improve than a rushed typist who must constantly repair errors.
Sources and further reading
- PubMed: A deliberate practice account of typing proficiency in everyday typists
- PubMed: Speed-accuracy trade-off in skilled typewriting
- PubMed: Effects of prolonged work on data entry speed and accuracy
- PMC: Keyboard typing practice and motor learning study
- PubMed: Work pace, keying force, muscle activity, and fatigue
- PubMed: Keyboard key spacing, typing speed, errors, and biomechanics
- PubMed: The role of physical keyboard feedback in skilled typing
- Wikimedia Commons: Touch typing keyboard diagram
- Wikimedia Commons: Ergonomic keyboard image