

A weather forecast is most useful when it changes a decision. “Thirty percent chance of rain” is not a complete plan for a hike, a school event, a long drive, a photo shoot, a picnic, or a day of yard work. The same is true of a temperature icon, a single wind number, or a radar image. Each tells you something, but none tells you everything you need to know about whether an outdoor activity is likely to be comfortable, inconvenient, or unsafe.
The practical skill is learning to combine several pieces of information: the forecast period, probability and amount of precipitation, temperature and “feels like” values, wind and gusts, thunderstorm risk, official alerts, UV exposure, air quality, and the timing of changes. You then compare those conditions with the activity you actually intend to do. A two-hour walk near home has a different weather tolerance than an exposed mountain hike, a youth soccer game, a road trip, or an outdoor event with hundreds of people.
This guide explains that process from the ground up. It does not require meteorology training, and it does not assume that forecasts are certain. Instead, it shows how to ask better questions, use official information, build backup options, and update the plan as the event gets closer.
 A weather forecast becomes more useful when you treat it as a decision tool rather than a single icon. NOAA Photo Library image, public domain in the United States via Wikimedia Commons.
1. Start With the Activity, Not the Weather App
Before checking the forecast, define what you are trying to protect. Weather only becomes meaningful when it is connected to an activity, a location, a time window, and a consequence. If you open an app first, you may end up staring at numbers without knowing which ones matter.
Write down four things: where you will be, when you will be there, what you will be doing, and how easily you can change the plan. “Saturday afternoon outdoors” is too vague. “A 10-mile trail hike from 9 a.m. to 2 p.m. with two exposed ridgelines and a 45-minute walk back to the car” is actionable. So is “a backyard birthday party from 4 to 7 p.m. with indoor space available if showers arrive.”
Next, identify the weather sensitivities of the activity. A photographer may care about cloud cover, wind, and the time of sunset. A runner may care more about heat, humidity, air quality, and lightning. A family driving several hours may care about heavy rain, visibility, high winds, flooding, and the timing of storms along the route. An outdoor vendor may care about gusts even on a dry day because canopies and signs can become unsafe.
Create a simple decision threshold. It does not need to be a scientific number. It can be a rule such as: “If thunderstorms are possible during the exposed section of the hike, move the start earlier or choose a lower route.” Another example is: “If the event is under an official warning, move indoors.” A picnic might tolerate a brief shower with nearby shelter, while a climbing trip may not tolerate the same forecast because retreat takes much longer.
The reason this step matters is that forecasts contain uncertainty. You cannot eliminate that uncertainty, but you can decide in advance what level of uncertainty is acceptable. That prevents a common mistake: changing your standard after you have already invested time or money in the plan. People often become more willing to accept risk once they are dressed, packed, driving, or standing at the trailhead.
How to verify the step: you should be able to describe, in one sentence, what weather would make you continue, modify, postpone, or cancel. If you cannot, the forecast will not make the decision for you.
2. Match the Forecast to the Exact Place and Time
A forecast is tied to a place and a period. That sounds obvious, but many bad weather decisions begin with a forecast that is geographically or temporally too broad. A city-level forecast may not represent a mountain ridge, lake shore, desert trail, beach, or destination an hour away. Likewise, a daily icon cannot tell you whether the rain risk is concentrated before sunrise or exactly during your event.
Use the most specific location available. In the United States, the National Weather Service provides point forecasts that can change when you click a different spot on the map. The NWS definition of probability of precipitation is also point-based: it refers to the chance of measurable precipitation at a particular location during a specified period, not the percentage of the region that will necessarily receive rain.
Then switch from the daily summary to the hourly forecast. Hourly information helps you see transitions: wind increasing after noon, temperatures peaking at 3 p.m., storms becoming more likely in the late afternoon, or rain ending before an evening event. The exact timing may shift, especially several days in advance, but the pattern is more useful than one icon for the entire day.
If your activity moves, check more than one point. A road trip, long bicycle ride, backpacking route, or boating day can cross multiple forecast zones. Treat the route as a series of segments. Check the start, the most exposed or remote section, and the destination. For a longer driving plan, the site’s guide on planning a road trip around driving time, safety, stops, and backup options can help you combine weather with route decisions.
Also check elevation. Temperature, wind, cloud, and precipitation type can be very different at higher elevations. A forecast for a valley town is not a substitute for the summit forecast above it. If the activity is in terrain where local effects matter, use the point closest to the actual location and consult local agency guidance when available.
Common mistake: checking the weather once for your home and assuming it covers the destination. A one-hour drive can take you into a different air mass, elevation, coastline, or storm corridor.
Alternative: if precise point data are unavailable, compare several nearby locations and use the more conservative interpretation when the activity is difficult to abandon.
3. Read the Forecast in Layers Instead of Looking for One “Good” Number
Weather apps encourage quick judgments: a sun icon looks good; a rain cloud looks bad. A more reliable method is to read the forecast in layers. Start with hazards, then timing, then comfort.
The first layer is official alerts. A warning, watch, or advisory can matter more than an ordinary forecast icon. The second layer is precipitation and thunderstorms. The third is wind. The fourth is temperature and heat or cold stress. The fifth is visibility, air quality, UV, and any activity-specific factor such as marine conditions or snow.
This order is deliberate. Comfort does not matter if there is a hazard that should move the activity indoors. A pleasant 72°F afternoon is not “good weather” for an exposed field if a severe thunderstorm warning is active. Likewise, a dry forecast can still be unsuitable for a tent, drone, kayak, ladder, or temporary canopy if wind gusts are high.
Once hazards are checked, read the timing. Ask when conditions change and how quickly you can get to shelter or a safe exit. A thunderstorm risk beginning at 4 p.m. may be manageable for a two-hour morning walk, but not for an all-day route with no shelter. A rain band arriving around noon may be less important for a covered market than for road construction or an outdoor electrical setup.
Finally, evaluate comfort. Temperature, humidity, sunshine, wind, and air quality influence how demanding the activity feels. This is where you adjust clothing, water, shade, pace, sunscreen, breaks, and start time.
This layered approach keeps you from being distracted by details that are less important than the main threat. It also makes forecast updates easier: if the rain chance changes from 30% to 40% but no thunder or warning appears, the plan may not change. If a watch is issued or the storm timing shifts into your exposed period, it might.
4. Understand What “Chance of Rain” Actually Means
Probability of precipitation is one of the most misunderstood forecast values. The National Weather Service defines probability of precipitation, often abbreviated PoP, as the likelihood that measurable precipitation will occur at a given location during a specified period. Measurable precipitation is generally at least 0.01 inch in NWS forecasting.
So a 30% chance of rain does not mean it will rain for 30% of the day. It does not automatically mean 30% of the forecast area will get rain. It does not tell you how hard it will rain. It means there is a 30% probability that the forecast point will receive measurable precipitation during the stated time window.
This is why rain chance must be paired with precipitation amount, storm type, and timing. A 60% chance of a brief light shower may be a minor inconvenience for a city walk. A lower probability of a slow-moving thunderstorm could have much more serious consequences for an exposed outdoor activity because lightning and intense rain are possible even if the chance is not near 100%.
Look for three separate questions:
- Will precipitation occur? This is what PoP addresses.
- How much could fall? Quantitative precipitation forecasts or expected rainfall amounts help with this.
- What kind of precipitation or storm is it? Light rain, heavy convective rain, freezing rain, snow, hail, and thunderstorms have very different consequences.
Suppose your forecast shows a 40% chance of showers from 1 to 5 p.m. If your activity is a neighborhood walk with shelter every few minutes, you might take a light rain shell and proceed. If it is a wedding ceremony with sound equipment on an uncovered lawn, that same probability may justify a tent or indoor backup. The weather number is identical; the decision is not.
What to do if forecasts disagree: check whether the apps are using different locations, update times, or forecast models. Give greater weight to official local warnings and forecasts, and focus on the range of plausible outcomes rather than trying to find the app with the most favorable number.
5. Separate Rain From Thunderstorms
Rain is often an inconvenience. Thunderstorms can be a life-safety issue. Never treat a thunderstorm icon as merely a stronger version of a rain icon.
The National Weather Service states that there is no safe place outside when thunderstorms are in the area. If you can hear thunder, you are close enough to be at risk from lightning. NWS guidance is to move to a substantial enclosed building or a hard-topped vehicle and remain in a safe place until 30 minutes after the last thunder is heard.
 Thunderstorm planning is different from rain planning because lightning can make outdoor shelter inadequate. NOAA Photo Library image by C. Clark, public domain in the United States via Wikimedia Commons.
Before an outdoor activity, check whether thunderstorms are mentioned in the forecast, not merely whether rain is likely. Then identify your safe place. A picnic shelter, open pavilion, dugout, porch, tent, or isolated tree is not the same as an enclosed building. If a hard-topped vehicle is the backup, know how long it will take every participant to reach it.
For group activities, assign a decision trigger before the event begins. For example: “If thunder is heard, everyone stops and goes to the designated building.” This is better than trying to negotiate under a darkening sky while half the group wants to continue.
Do not wait for rain to start. Lightning can occur outside the heaviest rain. Likewise, do not leave shelter just because the rain ends. The 30-minute-after-last-thunder rule addresses the danger that remains as a storm departs.
Example: a youth soccer game has a 30% thunderstorm chance after 5 p.m. The field is ten minutes from the parking lot and fifteen minutes from a substantial building. The correct planning question is not “Will the storm definitely happen?” It is “Can we recognize the trigger and move everyone to a safe place before the storm reaches us?” If the answer is no, the event needs a different location, time, or safety plan.
6. Read Watches, Warnings, and Advisories as Instructions
Official alert terminology is easier to remember when you connect each word with an action. The National Weather Service describes a watch as a period when the risk of hazardous weather has increased significantly but the exact timing or location may still be uncertain. A watch means hazardous weather is possible and you should prepare. A warning means the hazardous event is occurring, imminent, or likely and protective action is needed. An advisory generally covers hazardous conditions that are less serious than a warning but can still cause significant inconvenience or create danger if people do not use caution.
Do not reduce all alerts to colored banners. Read the alert text. It tells you the hazard, affected area, timing, and recommended action. Two alerts with the same label can have different consequences depending on where you are and what you are doing.
For an outdoor plan, translate the alert into a decision:
- A watch is a prompt to review shelter, route, timing, communication, and cancellation thresholds.
- A warning is a prompt to take the protective action appropriate to that hazard rather than continuing to monitor casually.
- An advisory is a prompt to ask whether the activity can tolerate the expected impacts.
Have more than one way to receive critical warnings. A phone app can fail because of battery, poor cellular service, notification settings, or network congestion. Depending on your location and activity, additional channels may include Wireless Emergency Alerts, local emergency alerts, NOAA Weather Radio, venue staff, or broadcast media.
Common mistake: assuming a watch means the event will happen or assuming it can be ignored because the sky currently looks normal. A watch is intentionally issued before the exact event is certain so people have time to prepare.
7. Use Radar for What Is Happening Now, Not as a Replacement for a Forecast
Radar is powerful because it shows precipitation and storm structure that are already occurring. It is especially useful in the hours before and during an event. But radar should not replace a forecast. An empty radar screen does not prove the next several hours will stay dry, and a storm visible on radar can weaken, strengthen, split, or change direction.
Start with animation rather than a single frame. A loop shows motion and development. Ask whether precipitation is moving toward your location, away from it, or forming nearby. Then compare the loop with the hourly forecast and any alerts. Radar tells you what is happening now; the forecast helps you understand what may develop next.
Be careful with apparent distance. A storm that seems “far away” on a phone screen can arrive quickly, especially when you are outdoors with a long walk to shelter. If thunderstorms are involved, use thunder and official warnings as safety triggers rather than trying to estimate a safe distance by eye from a radar map.
Radar colors are also not a universal translation of danger. Reflectivity colors usually relate to the strength of returned radar energy and can indicate heavier precipitation or hail, but the exact display depends on the product and service. A red area is not automatically a tornado, and a green area is not automatically harmless. Read the legend and warning overlays.
 Radar is best used as a near-term situational tool alongside forecasts and alerts. National Weather Service image, public domain in the United States via Wikimedia Commons.
Practical method: the night before, use the forecast. A few hours before, refresh the forecast and alerts. During the event, use radar and real-world observations to monitor changes. This gives each tool the job it is best suited to perform.
8. Read Wind as Sustained Wind Plus Gusts
Many people notice wind only when the number looks high, but outdoor risk often comes from gusts. The sustained wind describes the more continuous flow; gusts are shorter bursts that can be substantially stronger. For activities involving balance, lightweight structures, open water, cycling, elevated work, or exposed ridges, gusts may be the more important value.
Wind direction matters too. Forecast direction tells you where the wind is coming from. A headwind can increase effort on a bicycle or hike. A crosswind can affect high-profile vehicles, tents, signs, umbrellas, ladders, and some outdoor sports. Wind across a cold body of water can also make conditions feel very different from a protected urban street.
Do not use one universal “safe wind speed” for every activity. Manufacturers may specify wind limits for canopies, drones, lifts, and other equipment. Marine agencies publish separate guidance for boating. A beginner cyclist and an experienced rider will have different tolerances. The correct approach is to use the activity-specific limit and add margin rather than trying to create one rule for everything.
Before using temporary outdoor equipment, ask what happens if the wind doubles briefly. Secure items according to the manufacturer’s instructions. Never assume a canopy, umbrella, banner, trampoline, or lightweight sign is safe because the average wind seems moderate.
Verification: check both sustained wind and gusts for the hours of the event. If the gust forecast is close to an equipment or activity limit, treat the plan as fragile and choose a safer setup.
9. Use Heat Index and Direct Sun to Plan Heat Exposure
Air temperature alone does not describe heat stress. The National Weather Service Heat Index combines temperature and relative humidity to estimate how hot conditions feel to the human body in shady, light-wind conditions. NWS also notes that full sunshine can make heat feel hotter than the shaded Heat Index suggests.
For outdoor planning, use heat information to change the schedule and workload, not merely the clothing. Earlier start times, more shade, shorter work intervals, lighter effort, and additional recovery can be more effective than trying to “push through” the hottest part of the day.
People do not respond to heat identically. Age, acclimatization, health conditions, medications, clothing, workload, hydration status, and access to shade all matter. A forecast number should therefore be treated as an environmental input, not a diagnosis of how any specific person will feel.
For exercise, yard work, events, or labor, identify where cooling is possible. If the only plan is “drink more water,” the plan is incomplete. Consider shade, air-conditioned breaks, a shorter route, an earlier start, or postponement when dangerous heat is forecast.
If heat illness is suspected, follow current public-health guidance and seek emergency help for severe symptoms such as confusion, loss of consciousness, or signs of heat stroke. Do not use a general article as a substitute for urgent medical care.
Common mistake: looking only at the afternoon high. The relevant value is the temperature and heat conditions during the exact activity window, including direct sun and humidity.
10. Add the UV Index Even When the Temperature Feels Comfortable
Ultraviolet exposure is a different problem from heat. A cool, breezy day can still have a high UV Index. The U.S. Environmental Protection Agency describes the UV Index as a forecast of expected risk from overexposure to solar ultraviolet radiation, generally reported on a scale from 1 to 11 or higher.
EPA’s current scale groups 1–2 as low, 3–7 as moderate to high, and 8 or above as very high to extreme, with increasing need for sun protection. The exact protective steps depend on the index and personal circumstances, but the practical lesson is simple: do not use temperature or cloud comfort as a proxy for UV exposure.
Check the UV Index when the activity keeps you outside for a long period, especially around the middle of the day, at higher elevations, or near reflective surfaces such as water, sand, or snow. Plan shade and protective clothing before you arrive. Sunscreen should be used according to product directions and relevant health guidance rather than as permission to extend exposure indefinitely.
Clouds can reduce UV, but they do not make UV irrelevant. EPA’s UV forecasting method accounts for cloud cover, ozone, and elevation. This is another reason to use the actual UV forecast instead of guessing from how bright or cool the day appears.
Example: an overcast-looking beach day is 68°F with a UV Index of 7. Someone checking only the temperature may plan no sun protection because the day feels mild. Someone checking the UV Index sees that protection is still warranted.
11. Check Air Quality Separately From the Weather Forecast
Weather and air quality are related, but they are not the same thing. Smoke, ozone, dust, and fine particle pollution can make outdoor exercise or long exposure less suitable even when the temperature, wind, and rain forecast look excellent.
In the United States, the Air Quality Index, or AQI, is EPA’s system for communicating outdoor air quality. AirNow explains six color-coded categories. Values from 0–50 are “Good,” 51–100 are “Moderate,” 101–150 are “Unhealthy for Sensitive Groups,” 151–200 are “Unhealthy,” 201–300 are “Very Unhealthy,” and 301 or higher are “Hazardous.” As values increase, health concern increases and the recommended behavior changes.
Do not treat AQI as a decorative number. Look at the dominant pollutant and the health message for your category. Sensitive groups can include people with certain heart or lung conditions, older adults, children, and others depending on the pollutant and current guidance.
For a long run, outdoor practice, hiking trip, or children’s activity, checking AQI can be as important as checking the rain chance. If smoke is changing rapidly, use current observations and official alerts because conditions can vary sharply over distance and time.
Alternative: if your country uses a different air-quality index, use the official local system rather than applying U.S. AQI categories directly. Index scales are not identical worldwide.
12. Read a Surface Weather Map for the Bigger Pattern
You do not need to interpret every symbol on a professional weather map to benefit from the larger pattern. Surface maps can show fronts, pressure systems, precipitation areas, and the broad organization of weather. They are especially useful when you want to understand why the forecast changes across a day or across a travel route.
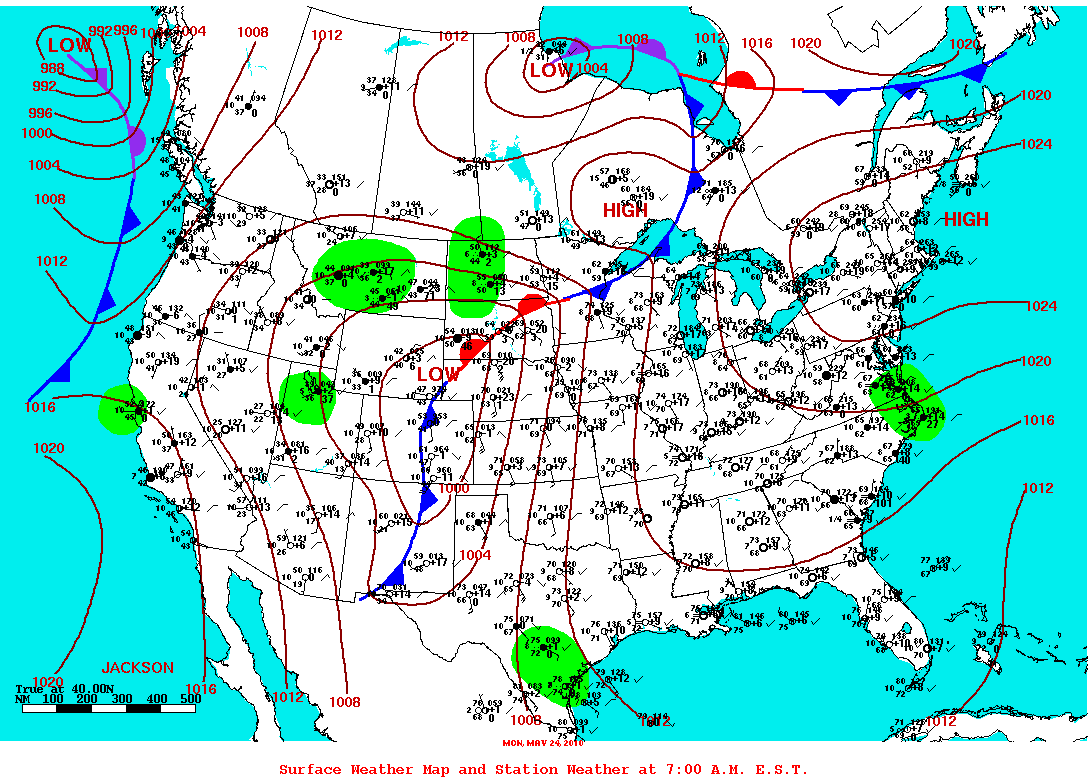 A surface weather map helps show the larger pattern behind local forecasts. NOAA/NCEP image, public domain in the United States via Wikimedia Commons.
A cold front approaching your area, for example, may explain why warm humid conditions are followed by a line of showers or thunderstorms and then cooler drier air. A broad high-pressure area may be associated with more settled conditions, although local weather can still vary. The map gives context; it does not replace your point forecast.
For a beginner, focus on movement and relationship rather than memorizing every meteorological symbol. Compare today’s surface map with tomorrow’s forecast. Ask: Is a front expected to cross the area? Is the weather system moving along my travel route? Is the forecast uncertainty concentrated around the timing of that feature?
This is particularly useful for multi-day outdoor plans. If a front is forecast to move through sometime Saturday, the exact hour may shift between model runs, but the basic idea—one period before the front and another after it—can help you build a flexible schedule.
Common mistake: trying to use a national map to predict whether it will rain at one picnic table at 3:15 p.m. Surface maps are for context. Use the local hourly forecast and radar for finer timing.
13. Treat Forecasts Far in Advance as Planning Information, Not a Promise
Forecasts are not equally certain at every lead time. The farther away the event, the more useful it is to focus on broad patterns and ranges rather than a precise hour-by-hour schedule.
Seven or ten days before an outdoor event, ask broad questions: Is there a signal for unusually hot conditions, a stormy period, or a major temperature change? Do not buy nonrefundable weather-dependent supplies because one app shows a tiny rain icon at 4 p.m. nine days away.
Three to five days out, start looking for consistency. Are several updates showing the same general pattern? Is the storm window repeatedly afternoon and evening, or does it keep moving by half a day? Is the expected wind increasing? This is the stage to strengthen backup plans.
Within 24 to 48 hours, timing becomes more actionable. Check the hourly forecast, expected precipitation, wind gusts, official alerts, and local forecast discussion if you want more context. A forecast discussion can explain confidence, alternative scenarios, and what forecasters are watching.
On the day of the activity, update again. Review current observations, alerts, and radar. Weather can evolve faster than your original plan.
A useful rule: the farther away the event, the broader the decision. Early: choose flexible options. Closer: choose the time window. Very close: choose whether to go and how to adapt.
14. Build a Simple Go, Modify, or Cancel Decision Matrix
A decision matrix prevents last-minute emotion from taking over. Divide outcomes into three categories: Go, Modify, and Cancel or postpone. The thresholds depend on the activity.
For a family picnic, “Go” might mean dry or light showers with nearby indoor shelter. “Modify” might mean move under a covered space, shorten the event, or change the start time. “Cancel” might include a severe thunderstorm warning or a venue that cannot provide safe shelter.
For an exposed hike, the matrix should be more conservative. A thunderstorm window overlapping the ridge crossing may be enough to change the route or start much earlier. High winds may make a narrow exposed trail unsuitable even when the sky is dry. Poor air quality may shorten the trip or move it indoors.
For a road trip, “Modify” can mean delay departure until a line of storms passes, reroute around flooding, or add an overnight stop. “Cancel” may be appropriate when authorities advise against travel or when route conditions exceed the driver’s or vehicle’s safe capability.
The matrix is not intended to override official instructions. If emergency authorities order evacuation, closure, or sheltering, follow that guidance. The matrix is for the many ordinary situations in which the forecast is uncertain but you still need a sensible plan.
Verification: someone else in your group should be able to apply the rules and reach approximately the same decision. If the rule is “we will see how we feel,” it is not a rule.
15. Create a Weather Timeline for the Day
For complicated activities, turn the hourly forecast into a short timeline. You do not need a spreadsheet. A note on your phone is enough.
Example:
- 7 a.m.: 68°F, light wind, low rain chance.
- 10 a.m.: 76°F, UV rising, partly cloudy.
- 1 p.m.: 84°F, heat index near 88°F, gusts increasing.
- 3 p.m.: thunderstorms possible.
- 5 p.m.: highest storm chance.
- 7 p.m.: storms moving east, but lightning risk may linger.
Now add your activity milestones. If the hike reaches the exposed ridge at 2:30 p.m., the plan is poorly aligned with the forecast. If you can start two hours earlier and be descending by noon, you may reduce exposure. The timeline makes the conflict visible.
Add shelter and exit points. “Car at 2 p.m.” is more useful than “finish around afternoon.” For a large event, note how long it takes to stop the activity and move everyone to shelter. The safety trigger has to occur earlier than the hazard if evacuation takes time.
Update the timeline the morning of the event. If the storm window shifts from 5 p.m. to 2 p.m., the original plan is no longer valid even if the daily icon has not changed.
16. Plan for the Forecast to Be Wrong
A good weather plan does not require a perfect forecast. It contains enough margin that a reasonable forecast error does not create a dangerous situation.
Ask “What if it arrives two hours early?” “What if the rain is heavier than expected?” “What if cellular data fails?” “What if the temperature is several degrees warmer?” “What if the wind gusts are stronger?” These are not predictions; they are resilience tests.
Build one backup into each critical dependency. If a picnic depends on dry weather, identify an indoor location. If a hike depends on crossing an exposed area before storms, choose a turnaround time and alternate low route. If an event depends on shade in hot weather, verify that the shade actually exists during the required hours. If a boat outing depends on calm conditions, know the safe harbor or cancellation threshold before launching.
Pack for the plausible range, not just the most likely number. A light rain layer, sun protection, extra water, warm layer, charged phone, offline map, and activity-specific safety equipment can turn a forecast miss into an inconvenience rather than an emergency.
Common mistake: using preparedness as justification to enter conditions that are already outside your safety threshold. Backup equipment is not a substitute for obeying warnings, closures, or sound judgment.
17. Use Real-World Observations Without Ignoring Official Information
When you are outside, pay attention to what the atmosphere is doing. Darkening clouds, rapidly increasing wind, thunder, sudden temperature changes, reduced visibility, blowing dust, or unexpectedly intense heat can tell you that conditions are changing faster than your last forecast check.
But local observation has limits. You cannot see a storm hidden behind terrain, smoke, haze, or another cloud layer. You cannot reliably judge whether a distant storm is severe by appearance alone. Radar and official alerts can reveal hazards outside your line of sight.
The best method is to combine the two. If the app says “storms later” but you already hear thunder, act on the thunder. If the sky over you is blue but a warning has been issued for your location, do not dismiss it because conditions look calm. The hazard may be approaching rapidly.
In remote areas, download key information before losing service and consider an appropriate alerting method for the environment. Technology should support judgment, not replace it.
18. Worked Example: Planning a Saturday Outdoor Event
Imagine you are organizing a community outdoor workshop from 1 p.m. to 5 p.m. on Saturday. The location is a park with a pavilion, but the pavilion is open-sided and therefore not a safe lightning shelter. A substantial recreation building is eight minutes away on foot. You expect 35 people, including children.
Five days out: the forecast shows warm weather with a general chance of afternoon storms. You do not cancel. Instead, you reserve the recreation building as a backup and tell participants that the final location may change.
Two days out: the hourly forecast now shows temperatures in the upper 80s, a heat index in the low 90s, UV in the high range, and thunderstorms becoming possible after 4 p.m. You add water, shade, and sun-protection reminders. You also decide that the outdoor portion must finish by 3:30 p.m. if the storm timing remains similar.
Saturday morning: thunderstorms are now possible from 2 p.m., and a severe thunderstorm watch is issued for the region. The watch does not mean a severe storm is guaranteed at the park, but it means conditions are favorable and the group needs to be ready. You move the event to the recreation building rather than depending on an eight-minute evacuation from the field.
At 2:20 p.m.: thunder is heard outside. Because the event is already indoors, no emergency movement is required. You keep participants inside. A severe thunderstorm warning is issued shortly afterward. The original “wait and see” outdoor plan would have created a rushed evacuation; the earlier decision avoided that problem.
After the storm: rain stops at 3:40 p.m., but thunder continues until 4:05. You do not resume outdoor activities immediately because NWS lightning guidance recommends waiting 30 minutes after the last thunder. The outdoor portion is cancelled for the day.
This example shows why weather planning is less about predicting the exact minute of a storm and more about aligning decisions with consequences. The forecast changed several times, but the plan remained useful because it had thresholds, shelter, and alternatives.
19. A 10-Minute Forecast Check You Can Reuse
When you do not have time for a deep analysis, use this sequence:
- Confirm location and time. Check the exact destination and activity window.
- Read active alerts. Do not skip directly to the temperature.
- Check hourly precipitation and thunderstorms. Note the start and end of the risky window.
- Check wind and gusts. Compare them with the activity and equipment.
- Check temperature and heat or cold stress. Adjust timing, clothing, water, and workload.
- Check UV for prolonged daylight exposure.
- Check AQI when smoke, ozone, dust, or pollution may matter.
- Look at radar if the event is near-term.
- Identify shelter or exit options.
- Make the decision: go, modify, postpone, or cancel.
The value of this checklist is consistency. You are less likely to forget wind because the sky is sunny, or forget lightning because the rain chance is only moderate.
20. Common Forecast-Reading Mistakes and Better Alternatives
Mistake: Using a daily icon as the whole forecast
Better: open the hourly view and identify when conditions change.
Mistake: Treating rain probability as rainfall intensity
Better: check rain chance, expected amount, and whether thunderstorms are involved.
Mistake: Looking at temperature but ignoring heat index, UV, or air quality
Better: evaluate the environmental factor that matters to the activity.
Mistake: Watching radar but ignoring forecasts and warnings
Better: use radar for current conditions and short-term motion while official forecasts and alerts provide broader context.
Mistake: Assuming a forecast for a nearby city covers mountain, coast, lake, or remote terrain
Better: use a point forecast for the actual destination and compare route segments.
Mistake: Waiting until everyone is outside to decide what will trigger shelter
Better: choose the trigger and safe location before the event begins.
Mistake: Searching multiple apps until one gives the answer you want
Better: compare official information, understand uncertainty, and plan for the less convenient plausible outcome when consequences are high.
Frequently Asked Questions
Does a 30% chance of rain mean it will rain for 30% of the day?
No. In National Weather Service terminology, probability of precipitation is the chance that measurable precipitation will occur at a particular forecast point during the specified period. It does not state the percentage of the day that rain will fall.
Is radar better than the hourly forecast?
They answer different questions. Radar is excellent for observing precipitation and storms that already exist. The hourly forecast is intended to describe expected conditions over future hours. Use both when an activity is close in time.
Can I stay under a picnic shelter during a thunderstorm?
An open picnic shelter is not the same as a substantial enclosed building. National Weather Service guidance says no place outside is safe when thunderstorms are in the area. Move to a substantial building or a hard-topped vehicle.
How often should I recheck the weather before an event?
For an important outdoor event, check the broad pattern several days ahead, review the hourly forecast within a day or two, and refresh forecasts, alerts, and radar on the day itself. Recheck more often when hazardous weather is possible.
Why does the forecast keep changing?
Forecasts update as new observations arrive and models refine the expected timing, location, and strength of weather systems. A changing forecast is not necessarily evidence that forecasting is useless; it is a reason to focus on ranges, trends, and decision thresholds instead of treating an early forecast as a fixed promise.
Should I cancel whenever there is a watch?
Not automatically. A watch means hazardous weather is possible and you should be prepared. Whether you cancel depends on the hazard, activity, shelter, timing, group vulnerability, and ability to act quickly if a warning is issued. Some activities with limited shelter may justify a more conservative decision.
Sources and Further Reading
- National Weather Service: Forecast Terminology and Probability of Precipitation
- National Weather Service: Watch, Warning, and Advisory Explained
- National Weather Service: Lightning Safety Overview
- National Weather Service: Heat Index and Heat Forecast Tools
- U.S. Environmental Protection Agency: UV Index Scale
- AirNow: Air Quality Index Basics
Conclusion
Reading a weather forecast well is not about finding a single number that tells you whether the day is “good” or “bad.” It is about matching the forecast to a real activity, reading hazards before comfort, understanding timing, and knowing what you will do when conditions change.
Start with one habit: before your next outdoor plan, open the hourly forecast instead of stopping at the daily icon. Check alerts, precipitation type, thunderstorm timing, wind gusts, heat, UV, and air quality as relevant. Then choose a shelter, exit, or backup option before you leave.
The biggest mistake to avoid is waiting for certainty. Weather rarely provides it. A strong plan does not need certainty; it needs clear thresholds, reliable information, and enough flexibility to change course before inconvenience becomes danger.