

Quick answer: To navigate with a map and compass, first make sure the map covers your current area and understand its scale, contour interval, legend, and north references. Identify your location from known terrain features. Set the correct magnetic declination for your location, then orient the map so map north matches the landscape. To travel toward a destination, place a baseplate compass between your location and the destination, align the compass housing with map north, read the bearing, then hold the compass level and turn your body until the magnetic needle aligns with the orienting arrow. Pick a visible landmark in that direction and walk to it rather than staring at the compass continuously. Reconfirm your position often. Practice these skills in a familiar park before depending on them in remote terrain, and carry redundant navigation tools rather than treating a phone or a compass as your only safety system.
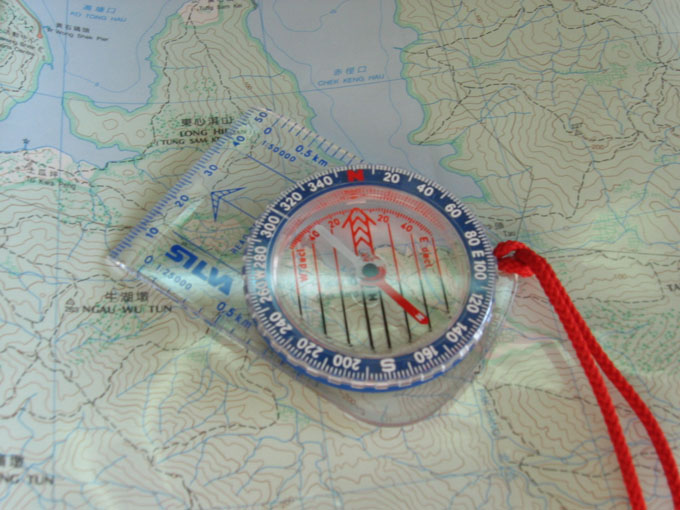 A transparent baseplate compass makes it easier to transfer directions between a map and the ground. Image: Simon Shek, Wikimedia Commons, CC BY-SA 2.0.
Phone navigation has made outdoor route-finding easier, but it has also hidden the reasoning behind navigation. A phone can tell you where to turn while the battery lasts, the screen works, the map is downloaded, and the location signal is usable. A paper topographic map and a simple magnetic compass work differently: they do not calculate the route for you. They help you understand the shape of the land, your relationship to it, and the direction you need to travel.
That makes map-and-compass navigation slower to learn but more transferable. The same core ideas—scale, contour lines, bearings, terrain association, distance, declination, and frequent position checks—apply across hiking, camping, fieldwork, hunting, emergency planning, and many other outdoor activities.
The purpose of this guide is not to turn a first-time reader into an expert wilderness navigator in one sitting. It is to build a reliable beginner system: understand the map, understand the compass, combine them correctly, and practice in places where a mistake is inconvenient rather than dangerous.
1. Start With the Right Kind of Map
A road map shows roads well. A transit map shows transit relationships. A topographic map is designed to show the shape and elevation of terrain as well as many natural and human-made features. For outdoor navigation, that third dimension matters.
The U.S. Geological Survey defines topographic maps by their use of contour lines—imaginary lines connecting points at the same elevation. USGS maps can also show roads, streams, lakes, boundaries, geographic names, and many other features. In the United States, current US Topo maps are commonly produced at 1:24,000 scale, while USGS topoBuilder can generate current OnDemand Topos at several scales.
Before a trip, choose a map that:
- covers your entire intended route plus meaningful surrounding terrain;
- is detailed enough for your activity;
- has a readable scale and contour interval;
- shows the trails, roads, water features, land boundaries, or landmarks you need;
- is recent enough that you are not unknowingly relying on obsolete roads or facilities.
Historical maps can be fascinating and useful for understanding old routes or land use, but they should not automatically be treated as current navigation data. Trails move, roads close, reservoirs change, access rules change, and vegetation can make former landmarks invisible.
Practical check: Before leaving home, find the map title, publication or revision information, scale, contour interval, legend, and north diagram. If you cannot point to all five, spend a few minutes learning the map before you depend on it.
2. Understand Map Scale Before Measuring Anything
Scale tells you how a distance on the map relates to distance on the ground. A scale of 1:24,000 means one unit on the map represents 24,000 of the same units on the ground. One centimeter represents 24,000 centimeters; one inch represents 24,000 inches.
USGS notes that many familiar 1:24,000 maps are highly detailed. At that scale, one inch on the map represents 2,000 feet on the ground.
You do not need to perform unit conversions every time you measure a route. Most maps include a scale bar. Use the compass baseplate ruler, a separate ruler, a strip of paper, or a piece of string to compare a route with that bar.
Important limitation: Straight-line map distance is not walking distance. A trail may curve around a hillside, switchback repeatedly, or detour around water. Elevation gain also changes travel time even if the horizontal distance is short.
For a winding trail, lay a string along the route, mark the start and finish on the string, straighten it, and compare it with the scale bar. On a digital map, use a route-measurement tool if available—but still understand what the measurement represents.
3. Read the Legend Instead of Assuming Every Symbol Is Universal
Map symbols communicate roads, water, vegetation, buildings, boundaries, trails, survey points, and other features. Even experienced map users check the legend because symbols vary between map series and countries.
Look for:
- trail styles and classifications;
- road types;
- water features;
- administrative boundaries;
- vegetation or land-cover colors;
- buildings and structures;
- power lines or other linear features;
- spot elevations;
- contour-line styles;
- restricted or special-use areas.
Do not assume a dashed line is always a hiking trail. On different maps, dashed lines can represent different features. The legend is the map’s grammar.
4. Learn What Contour Lines Actually Mean
Contour lines are the core of a topographic map. Each contour joins points of equal elevation. The vertical difference between neighboring contour lines is the contour interval, which is printed in the map margin or legend.
Suppose a map has a 20-foot contour interval. Moving from one contour to the next means gaining or losing 20 feet of elevation, regardless of how far apart the lines are horizontally.
The spacing of contours reveals slope:
- widely spaced lines generally indicate gentler terrain;
- closely spaced lines indicate steeper terrain;
- extremely close or merging lines can indicate very steep slopes or cliffs;
- closed loops often indicate a hill or summit unless hachures or other symbols show a depression.
USGS explains that the thicker contour lines are commonly index contours and are labeled with elevation. Use them as anchors, then count the thinner lines between them.
Practice: Pick a hill on a topo map. Find the lowest index contour near its base, then count upward to estimate the summit elevation. You may not get an exact summit height if the top lies between contours, but you can estimate a range.
5. Recognize Ridges, Valleys, Spurs, and Saddles
Contour patterns become much more useful when you connect them to landforms.
Valleys and drainages
Where contour lines cross a stream or drainage, they usually form a V shape that points uphill or upstream. Water flows in the opposite direction, toward lower elevation.
Ridges and spurs
A ridge is an elongated high area. Contours often bend in U- or V-like shapes that point downhill when describing a ridge or spur, roughly opposite the pattern of a valley.
Saddles
A saddle is a lower point between two higher areas. On a topo map it often looks like two opposing bulges or an hourglass-like contour pattern.
Summits
Hills are commonly shown by nested closed contours with elevation increasing toward the center.
These patterns matter because terrain features can be easier to identify on the ground than an exact coordinate. If you know you are following a broad ridge with a deep drainage to the west, those features can confirm your position even without a visible trail sign.
6. Understand the Three “Norths” You May See
Beginners often assume north is one simple direction. Navigation can involve several north references:
- True north: direction toward the geographic North Pole along lines of longitude.
- Magnetic north: the direction a magnetic compass responds to at your location.
- Grid north: north defined by the map’s coordinate grid, which may differ slightly from true north depending on the map projection and location.
For many recreational tasks, the most important correction is between true north on the map and magnetic north on the compass. The angle between them is called magnetic declination.
7. Get Magnetic Declination From a Current Source
Magnetic declination changes with location and slowly changes over time. NOAA’s National Centers for Environmental Information states that declination is the angle between true north and magnetic north and that it varies with both place and time.
That means a declination value printed on an old paper map may no longer be the best value to use. Before a trip, obtain a current value for the area from an authoritative source such as NOAA’s magnetic declination tools, or use the current value provided by a trusted mapping application that clearly identifies its source.
Declination can be east or west. NOAA describes east declination as positive and west declination as negative in its calculation convention.
Why this matters: A small declination error may not matter on a short walk toward a large nearby feature. Over long distances, a several-degree error can move your path substantially away from the intended line.
8. Set Declination on an Adjustable Compass When Possible
Many quality baseplate compasses let you adjust declination mechanically so the orienting arrow is offset from the housing’s north mark. Once correctly set for your area, you can usually transfer bearings between map and ground without doing a mental add/subtract calculation every time.
Follow your compass manufacturer’s instructions because adjustment mechanisms differ. Some require a small key or tool. Others use a rotating internal scale.
After setting it, verify that you understand which mark now represents the magnetic needle alignment. Do not turn the declination adjustment accidentally while rotating the normal compass bezel.
If your compass is not adjustable: You can still navigate accurately, but you must apply the correct true-to-magnetic conversion. Because “add east/subtract west” mnemonics are easy to misuse when switching between directions, use a worked example from your map or the USGS compass guide and practice until you can explain what you are converting and why.
9. Learn the Parts of a Baseplate Compass
A beginner-friendly baseplate compass usually includes:
- a transparent baseplate;
- a direction-of-travel arrow;
- a rotating compass housing or bezel;
- a degree scale from 0 to 360;
- a magnetic needle with a north-seeking end, commonly red;
- an orienting arrow inside the housing;
- parallel orienting lines;
- an index line where the bearing is read;
- ruler markings along the baseplate;
- sometimes adjustable declination.
North is 0° or 360°, east is 90°, south is 180°, and west is 270°.
Hold the compass level and away from strong magnetic influences. Phones, magnets, speakers, vehicles, steel structures, some watch bands, and other metal objects can deflect the needle. Before trusting a bearing, move away from obvious interference and see whether the needle settles consistently.
10. Orient the Map to the Ground
Orienting a map means rotating the map so its north aligns with actual north and features appear in the same relative directions as the landscape.
A common baseplate method is:
- Set or account for the current magnetic declination.
- Place the compass flat on the map.
- Align the edge or orienting lines with the map’s north-south lines so the compass housing points toward map north.
- Hold the map and compass together horizontally.
- Rotate your entire body and the map until the magnetic needle aligns with the adjusted orienting arrow.
Now the map is approximately oriented to the terrain.
Look up. A lake shown to your right on the map should also be to your right in the landscape. A ridge ahead on the map should correspond to the actual ridge ahead.
Common mistake: Rotating the compass housing when you should rotate your body and map. Once the housing is correctly aligned to map north, preserve that relationship while turning the whole system.
11. Locate Yourself Using Known Features Before You Take Bearings
A bearing is useful only if your starting point is reasonably known.
Before setting out, identify your location from something obvious: a trailhead, road junction, bridge, summit, lake shore, building, campground, or signed intersection. Then look at the surrounding map and note what should appear as you travel.
Ask:
- Which direction should the trail initially go?
- Should I climb or descend?
- Where will I cross water?
- What major ridge or valley should remain on one side?
- How far is the next unmistakable landmark?
This creates a mental route model. You are no longer blindly following a line; you are testing reality against expectations.
12. Take a Bearing From the Map
Suppose you know your position and want to travel to a visible or mapped destination.
With a transparent baseplate compass:
- Place the long edge of the compass on the map so it connects your current position to the destination.
- Make sure the direction-of-travel arrow points from you toward the destination, not backward.
- Without moving the baseplate, rotate the compass housing until its orienting lines are parallel with the map’s north-south lines and the orienting arrow points toward north on the map.
- Read the bearing at the index line.
- If your compass is adjusted for declination, the bearing is ready to follow using that compass. If not, apply the correct declination conversion.
USGS provides worked methods for this exact map-to-compass process. Practice on known points before using it in the field.
13. Follow a Bearing Without Staring at the Compass
Once you have the bearing:
- Hold the compass level in front of you with the direction-of-travel arrow pointing away from your body.
- Turn your entire body until the magnetic needle aligns with the orienting arrow.
- Look along the direction-of-travel arrow.
- Select a distinctive object in that direction—a tree, boulder, hill shoulder, gap, or other visible landmark.
- Walk to that object.
- Repeat the alignment and choose the next landmark.
This technique is more stable than walking while constantly watching the needle. It also keeps your eyes on terrain hazards.
In dense forest or poor visibility, the visible landmark may be close. In open terrain it may be hundreds of meters away.
Verification: As you move, compare terrain with the map. A correct compass bearing does not protect you from starting at the wrong location or choosing the wrong destination.
14. Use Handrails to Make Navigation Easier
A handrail is a linear feature you can follow, such as a trail, road, ridge, river, fence, coastline, or obvious valley. Instead of navigating every meter by compass, you use the feature to constrain your movement.
Example: your destination is a trail junction two kilometers north. A large stream runs parallel to your route on the east. Rather than navigating precisely through forest the entire way, you may use the stream as a broad reference while staying on the trail.
Handrails reduce cognitive load. The best navigation plans often rely on terrain features rather than continuous compass work.
15. Use Catching Features to Prevent Overshooting
A catching feature is an unmistakable feature beyond your target that tells you you have gone too far.
Examples include:
- a road;
- a large river;
- a ridge crest;
- a power line;
- a lake shore;
- a major trail.
Suppose you are looking for a small junction in forest and a large east-west road lies 300 meters beyond it. If you reach the road, you know you passed the junction and can correct without wondering whether you are still approaching it.
Before each leg of a route, ask, “What stops me if I miss the target?” If the answer is “nothing obvious for several kilometers,” that leg deserves more careful navigation.
16. Choose Attack Points for Small Targets
Small targets are difficult to navigate to directly. A spring, small campsite, trail junction, or narrow saddle may be hard to recognize from a distance.
Instead, navigate first to a nearby attack point that is easier to identify—a bridge, obvious bend, summit, stream junction, large trail intersection, or ridge end. Then take a shorter, more precise bearing from that point to the small target.
This reduces the time spent on precision navigation and gives you a known starting location for the final leg.
17. Estimate Distance With More Than One Method
Direction alone is not enough. You need to know when you should expect to arrive.
Useful methods include:
- map measurement: estimate route distance before travel;
- time: learn your approximate pace on similar terrain;
- step or pace counting: measure how many paces you typically take over a known distance;
- terrain events: count stream crossings, junctions, ridges, or other features.
Pace count is highly individual and changes with slope, vegetation, fatigue, pack weight, and surface. Do not copy someone else’s number. Measure your own on a known 100-meter or 100-yard course, then repeat on different terrain.
For beginners, time and terrain association are often easier than precision pacing. If a leg should take roughly 20 minutes and you have walked 45 minutes without seeing the expected stream, stop and reassess.
 Navigation improves through deliberate practice: plot a point, predict the terrain, travel the leg, then compare the result with the map. Image: Pfc. Franklin E. Mercado, U.S. Marine Corps; public domain as a U.S. federal government work.
18. Build a Route Card Before Entering Complex Terrain
A route card is a short written plan. It does not need to be formal.
For each leg, record:
- start point;
- destination or attack point;
- bearing;
- distance;
- expected terrain;
- handrail;
- catching feature;
- estimated time;
- major hazard or decision point.
This turns a long route into manageable segments.
For example:
Leg 2: Trail junction to saddle; 1.3 km; generally northwest; climb about 180 m; stream remains east; cross one minor drainage; saddle is attack point for final summit path; broad ridge beyond saddle is catching feature.
If conditions change, update the plan rather than forcing the original route.
19. Use Terrain Association Continuously
Terrain association means matching the landscape to the map while moving.
Do not wait until you are uncertain. Every few minutes, ask:
- Am I climbing or descending as expected?
- Is the slope on the correct side?
- Did I cross the stream shown on the map?
- Is the ridge shape consistent?
- Has the trail curved as expected?
- Should I be able to see the lake, road, or summit yet?
Each correct observation increases confidence. Several contradictions mean you should stop early and investigate.
A good navigator tries to avoid becoming lost rather than practicing heroic recovery after uncertainty becomes severe.
20. Stop Immediately When the Map and Terrain Stop Agreeing
The most damaging response to uncertainty is walking faster in the hope that something recognizable appears.
When the terrain stops matching your expectations:
- Stop moving.
- Note the time.
- Look at the last point where your location was certain.
- Review how far and in what direction you have traveled since then.
- Orient the map.
- Identify major terrain around you.
- Check whether a simple error—wrong junction, reversed bearing, unaccounted declination, misread contour—explains the mismatch.
If you can safely return to the last known point along a clear route, that may be simpler than continuing into uncertainty.
In an actual emergency, use local emergency procedures and communication tools. This guide is for navigation technique, not a substitute for professional rescue advice.
21. Practice Resection Only After Basic Skills Are Solid
Resection is a method for estimating your position by taking bearings to known landmarks and plotting lines back from those landmarks onto the map.
A simplified two-feature method can help when you can identify two distant mapped features with confidence. Three features can provide a stronger check because the plotted lines should converge near your location.
The difficulty is not the geometry; it is correctly identifying the landmark, converting bearings consistently, and drawing the reciprocal direction accurately. Beginners often make errors by sighting the wrong summit or mixing magnetic and true bearings.
Practice resection from a known viewpoint first. Take bearings to three obvious peaks, plot them, and see how close the intersection is to your known position. That gives immediate feedback without risk.
22. Learn Back Bearings
A back bearing points in the opposite direction of a bearing.
For bearings under 180°, add 180°. For bearings 180° or greater, subtract 180°. For example, the back bearing of 70° is 250°. The back bearing of 240° is 60°.
Back bearings are useful for:
- checking the direction back to a known point;
- plotting lines during resection;
- verifying that a linear feature runs in the expected orientation;
- maintaining a route that you may need to reverse.
Remember that declination still matters when transferring between map and magnetic compass references.
23. Use “Aiming Off” When a Linear Feature Is Easier Than a Point Target
Aiming off is an intentional navigation technique for approaching a long linear feature, such as a trail or stream, near a small target.
Suppose a cabin lies somewhere along an east-west trail. If you navigate directly toward the cabin and reach the trail without seeing it, you may not know whether the cabin is east or west. Instead, intentionally aim to reach the trail west of the cabin. When you hit the trail, turn east. Now the direction to the cabin is known.
This converts an uncertain left-or-right decision into a planned one.
Use aiming off only when the linear feature is unmistakable and safe to follow.
24. Understand Contour Interval Before Estimating Elevation Gain
Elevation gain is not simply the difference between your starting and finishing elevations if the route goes up and down repeatedly.
To estimate total gain, trace the route and count the contour intervals crossed uphill, segment by segment. If you climb 200 feet, descend 100, then climb another 300, your total ascent is roughly 500 feet even though the net change is only 400 feet.
This matters for effort and timing. A five-kilometer route with repeated steep climbs can take much longer than a flat five-kilometer route.
25. Read Slope Shape, Not Just Steepness
Contour spacing can show whether a slope is consistent, convex, or concave.
A slope where contours become farther apart as you descend may flatten toward the bottom. A slope where contours become closer as you descend may steepen below you. That distinction matters because the steepest part of a slope may be hidden from your current viewpoint.
Do not use a topographic map as a guarantee that terrain is safe to descend. Cliffs, loose rock, vegetation, seasonal water, snow, private land, and other hazards may not be obvious from contour lines alone.
26. Treat Water Features as Both Landmarks and Potential Hazards
Rivers and streams are excellent handrails because they are linear and often easy to identify. But they can also become barriers.
A map may show a stream without telling you its current flow depth, flood condition, bridge status, or crossing safety. Heavy rain or snowmelt can transform a minor blue line into a dangerous crossing.
Plan crossings conservatively. If a bridge or established crossing exists, prefer it. Do not assume that because a route appears short on the map, a water crossing will be easy.
27. Account for Trails That Do Not Match the Map
Trails change. New routes are built, old ones fade, switchbacks are rerouted, unofficial paths appear, and temporary closures occur.
If a trail on the ground differs from the map, do not immediately assume the map is wrong. First confirm your location. Then use terrain features, signs, current official information, and other reliable data to understand the discrepancy.
Before a trip, check the land manager’s current trail conditions, closures, permit rules, and alerts. A topographic map describes geography; it is not necessarily a live operations notice.
28. Carry the Map So You Can Actually Use It
A map buried at the bottom of a backpack is not an active navigation tool.
Fold the map so the current area is visible. Protect paper maps from rain in a map case, waterproof sleeve, or sealed transparent bag. Avoid folding across one critical area repeatedly if the paper is fragile.
If you print a map, include the scale, north references, coordinate information, legend or needed symbols, and sufficient surrounding terrain. A screenshot cropped tightly around a trail may remove the very features needed for recovery if you leave the route.
29. Use Digital Navigation as Redundancy, Not as an Enemy
Learning compass skills does not require rejecting technology.
A phone with offline maps can provide a fast position check, track recording, satellite imagery, and current map layers. A dedicated GPS device can provide another independent location source. The problem is relying on one electronic device without understanding its limitations.
Before a trip:
- download the map for offline use;
- confirm the app can open the map without data service;
- charge the device;
- carry a suitable power bank for longer trips;
- keep the phone protected from weather;
- know the coordinate format and map datum if you plan to exchange coordinates;
- carry a paper map and compass when the consequences of device failure are significant.
Redundancy is stronger when the backups fail differently. Two phone apps on the same dead phone are not two independent navigation systems.
30. Make Coordinate Systems Consistent
Maps and GPS devices can represent location using latitude/longitude, UTM, or other grid systems. Even within latitude/longitude, coordinates can be shown in decimal degrees, degrees and decimal minutes, or degrees-minutes-seconds.
If you copy coordinates between devices, maps, route plans, or people, verify:
- coordinate format;
- map datum;
- hemisphere or east/west and north/south signs;
- units.
A perfectly entered number in the wrong format can describe the wrong location.
For casual hiking on a clear trail, you may never need to calculate coordinates manually. But if you plan to use them, consistency matters more than memorizing multiple systems.
31. Practice Compass Interference Checks
A magnetic compass is simple but not immune to the environment.
Test your compass away from:
- vehicles;
- large steel structures;
- electrical equipment;
- speakers and magnets;
- some phones and cases;
- magnetic clasps;
- metal railings.
Move several steps away and compare the direction. If the needle changes significantly, interference was present.
On the trail, do not take a precise bearing while leaning against a vehicle or standing beside a large metal signpost.
32. Check for Compass Damage Before a Trip
Inspect the compass for:
- cracks in the capsule;
- large bubbles that interfere with needle movement;
- a sticky or sluggish needle;
- a bezel that no longer holds its setting;
- damaged declination adjustment;
- faded index or orienting marks.
A tiny bubble may not affect some compasses, especially at altitude or temperature extremes, but a compass that does not settle consistently should not be your primary navigation instrument.
Compare it with another known-good compass away from interference before trusting it.
33. Use a Simple Pre-Trip Navigation Brief
Before moving, explain the route to yourself or your group in ordinary language:
“We start at the east trailhead, climb northwest for about 1.5 kilometers, cross one stream, then reach a broad saddle. The main ridge stays north of us. If we hit the power line, we went too far. From the saddle we turn west on the marked trail.”
If you cannot describe the route without staring at turn-by-turn instructions, you do not yet have a mental model.
For group trips, make sure more than one person understands the route. Navigation should not become a single point of failure if one person is tired, injured, separated, or simply wrong.
34. Use Decision Points Instead of Constant Micro-Decisions
A decision point is a place where you intentionally stop and confirm the next leg: trail junction, bridge, summit, saddle, road crossing, major bend, or stream junction.
At each decision point:
- confirm location;
- check time and distance;
- review the next feature;
- confirm bearing if needed;
- check weather and group condition;
- decide whether to continue, modify, or turn back.
This prevents small uncertainties from compounding across an entire day.
35. Add Weather to the Navigation Plan
Weather can change what is visible and what is passable. Fog may hide landmarks. Snow can cover trails. Heavy rain can swell streams. Strong wind can make ridges unpleasant or hazardous. Heat can slow travel dramatically.
Do not build a navigation plan that requires distant visual landmarks if forecast conditions may eliminate visibility.
In poor visibility, shorter legs between strong terrain features are easier to manage. If conditions exceed your skills, turn back or use a safer alternative rather than treating the compass as permission to continue.
36. Learn Night Navigation in a Safe Training Area First
Navigation becomes harder at night because distant terrain features disappear and judging distance becomes less intuitive.
Do not make your first compass practice a night hike in remote terrain. Instead, practice in a familiar park or open area where roads or obvious boundaries surround the course.
Use:
- shorter legs;
- clear catching features;
- careful pace counts;
- a headlamp;
- a backup light;
- reflective or known landmarks where appropriate.
Night navigation is a separate skill layer, not simply daylight navigation with a flashlight.
37. Practice With “Known Answer” Exercises
The fastest way to learn is to work problems whose answer you can check.
Examples:
- Stand at a signed trail junction, take a bearing to another known landmark, then compare with the map.
- Walk a measured 100-meter course and determine your pace count.
- Orient the map, then identify three visible hills and verify their positions.
- Take a bearing to a water tower, then use the map to check whether the line makes sense.
- Plot a route between two known points and walk it while comparing terrain.
These exercises reveal whether the error is in map reading, compass use, declination, distance estimation, or terrain recognition.
38. Build a Progressive Four-Session Practice Plan
Session 1: Map only
Use a local park map or topo map. Learn the legend, scale, contour interval, and major terrain shapes. Walk only on familiar trails and predict what terrain should appear next.
Session 2: Compass only
In an open area, identify cardinal directions, set several bearings, choose visible landmarks, and walk short legs. Practice back bearings.
Session 3: Map and compass together
Orient the map, take map bearings between known points, walk them, and verify the result with obvious landmarks.
Session 4: Short navigation course
Choose several safe points inside an area bounded by obvious roads or trails. Navigate from one to another using bearings, terrain association, handrails, and catching features.
Do not increase difficulty until you can explain why each exercise succeeded or failed.
39. Use a Safety Box Around Beginner Practice
Create a practice area with unmistakable boundaries. For example, choose a park bordered by roads on all four sides. If you reach any road unexpectedly, you know you have left the intended training area and can reorient safely.
Tell someone where you are going and when you plan to return, even for simple outings. Carry water, weather-appropriate clothing, a charged phone, and any other essentials appropriate to the environment.
Navigation training should have a low consequence of error. You learn faster when you are not afraid that one mistake will become an emergency.
40. Work Through a Full Example
Imagine a hiker wants to travel from a marked trail junction to a broad saddle 1.2 kilometers away, then join another trail.
Step 1: Confirm the start. The hiker identifies the signed junction on the map. A stream lies east of the trail and the terrain rises to the northwest.
Step 2: Read the terrain. Contours show a moderate climb that becomes gentler near the saddle. The stream remains a handrail to the east but moves farther away as elevation increases.
Step 3: Identify the catching feature. A large ridge beyond the saddle is unmistakable. If the hiker begins climbing steeply again after terrain flattens, the saddle was probably passed.
Step 4: Measure the leg. Map measurement gives about 1.2 kilometers. Based on previous walks, the hiker expects 30–40 minutes because of the climb.
Step 5: Take a bearing. The compass edge connects the junction and saddle. The housing is aligned with map north. Declination is already set to the current local value.
Step 6: Travel. The hiker does not stare at the compass. Short visible landmarks are selected along the bearing while the slope and stream position are continuously checked.
Step 7: Confirm arrival. After about 35 minutes, the terrain flattens, the expected opposing slopes appear, and the connecting trail is found.
Step 8: Reconfirm before continuing. Instead of immediately turning onto the trail, the hiker verifies its direction and the next major feature.
This is the pattern to copy: location, terrain, distance, bearing, catching feature, travel, verification.
41. Troubleshoot Common Beginner Errors
“My compass direction seems completely wrong.”
Move away from metal and electronics. Check whether you reversed the direction-of-travel arrow, mis-set declination, or aligned the orienting arrow south instead of north on the map.
“I followed the bearing but missed the target.”
Review the starting location, distance estimate, declination, and target size. A small target may require an attack point and catching feature rather than a long direct bearing.
“The trail on the map is not where I expected.”
Stop and verify location before assuming the trail moved. Use terrain features, current official information, and other navigation tools.
“Contours all look the same to me.”
Practice with one hill and one valley at a time. Trace contour lines with your finger and imagine each line as a horizontal slice through the landscape.
“I keep confusing east and west declination.”
Use an adjustable-declination compass if possible. Otherwise, write the local conversion directly on your map and practice with known bearings. Do not rely on a mnemonic you cannot explain.
“My GPS position and compass direction disagree.”
Check whether the GPS display uses true north, magnetic north, or grid north; verify declination and coordinate settings; move away from compass interference. Also remember that a stationary GPS course arrow may be unstable because course over ground requires movement.
“I am walking much slower than my plan.”
Terrain, elevation, heat, vegetation, footing, and group condition can invalidate a simple speed estimate. Update the plan instead of forcing the original schedule.
42. Know What Not to Do
- Do not take your first navigation lesson in remote terrain.
- Do not rely on an old declination value without checking whether it is still appropriate.
- Do not assume the compass is accurate beside a car, phone magnet, or metal structure.
- Do not walk for a long time after the terrain stops matching the map.
- Do not use a tightly cropped map that removes surrounding recovery features.
- Do not treat a paper map as proof that a crossing or trail is currently safe or open.
- Do not rely on one device, one person, or one navigation method when failure has serious consequences.
- Do not confuse precise numbers with precise knowledge; a 274° bearing from the wrong location is still wrong.
43. A 10-Minute Pre-Hike Navigation Check
- Confirm the map covers the full route and surrounding terrain.
- Check scale and contour interval.
- Get current declination.
- Set the compass or write down the conversion.
- Check compass movement away from interference.
- Identify start location and first decision point.
- Identify at least one handrail and one catching feature.
- Download offline digital maps.
- Tell someone the route and expected return time when appropriate.
- Put the map where you can reach it while moving.
This short check prevents many errors before the first step.
 A topographic map compresses terrain, water, routes, labels, and elevation into one view. Image: Mickaël Delcey (Silverkey), Wikimedia Commons, CC BY-SA 4.0.
44. Frequently Asked Questions
Do I still need a compass if I have a GPS?
For simple urban or front-country routes, a phone may be sufficient for many people. In areas where navigation failure has higher consequences, a paper map and compass provide useful redundancy because they do not depend on battery power or satellite reception for direction. The strongest approach is knowing how the systems complement each other.
Does a compass point to the geographic North Pole?
No. NOAA explains that a magnetic compass aligns with the local horizontal component of Earth’s magnetic field. Magnetic declination is the angle needed to relate that direction to true north.
Why does magnetic declination change?
Earth’s magnetic field changes over time and varies by location. That is why NOAA maintains models and calculators for current values rather than treating declination as permanent.
What map scale is best for hiking?
There is no universal best scale. More detailed maps such as 1:24,000 or 1:25,000 are useful for local navigation because they show terrain and features at a larger scale, while smaller-scale maps are useful for seeing a broader region. Choose the scale that shows enough detail for your route while still giving useful context.
Do contour lines ever cross?
On ordinary topographic maps, contour lines generally do not cross because one horizontal location does not normally have two ground elevations. Exceptional terrain such as overhangs can complicate representation, but beginners should treat crossing contours as unusual and consult the map specification or legend.
What does it mean when contour lines are close together?
They indicate a large elevation change over a short horizontal distance, which means a steep slope. Widely spaced contours indicate gentler terrain.
What is the easiest way to avoid getting lost?
Know where you are before moving, predict what you should see next, check terrain frequently, and stop as soon as reality and the map disagree. Frequent small confirmations are easier than recovering after a long period of uncertainty.
Should I learn pace counting?
It is useful, especially when landmarks are limited, but it should not be your only distance method. Time, map measurement, GPS distance, terrain events, and pacing can cross-check one another.
Can I use a phone compass instead of a magnetic compass?
Phone compass sensors can be useful but depend on calibration, battery, device health, and local interference. They are valuable as a supplementary tool but do not provide the same independent backup as a simple magnetic compass.
What if my map is several years old?
Terrain shape may still be useful, but trails, roads, buildings, access, facilities, and land management can change. Pair older maps with current official information and current navigation data.
Is a more expensive compass more accurate?
Price alone does not guarantee useful field performance. A beginner benefits from a clear baseplate, readable degree markings, smooth needle movement, a stable bezel, and adjustable declination if possible. Specialized sighting compasses can add precision but are not required for learning fundamentals.
Can I learn all of this indoors?
You can learn the map concepts indoors, but compass navigation becomes intuitive only through field practice. Start in a familiar park or open area with obvious boundaries and known landmarks.
45. Conclusion: Navigation Is a Cycle of Prediction and Verification
The most important map-and-compass skill is not memorizing how many degrees to add or subtract. It is learning to make a prediction and then test it against the world.
You predict that the trail will climb, curve west, cross a stream, and flatten at a saddle. Then you walk and verify each event. The compass supports the process by giving direction. The map supports it by giving terrain, distance, and context. Your observations connect the two.
Start with a detailed topographic map, a transparent baseplate compass, and a safe practice area. Learn scale and contours. Obtain current magnetic declination. Orient the map. Take short bearings between known points. Use handrails, catching features, attack points, and distance estimates. Stop early when something does not match.
The biggest beginner mistake is continuing while uncertain. The most useful habit is the opposite: confirm your position before you need to recover it.
Your first practical step can be simple. Take a map and compass to a familiar park, stand at a known location, orient the map, and identify three real features that correspond to the map. Then take a bearing to one visible landmark and verify it. That single exercise turns abstract symbols into a navigation skill you can build on.
Sources and Further Reading
- U.S. Geological Survey — How To Use a Compass with a USGS Topographic Map
- U.S. Geological Survey — Finding Your Way With Map and Compass
- U.S. Geological Survey — What Is a Topographic Map?
- U.S. Geological Survey — Topographic Maps
- U.S. Geological Survey — topoBuilder
- NOAA/NCEI — Magnetic Declination
Image Credits
- “Baseplatecompass.jpg” — Simon Shek, Wikimedia Commons, CC BY-SA 2.0.
- “USMC-120322-M-PT151-022.jpg” — Pfc. Franklin E. Mercado / U.S. Marine Corps, public domain.
- “Vindelfjallen topographic map-en.svg” — Mickaël Delcey (Silverkey), Wikimedia Commons, CC BY-SA 4.0.