

Quick answer: A successful balcony vegetable garden starts with five decisions in the right order: measure your usable sunlight, confirm how much weight and water your space can safely handle, choose containers with real drainage, match crops to the light and root volume you can provide, and build a watering routine you can maintain in hot weather. Start with a small group of dependable crops rather than filling every corner at once. Leafy greens and herbs can work with less direct sun, while tomatoes, peppers, cucumbers, and other warm-season fruiting crops usually need a brighter location and larger containers.
Growing food on a balcony sounds simple because the physical scale is small. In practice, the smaller space makes every decision more important. A garden bed can buffer mistakes because it holds more soil, more moisture, and a larger community of roots and soil organisms. A container has very little reserve. One undersized pot can dry out before dinner. One blocked drainage hole can keep roots waterlogged. A sunny wall can turn a pleasant balcony into a heat trap. A windy upper floor can bend plants that looked perfectly healthy at ground level.
The good news is that container gardening is highly controllable. You choose the growing mix, container size, location, crop, support, and irrigation method. That makes a balcony an excellent place to learn how plants respond to light, water, nutrients, temperature, and space. This guide walks through the entire process as a practical system, not as a decorative list of plants to buy.
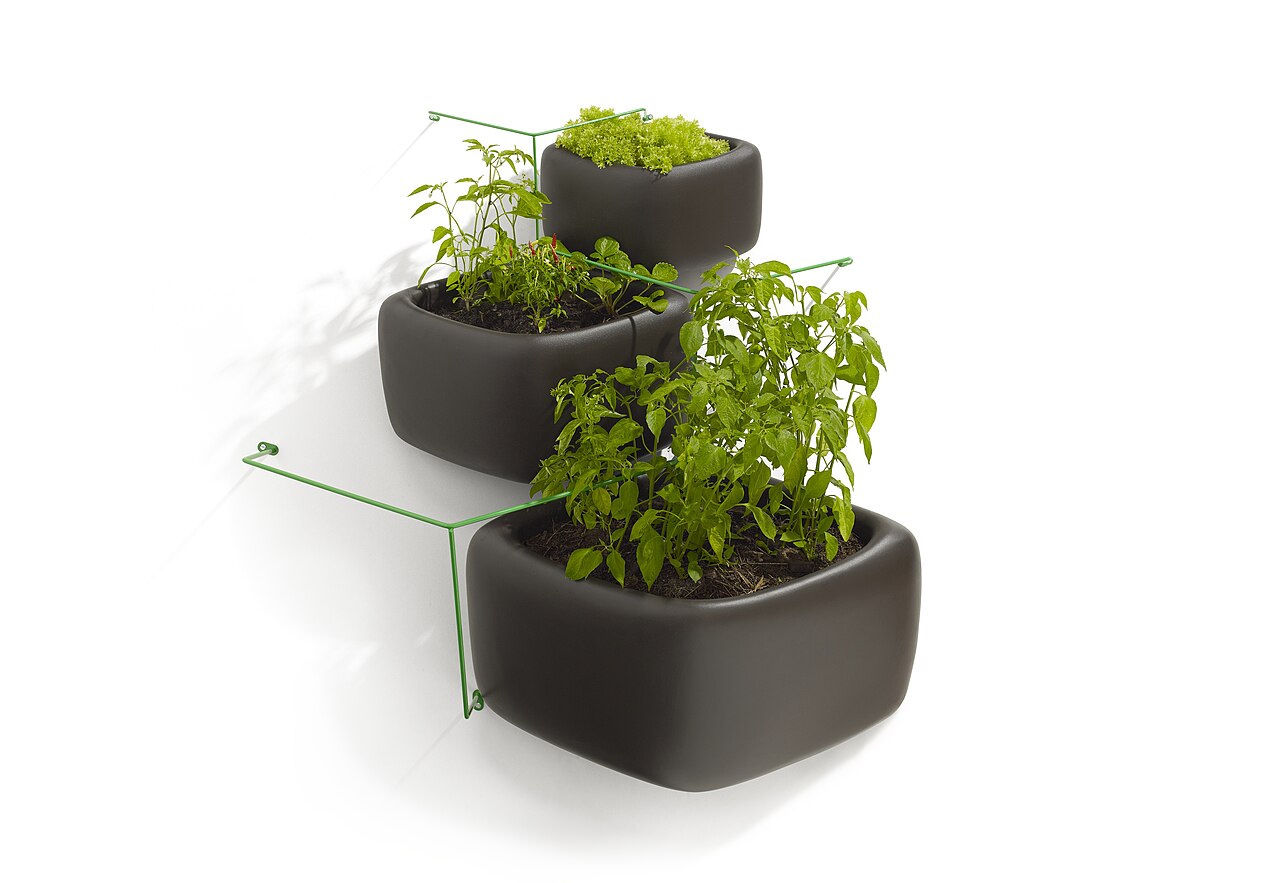 A vertical container system shows how unused wall space can become productive growing space. Image: Haldane Martin, Wikimedia Commons, CC BY 2.0.
1. Start by auditing the balcony, not by buying plants
The most common beginner mistake is beginning at the garden center. Attractive seedlings create urgency, but the balcony itself decides what will survive. Spend one normal day observing the space before you buy anything. Record where direct sunlight reaches, how long it stays, where wind enters, where water can drain, and which surfaces become unusually hot.
Measure usable direct sunlight
Do not estimate sunlight from how bright the balcony feels. Bright shade and direct sun are different growing conditions. Check the space several times across the day and note when sunlight actually strikes the leaves or the floor where containers would sit. The University of Maryland Extension notes that warm-season crops such as tomatoes, peppers, eggplants, and squash generally need about six to eight hours of direct sun, while cool-season greens such as lettuce, spinach, and Asian greens can often work with roughly three to five hours.
If your balcony receives strong morning sun but becomes shaded after lunch, that can still be useful. Lettuce, parsley, cilantro, chives, mint, arugula, radishes, and some compact leafy vegetables may perform well. If the balcony receives strong afternoon sun, heat becomes a more important management issue. A west-facing wall, dark floor, glass railing, or nearby brick can reflect heat into containers long after the sun reaches them directly.
How to verify your measurement: Mark three candidate container positions with tape. At 8 a.m., 10 a.m., noon, 2 p.m., 4 p.m., and 6 p.m., note whether each point is in direct sun, bright shade, or deep shade. Repeat once on a clear day if the first day is cloudy. Your result is more useful than a generic label such as “south-facing balcony,” because nearby buildings, overhangs, and railings can completely change exposure.
Common mistake: Counting light through a window or bright reflected light as full direct sun. Plants can grow in bright indirect light, but fruiting vegetables may become weak, stretched, or unproductive if their true direct-sun requirement is not met.
Check wind before you choose tall crops
Upper-floor balconies can funnel wind between buildings. Wind increases water loss, cools or dries leaves, and can topple tall plants. A tomato that is easy to stake in a protected courtyard may need a heavier pot and stronger support on a windy balcony.
Watch lightweight objects, hanging fabric, or existing plants. If leaves or objects move strongly most afternoons, treat the location as windy. Use broad, stable containers, place taller plants closer to a protected wall where practical, and avoid creating a solid wind barrier that could act like a sail. A porous screen can reduce force while still allowing air movement.
Confirm drainage and neighbor impact
Every normal container should have a way for excess water to leave. At the same time, that water cannot simply pour onto a neighbor below. Decide where runoff will go before planting. Trays can protect surfaces, but they should not become permanent pools around the bottom of pots. University of Maryland guidance warns that containers and drainage can stain decks and balconies, and emphasizes that excess water must be able to drain rather than leave roots sitting in water.
If you use saucers, empty them after watering once the pot has drained. Pot feet or small risers can improve airflow under a container and help drainage holes remain open. On a balcony with strict runoff rules, self-watering containers can be especially useful because they hold a reservoir and release overflow from a controlled point.
Respect structural load limits
Wet potting mix is much heavier than an empty planter. Large ceramic containers, water reservoirs, soil, trellises, and groups of pots can create significant concentrated weight. The University of Maryland notes that a large container filled with moist growing medium and plants can become surprisingly heavy. If you live in a rental or apartment building, review balcony rules before adding large planters, heavy raised beds, or attached structures. When in doubt about load capacity, keep the system small and use lightweight containers rather than guessing about structural limits.
2. Choose a garden goal that fits your space
A balcony garden becomes easier when you decide what success means. “Grow vegetables” is too vague. A better target might be “harvest salad greens twice a week,” “grow herbs for cooking,” “produce cherry tomatoes in summer,” or “learn container gardening with four pots.” Each target leads to different container sizes, crops, and care routines.
For a first season, choose one main goal and one optional experiment. For example, make reliable herbs and salad greens the main project, then try one tomato as the experiment. This prevents a single demanding plant from defining the success or failure of the whole garden.
High-yield goals for very small balconies
- Fresh herbs: basil, parsley, chives, thyme, oregano, mint, and cilantro can provide repeated harvests from modest space.
- Cut-and-come-again greens: lettuce, arugula, baby kale, and some Asian greens can be harvested by taking outer leaves while allowing the center to continue growing.
- Compact fruiting plants: dwarf or patio tomatoes and compact peppers can produce well if they receive enough sun and root volume.
- Vertical crops: pole beans and compact cucumbers can turn railing or trellis height into productive space, provided the support is secure.
- Quick roots: radishes and small-rooted carrots can work in sufficiently deep containers and offer a clear harvest cycle.
Do not choose crops simply because they are expensive at the store. Choose crops you actually eat and that match your conditions. Corn, sprawling melons, large pumpkins, and full-size indeterminate tomatoes can be grown in containers under the right conditions, but they are usually less forgiving for a beginner with limited balcony space.
3. Match crops to light before matching them to containers
Light is the hardest resource to manufacture on a balcony. You can buy a larger pot and a better growing mix, but you cannot make a shaded balcony behave like an open sunny yard without supplemental lighting. That is why crop selection should begin with the sunlight audit.
If you have six to eight hours of direct sun
You have the widest choice. Tomatoes, peppers, eggplants, cucumbers, bush beans, many herbs, and compact squash become realistic. Fruiting plants use substantial energy, so stronger sun generally supports better flowering and fruit development.
Start with varieties described as patio, compact, bush, dwarf, or container-friendly. These labels do not guarantee success, but they often indicate a plant habit better suited to limited space. A dwarf tomato may still need a substantial container; “compact” refers mainly to plant habit, not to a magically tiny root system.
If you have three to five hours of direct sun
Build the garden around leafy greens and herbs. Lettuce, spinach during suitable temperatures, arugula, mustard greens, chard, parsley, cilantro, and chives are more realistic than expecting a heavy tomato harvest. Some crops may tolerate the light but grow more slowly.
Use the brightest part of the balcony for the most demanding plant and place shade-tolerant herbs or greens around it. A tiered arrangement can help, but avoid letting the upper tier cast unnecessary shade over everything below.
If you have less than three hours of direct sun
Be conservative. Some leafy herbs and greens may survive in bright indirect light, but productivity can be limited. Consider growing microgreens indoors near a bright window or under a suitable grow light rather than forcing sun-loving vegetables onto a dark balcony.
How to verify crop fit: After two to three weeks of active growth, compare new growth with the plant’s expected form. Long, weak stems leaning toward light, very wide spacing between leaves, slow growth, and poor flowering can indicate insufficient light. Do not respond by adding fertilizer first; fertilizer cannot replace light.
4. Select containers by root volume, stability, and drainage
The container is not just decoration. It is the plant’s entire root environment. A container that is too small creates three problems at the same time: less water reserve, less nutrient reserve, and less physical space for roots. That forces you to water more often while the plant becomes more vulnerable to heat and nutrient stress.
 Large lightweight containers can provide more root volume without the weight of masonry planters. Image: Smart Pot, Wikimedia Commons, CC BY-SA 4.0.
Use bigger containers for long-season fruiting crops
Penn State Extension advises that a single tomato can need a pot around twenty inches wide, while peppers and eggplants can do well in smaller but still substantial containers around fourteen inches. Exact requirements vary by variety and pot shape, but the principle is consistent: a mature fruiting plant needs meaningful root volume.
Greens and herbs can use smaller containers, though a slightly larger shared planter often makes watering easier because it dries more slowly. Deep-rooted vegetables need depth as well as surface area. Always check the seed packet or cultivar information for spacing and expected plant size.
Choose the material deliberately
Plastic: lightweight, inexpensive, and slower to lose moisture through the sides. It is often the easiest beginner choice on a balcony.
Fabric grow bags: lightweight and easy to store, but they can dry quickly in hot or windy locations. They are useful when you need large root volume without a heavy rigid pot.
Unglazed terra cotta: attractive and breathable, but moisture evaporates through the porous wall. In hot weather you may need to water more frequently.
Glazed ceramic: holds moisture better than unglazed clay but can be heavy and breakable.
Wood: can work for larger planters, but consider durability, drainage, and whether the material or treatment is appropriate for growing edible crops.
Metal: durable but can become very hot in intense sun. A metal container exposed to strong afternoon heat can warm the root zone more than expected.
Drainage holes are non-negotiable
A decorative pot without drainage is a cachepot, not automatically a safe growing container. Excess water must have an exit. University of Maryland guidance specifically notes that gravel, broken pot pieces, or rocks at the bottom do not fix poor drainage. In fact, adding a gravel layer can create an unfavorable perched water zone rather than solving the problem.
If you love a decorative container with no hole, place a properly drained nursery pot inside it and remove the inner pot for watering. Allow it to drain completely before returning it. This “double pot” method protects the decorative container while keeping the root system functional.
Use self-watering containers when daily watering is difficult
A self-watering container uses a reservoir below the growing medium and a wicking system that makes water available to roots. It still needs an overflow path so excess water does not drown the root zone. This design can greatly increase your margin for error during hot weather or busy workdays.
Self-watering does not mean maintenance-free. You still need to fill the reservoir, monitor plant condition, manage nutrients, and occasionally flush the growing medium if salts accumulate. But it can make the difference between a manageable garden and a row of pots that dries out every afternoon.
5. Fill containers with potting mix, not ordinary garden soil
One of the most important distinctions in container gardening is the difference between ground soil and container growing media. Straight garden soil is often too dense for pots. Once confined, it can compact, drain poorly, and leave roots without enough air.
Penn State Extension recommends a soilless potting mix rather than straight garden soil for container vegetables. These mixes typically combine materials such as bark, peat or coconut coir, perlite, and vermiculite to create both water-holding capacity and air space.
What a good mix should do
- Drain excess water after thorough irrigation.
- Hold enough moisture that roots do not dry immediately.
- Remain porous enough for oxygen to reach roots.
- Support the plant physically.
- Hold nutrients while allowing excess salts to wash out.
A bag labeled “garden soil” is not the same as potting mix. Read the package. Choose a product designed for containers or raised planters when appropriate. If you reuse an old potting mix, remove old roots, evaluate compaction and disease history, and refresh it with new material rather than assuming it has the same structure and nutrients as a fresh mix.
Use compost as an amendment, not necessarily the entire medium
Finished compost can improve fertility and water-holding capacity, but pure compost can behave differently depending on source and maturity. Penn State notes that finished compost can be incorporated into a soilless mix, while University of Maryland guidance suggests adjusting fertilizer if a mix contains a high proportion of compost.
For a first-year balcony garden, a commercially prepared container mix is simpler and more predictable than inventing a complicated recipe. You can experiment later after you know how quickly your particular balcony dries out.
6. Decide whether to start from seed or transplants
Seeds are inexpensive and give access to a huge range of varieties. Transplants save time and reduce the risk of losing tiny seedlings to weather, overwatering, or neglect. The best choice depends on the crop.
Crops that are easy to direct sow
Radishes, beans, peas, carrots, lettuce, arugula, and many fast greens can be sown directly in the final container. Root crops are especially convenient to direct sow because transplanting can disturb the developing root.
Crops where transplants can simplify the first season
Tomatoes, peppers, eggplants, and many herbs are easy to purchase as established transplants. Starting them from seed is absolutely possible, but it adds indoor light, timing, potting-up, and hardening-off steps. A beginner who wants a productive balcony quickly may gain more from buying healthy transplants and focusing on container care.
Inspect nursery plants before buying. Look for compact growth, healthy color, intact stems, and no obvious clusters of insects under leaves. Avoid choosing the tallest plant simply because it looks mature. A compact, well-rooted transplant can establish better than a stretched plant that has outgrown its pot.
 Transplants can shorten the path to harvest for long-season crops. Image: Nenad Stojković / Shixart1985, Wikimedia Commons, CC BY 2.0.
7. Plant at the right density instead of filling every empty space
A newly planted container looks empty because the plants are small. Beginners often respond by adding more plants. A month later, the same container becomes a crowded mass competing for light, water, airflow, and nutrients.
Use mature spacing, not seedling size, to plan. Read the seed packet or plant label. If you want a dense display, use crops that tolerate close harvesting, such as baby greens, and plan to thin or harvest them early.
Prepare dry potting mix before planting
Some peat-based mixes repel water when completely dry. University of Maryland recommends moistening the growing medium thoroughly before planting. Add water gradually and mix until the medium is evenly damp rather than leaving dry pockets inside the pot.
Leave watering space at the top
Do not fill the container level with the rim. Leave roughly an inch or so of headspace. That allows you to water deeply without immediately washing mix over the edge.
Install supports early
Tomatoes, cucumbers, pole beans, peppers, and eggplants can benefit from support. Installing a cage, stake, or trellis while the plant is small reduces the chance of damaging a mature root system later.
On balconies, support must be secure in two directions: it must hold the plant, and it must not become unsafe in wind. Do not tie a large trellis to a railing unless building rules and the physical design clearly allow it. A freestanding support anchored by the container may be safer.
8. Build a watering method based on observation, not a calendar
Water management is where container gardens most often succeed or fail. University of Maryland identifies improper watering—both too much and too little—as a major cause of failure in container vegetables.
The goal is not “water every day.” The goal is to keep the root zone appropriately moist while allowing air into the mix. Weather, crop size, pot material, sun, wind, and container volume all change how quickly a pot dries.
Use the finger test and container weight
Push a finger below the surface. If the medium is still moist at root level, the plant may not need water yet. Lightweight containers also give a useful clue: lift or slightly tilt the pot when it is thoroughly watered, then compare that weight with the weight as it dries. With practice, you can recognize dryness before the plant wilts.
Water thoroughly when watering is needed
Apply water slowly to the growing medium around the base of the plant. Continue until the entire root zone is moistened and excess water exits the drainage holes. A quick splash that only wets the surface encourages roots to remain shallow and can leave the lower container dry.
A watering can with a gentle rose or a hose attachment that softens the stream helps prevent potting mix from being blasted out of the container. Direct water at the medium rather than repeatedly wetting foliage, especially when disease conditions are favorable.
Expect hot weather to change the schedule
A container that needs water every two or three days in mild weather may need daily attention during a hot, windy period. Large plants can transpire substantial water. Check pots daily during summer until you understand their pattern.
If you repeatedly arrive home to wilted plants, do not simply water more in the morning and hope. Increase container volume, add a suitable mulch layer, group compatible containers to reduce exposure, shift the pot out of the most extreme reflected heat if the crop can tolerate it, or move to a self-watering design.
Recognize overwatering
Overwatering is not just “too much water at one time.” A well-drained container can often accept a thorough watering. The problem is keeping the growing medium saturated for too long, especially when drainage is poor or the plant is using little water.
Yellowing, weak growth, fungus gnats, sour-smelling mix, and chronically wet soil can indicate excessive moisture, although these symptoms are not unique to overwatering. Check drainage holes, saucers, and root-zone moisture before deciding that the plant needs more fertilizer.
9. Feed container vegetables without overfertilizing them
Container plants have limited access to nutrients, and frequent watering can move nutrients out through drainage. That makes fertilization important, but more fertilizer is not automatically better. Excess fertilizer can burn roots, create salt buildup, and promote excessive leafy growth at the expense of balanced development.
Check whether your potting mix already contains fertilizer. Many commercial mixes include a starter charge or slow-release product. If you add another full dose immediately, you may be doubling up unnecessarily.
Choose one simple feeding system
For beginners, either a labeled slow-release fertilizer incorporated according to package directions or a water-soluble fertilizer applied at the labeled interval is easier than mixing multiple products. Long-season vegetables such as tomatoes, cucumbers, peppers, and eggplants often need continuing nutrition because they remain in the same pot while producing for months.
University of Maryland notes that long-season container crops may benefit from light fertilization around every two weeks depending on the product and growing conditions. Always treat the product label as the final instruction because fertilizer concentration varies widely.
Watch the plant, not just the calendar
Very dark soft growth, burned leaf edges, white crust on the soil surface, or poor performance after repeated feeding can indicate excessive salts or nutrition imbalance. If a plant is weak because it lacks light, has damaged roots, or is chronically dry, adding fertilizer may make the problem worse rather than better.
10. Use vertical space without creating shade or wind hazards
Balconies have limited floor area but often have unused height. A trellis can make beans, cucumbers, and some tomatoes productive without consuming the whole floor. Hanging baskets and wall planters can hold herbs or strawberries where appropriate. Tiered shelves can place short crops at different heights.
The key is to treat vertical structures as part of the light plan. A six-foot wall of beans can shade every container behind it. Put the tallest crops where their shadow causes the least harm. In the northern hemisphere, that often means positioning tall plants toward the side that does not block the main sun path, but surrounding buildings can change the pattern, so observe your specific space.
Keep access in the design
A productive balcony still needs a walking path. You must be able to reach the back of pots to check pests, tie stems, harvest fruit, and water evenly. If you pack containers so tightly that you cannot inspect them, small problems stay hidden until they become large problems.
Leave enough clearance to open doors, access drains, and move safely. Do not create trip hazards with irrigation tubing, loose stakes, or saucers in narrow walkways.
11. Manage heat as carefully as sunlight
A balcony can be hotter than the official air temperature because hard surfaces absorb and reflect solar energy. Concrete, brick, glass, dark railings, and walls can create a local microclimate. The same six hours of sun can be pleasant in spring and punishing in midsummer.
Signs of excessive heat
Plants may wilt during the hottest part of the day even when the pot is moist. Leaves may scorch along exposed edges, flowers may drop, and potting mix may heat dramatically. Some temporary midday wilting can recover in the evening, but repeated heat stress can reduce growth and yield.
Move dark pots away from reflective walls if possible. Use a larger container to buffer root temperature. Group pots without overcrowding foliage. A light mulch layer can reduce surface evaporation. During extreme heat, temporary shade cloth can protect susceptible crops during the most intense afternoon period, but do not permanently reduce light below what a fruiting crop needs.
12. Plan for pests with inspection before treatment
Container gardens often have fewer pest problems than large ground gardens, but they are not pest-free. Aphids, whiteflies, spider mites, caterpillars, slugs, and fungus gnats can still appear. The advantage of a balcony is that you can inspect every plant closely.
Create a two-minute inspection routine
Twice a week, check the underside of leaves, new growing tips, stems near the soil line, and the surface of the potting mix. Look for clusters of insects, sticky residue, webbing, holes, discolored stippling, eggs, or frass. Early detection gives you more options.
Do not spray a pesticide because a leaf looks damaged. First identify the likely cause. Wind, sun scorch, nutrient problems, root damage, and disease can resemble insect injury. If you find an insect, use a reliable extension or university identification resource and choose the least disruptive control that fits the problem.
Use physical controls first when practical
For a small number of aphids, a firm stream of water or hand removal may be enough. Caterpillars can often be picked off. Severely infested leaves can sometimes be removed without harming the plant. If you use any pesticide, even a product described as natural or organic, follow the label exactly and confirm that it is labeled for the crop and pest involved.
13. Prevent disease through airflow and watering habits
Disease management begins before symptoms appear. Overcrowding keeps leaves wet and reduces airflow. Watering leaves late in the day can extend moisture duration. Reusing a contaminated container or diseased plant debris can carry problems forward.
Space plants according to their mature habit, prune only when the crop benefits from it, and remove dead or obviously diseased material. Water the growing medium rather than soaking leaves as a routine. Clean tools after working with a diseased plant before using them on healthy plants.
If a plant develops a serious disease, identify it before treating. Many different problems create yellow leaves or brown spots. A photo and crop-specific extension resource can often narrow the diagnosis more effectively than a generic search for “brown tomato leaves.”
14. Pollinate fruiting crops when the balcony environment needs help
Tomatoes and peppers are self-fertile and their flowers can release pollen through vibration, so wind and normal movement often help. Cucumbers and squash can produce separate male and female flowers and may depend more on insect visits unless you grow a parthenocarpic variety that sets fruit without pollination.
If tomato flowers form but repeatedly fall without fruit under otherwise good conditions, lightly shaking the support or tapping flower clusters can help pollen move. However, poor fruit set can also result from heat, cold, insufficient light, excess nitrogen, or general plant stress. Do not assume pollination is the only cause.
For crops with distinct male and female flowers, learn to recognize both. If pollinators rarely reach your balcony, hand pollination with a small clean brush can move pollen from a male flower to the female flower. This is a targeted technique, not a requirement for every balcony crop.
15. Use succession planting so the garden does not peak all at once
A single sowing of lettuce can create too much harvest for one week and none a month later. Succession planting means sowing a smaller amount at intervals so new plants replace harvested ones.
For fast greens and radishes, sow a short row or small section, then repeat after a week or two depending on crop and season. Keep records because temperature changes germination and growth speed. In hot weather, cool-season greens may bolt quickly and succession planting may need to pause until temperatures moderate.
Reset containers between crops
Remove old roots and plant debris, check drainage, loosen compacted media, and refresh nutrients as appropriate before replanting. If the previous crop had a serious soil-borne disease, replacing the mix may be safer than immediately reusing it for a susceptible crop.
16. Build a simple four-container starter garden
If the amount of information feels overwhelming, start with four containers. This setup is large enough to teach the core skills while remaining manageable.
Container A: herbs
Use a medium planter for parsley and chives or another compatible combination. Keep mint in its own pot because it can spread aggressively. Basil prefers warmer conditions and more sun than some cool-season herbs, so match the combination to season and exposure rather than mixing plants only because they are all called herbs.
Container B: leafy greens
Use a broad planter for lettuce, arugula, or baby greens. Sow lightly, thin seedlings, and harvest outer leaves. This container teaches watering because leafy greens respond quickly to dryness but do not need the enormous root volume of a mature tomato.
Container C: one compact pepper
Choose a healthy transplant and a generous container. Place it in the brightest location. Add support if needed. This crop teaches long-season feeding and monitoring.
Container D: one dwarf or patio tomato
Use the largest pot in the group and install its cage or stake at planting. This crop teaches the importance of root volume, consistent moisture, support, nutrition, and pollination conditions.
With these four containers, you can observe four different growth habits without creating a maintenance burden. If you can keep them healthy for six to eight weeks, expand intentionally rather than impulsively.
17. Create a weekly maintenance routine that takes less than an hour
Balcony gardens fail less often from one dramatic mistake than from small maintenance tasks being postponed. A short routine is easier to sustain than occasional rescue sessions.
Daily, two to five minutes
- Check moisture in containers during warm weather.
- Look for severe wilting, broken stems, or wind damage.
- Harvest ripe produce before it overripens.
Twice weekly, ten minutes
- Inspect leaf undersides and new growth for pests.
- Tie growing vines or stems to supports with soft ties.
- Remove dead leaves and fallen fruit.
- Check that drainage holes and saucers are clear.
Weekly, fifteen to thirty minutes
- Record what you harvested.
- Check fertilizer timing against the product label.
- Rotate movable containers if one side receives much more light and the crop benefits from balanced exposure.
- Sow the next succession of greens if conditions are suitable.
- Clean the balcony floor and keep drains accessible.
18. Diagnose problems by changing one variable at a time
When a plant struggles, beginners often change everything: more water, more fertilizer, a new location, pruning, and a pesticide on the same day. That makes diagnosis impossible and can compound the stress.
Instead, work through a sequence.
Step 1: Check moisture at root depth
Is the mix dry, evenly moist, or saturated? Do not judge from the surface alone.
Step 2: Check drainage
Does water leave the pot? Is the saucer full? Are holes blocked by the floor or compacted media?
Step 3: Check actual sunlight
Has a seasonal sun angle, new shade, or nearby structure reduced light? Is the plant stretching toward the balcony edge?
Step 4: Check temperature and wind
Did the problem appear after a heat wave, cold night, or unusually windy day?
Step 5: Inspect pests and disease
Look closely rather than treating preemptively. Photograph symptoms in good light and compare them with crop-specific extension resources.
Step 6: Review feeding history
When was fertilizer last applied? Does the potting mix already contain slow-release fertilizer? Has the plant been repeatedly fed because growth seemed slow?
Change the most likely cause and observe for several days unless the plant is in immediate danger. Old damaged leaves may not repair themselves, so judge improvement by new growth and overall plant behavior.
19. Know what common symptoms can mean
Plant wilts every afternoon but recovers at night
Possible causes include heat stress, insufficient container volume, or a root system that cannot supply water as fast as leaves lose it. Check moisture before adding water. If the mix is wet, more irrigation may not help.
Lower leaves yellow while growth slows
Possible causes include nutrient shortage, root stress from overwatering, normal aging, disease, or insufficient light. Review the whole system rather than assuming nitrogen deficiency.
Leaves are pale and stems are long
Insufficient light is a strong possibility, especially if the plant leans toward the balcony edge. Move it to a brighter position if available before increasing fertilizer.
Flowers appear but no fruit develops
Check temperature, sunlight, water consistency, pollination, and excess nitrogen. In tomatoes, very hot or cold conditions can interfere with fruit set even when the plant looks vigorous.
Potting mix grows green algae
The surface may be staying wet for long periods. Improve watering intervals and airflow, but also check whether the container remains saturated below the surface.
20. Prepare the garden for travel and busy weeks
Containers can become dependent on daily attention during hot weather. If you travel often, design around that reality from the start.
Use larger containers that dry more slowly, self-watering planters, a properly installed drip system with a timer where building rules allow, or a trusted person who can check moisture. Test any automatic system for at least a week before leaving. A timer setting that seems correct on paper may overwater one pot and underwater another.
Move highly vulnerable containers out of extreme reflected heat before a short trip if the crops can tolerate slightly less light. Harvest ripe fruit and remove dead plant material. Do not apply an unusually heavy dose of fertilizer immediately before leaving.
21. Garden responsibly in a shared building
A balcony is part garden and part building infrastructure. A productive setup should not create runoff, falling objects, blocked drains, insects, or unauthorized attachments.
- Secure lightweight pots and supports against wind.
- Keep containers back from edges when possible.
- Never place heavy objects on a railing.
- Do not allow irrigation water to drip onto balconies or pedestrians below.
- Keep emergency exits, doors, and drainage points clear.
- Follow building restrictions on drilling, trellises, hanging planters, and visible structures.
- Manage compost cautiously; a conventional outdoor compost pile is usually inappropriate for a small shared balcony unless the building specifically allows a contained system.
22. Harvest in ways that encourage continued production
Harvest is part of plant care. Leaving mature cucumbers, beans, zucchini, or peppers on a plant can redirect energy toward seed maturation rather than continuing production. Frequent picking can encourage some crops to keep flowering.
For leafy greens, take clean outer leaves while leaving the central growing point intact when the crop is suitable for repeated harvest. For herbs such as basil, harvest above a node so branching can continue. Do not remove so much foliage at once that the plant loses its ability to photosynthesize effectively.
Use clean scissors or pruners for stems that do not snap easily. Support the plant with one hand while harvesting heavy fruit so you do not tear branches.
23. Keep a tiny garden log instead of relying on memory
You do not need a gardening app or complicated spreadsheet. A note on your phone is enough. For each container, record the crop, variety, planting date, container size, approximate daily sun, fertilizer used, and first harvest date.
The most valuable note is often a failure note: “Pepper pot dried by 3 p.m. in July,” “lettuce bolted after balcony began receiving afternoon sun,” or “tomato produced well only after moving two feet away from the wall.” Those observations become your customized growing guide for the exact microclimate of your home.
24. Plan the second season from evidence
At the end of the season, sort crops into three groups: definitely repeat, repeat with changes, and not worth the space. A tomato that produced two fruits after months of care may not deserve your brightest corner next year. A small parsley pot that supplied weekly cooking herbs may be a much better use of space.
Ask four questions:
- Which crops did we actually eat?
- Which containers stayed moist enough without constant rescue?
- Where did the balcony provide the best light and wind protection?
- Which tasks were annoying enough that we avoided them?
Use the answers to simplify. A good balcony garden is not the one with the most pots. It is the one that produces something useful while remaining easy enough to maintain.
A practical 30-day balcony garden launch plan
Days 1–3: Measure the site
Track direct sunlight, wind, drainage, and available floor space. Confirm building rules and decide how you will prevent runoff.
Days 4–6: Choose four crops
Select crops based on measured light and what you eat. Limit yourself to four container groups for the first month.
Days 7–10: Buy containers and potting mix
Choose containers with drainage and enough volume for mature roots. Buy a container-specific growing mix. If you choose a self-watering planter, understand how its reservoir and overflow work before planting.
Days 11–12: Install supports and prepare media
Position containers empty first. Make sure doors and drains remain clear. Install cages or trellises. Moisten dry potting mix evenly.
Days 13–14: Plant
Sow direct-seeded crops and transplant established plants. Label each container. Water thoroughly until excess exits the drainage holes.
Days 15–21: Learn the watering pattern
Check moisture daily without automatically watering. Note how long each pot takes to dry under your normal weather. Adjust container placement if one location is much hotter or windier than expected.
Days 22–30: Start the maintenance rhythm
Inspect pests twice, tie or train growing stems, thin crowded seedlings, and record plant response. By day 30, you should know which pot dries first, which spot receives the strongest sun, and which crop is growing most confidently.
Frequently asked questions
Can vegetables really grow well on an apartment balcony?
Yes, if the balcony provides enough light for the chosen crop and the containers provide adequate root volume, drainage, water, and nutrition. The University of Maryland Extension specifically identifies balconies as suitable locations for container vegetable gardens. The limiting factors are usually sunlight, container size, heat, and consistent watering rather than the fact that the garden is elevated.
What are the easiest vegetables for a beginner balcony garden?
Leaf lettuce, arugula, radishes, chard, herbs, compact peppers, bush beans, and dwarf or patio tomatoes are common beginner choices. The easiest crop for your balcony depends on sunlight and season. A lettuce planter in bright morning sun may be much easier than a tomato on a shaded balcony.
Can I use regular soil from a yard in balcony pots?
It is usually better to use a container potting mix. Ground soil can become dense and poorly aerated when confined in a pot. A soilless container mix is designed to balance drainage, air space, and moisture retention.
Should I put rocks at the bottom of pots for drainage?
No. Extension guidance from the University of Maryland notes that gravel, rocks, or broken pot shards do not improve drainage and can worsen the water distribution in the container. Use an appropriate growing mix and real drainage holes instead.
How often should balcony vegetables be watered?
There is no universal schedule. Check moisture before watering. Hot weather, wind, small containers, mature plants, and porous pots increase water use. During summer, some containers may need daily checks or even more frequent attention under extreme conditions, while others may remain moist for several days.
What can I grow with only four hours of sunlight?
Focus on leafy greens and herbs that tolerate lower light, such as lettuce, spinach in suitable weather, arugula, parsley, cilantro, and chives. Fruiting crops such as tomatoes and peppers are less reliable without stronger direct sun.
Are grow bags good for balconies?
They can be. Grow bags are lightweight and provide useful root volume, but they often dry faster than nonporous pots. They are best when you can monitor moisture consistently and manage runoff.
Can I grow tomatoes in a five-gallon bucket?
Some compact tomato varieties can be grown in a bucket-sized container, but larger tomatoes generally perform better with more root volume. Container recommendations vary by cultivar. If you use a bucket, it must be food-safe where relevant, stable, and have adequate drainage. A larger pot can reduce watering stress.
Why does my balcony tomato have flowers but no tomatoes?
Potential causes include insufficient light, temperature extremes, inconsistent water, excess nitrogen, or poor pollen movement. Gently vibrating flower clusters can help pollen release in tomatoes, but correct the environmental cause if the plant is stressed.
How can I keep a balcony garden alive while traveling?
Use larger or self-watering containers, test drip irrigation before leaving, group pots where appropriate, harvest ripe produce, and arrange a reliable person to check the garden during hot weather. Never test a brand-new automatic watering system for the first time after you leave.
Sources and further reading
- University of Maryland Extension: Growing Vegetables in Containers and Salad Tables
- University of Maryland Extension: Growing Vegetables in Containers
- University of Maryland Extension: Types of Containers for Growing Vegetables
- Penn State Extension: Container Vegetable Gardening — Four Keys to Success
Start with one container you can manage well
The first goal of a balcony vegetable garden is not maximum yield. It is learning the relationship between your specific space and the plants living in it. Begin with measured sunlight, one dependable watering method, containers large enough for mature roots, and crops that match the conditions you actually have. The biggest mistake to avoid is buying a balcony full of plants before you know how quickly the space dries out or how much direct sun reaches it.
Your first practical step is simple: tomorrow, record direct sunlight on the balcony at several times of day. That one observation will make every decision that follows—crop choice, container placement, watering, and expected harvest—more accurate. Once you can keep a small set of containers healthy through changing weather, expansion becomes easy because you are building on evidence rather than guesswork.