

Quick answer: You can handle many everyday clothing repairs with a hand needle, all-purpose thread, small scissors, pins or clips, and a few stitches. Learn the running stitch for temporary or light work, the backstitch for strong seams, the whip stitch for edges and some patches, and the slip or ladder stitch for less-visible closures. Match the needle and thread to the fabric, keep thread lengths manageable, avoid pulling stitches so tight that the fabric puckers, and follow the garment’s care label after the repair. Start on scrap fabric before repairing a favorite garment.
 Hand sewing is a practical repair skill: the same basic tools can secure buttons, close opened seams, repair hems, and attach patches. Image: Azorbli, Wikimedia Commons, CC BY-SA 4.0.
A sewing machine is useful, but it is not required for a surprising number of repairs. A shirt button can be replaced at a kitchen table. A split seam can be closed with a backstitch. A dropped hem can often be secured with a nearly invisible stitch. A small tear can be stabilized before it grows. Learning these repairs can save a wearable garment from being discarded simply because one small part failed.
The difficult part for beginners is rarely pushing a needle through fabric. The difficult part is deciding which stitch to use, how tight to pull the thread, how to make the repair strong without making it bulky, and when a garment is too damaged for a simple hand repair. This guide treats sewing as a troubleshooting skill rather than a decorative craft. You will learn how to inspect the failure, choose a repair strategy, practice the necessary stitch, complete the work, and check whether the repair can survive real use and laundering.
1. Diagnose the Problem Before You Thread the Needle
Do not start by sewing the first two edges you can grab. Look at how the garment originally failed.
Common repair categories include:
- Open seam: the thread holding two fabric pieces together broke, but the fabric itself is mostly intact.
- Torn fabric: the fibers of the cloth split or ripped, so sewing the edges directly may concentrate stress and tear again.
- Loose hem: the folded lower edge of a sleeve, trouser leg, skirt, or shirt came detached.
- Missing button: the button detached, sometimes leaving enlarged or damaged holes.
- Loose button: the button is still attached but its thread is fraying or stretched.
- Small hole: the fabric is worn through, often at an elbow, knee, pocket corner, sock, or friction point.
- Detached trim: a patch, label, belt loop, hook, or decorative element is coming loose.
- Fraying edge: a raw edge is shedding fibers and needs containment rather than simple seam closure.
The repair method depends on the failure. A split seam is often ideal for backstitch because the original seam line tells you exactly where the fabric should meet. A tear in thin fabric may need a patch or backing because pulling the torn edges together can distort the garment. A loose hem needs a stitch that catches only a small amount of the outer fabric so the repair remains discreet.
Success check: Before sewing, you should be able to describe the failure in one sentence: “The seam thread broke but the fabric is sound,” or “The fabric itself is worn thin around the hole.” If you cannot tell which one happened, slow down and inspect both sides under good light.
2. Read the Care Label Before You Choose Repair Materials
A repair becomes part of the garment. That means it must tolerate the same washing, drying, and ironing routine as the surrounding fabric.
The U.S. Federal Trade Commission’s Care Labeling Rule requires covered garments to carry regular care instructions and relevant warnings. For a home repairer, the useful lesson is simple: read the existing label before choosing thread, fusible products, patches, adhesives, or heat-based methods.
If a garment is labeled “dry clean only,” do not assume an adhesive patch designed for hot washing and tumble drying is appropriate. If a garment cannot tolerate a hot iron, do not use an iron-on repair without confirming compatibility. If the item is washed frequently, choose thread and patch fabric that can tolerate that cycle.
The care label also gives clues about fiber sensitivity. Delicate, loosely woven, coated, waterproof, pleated, or highly structured garments may need more conservative repairs than a cotton T-shirt.
Common mistake: Repairing the garment successfully, then destroying the repair during normal care because the added thread, patch, glue, or interfacing has different requirements.
3. Build a Small Hand-Sewing Kit
You do not need a large sewing box. A compact kit can handle most ordinary repairs.
Include:
- a small assortment of sharp hand-sewing needles;
- good-quality all-purpose polyester thread in black, white, navy, gray, and a few colors that match your wardrobe;
- small sharp scissors or thread snips;
- straight pins or fabric clips;
- a seam ripper;
- a thimble if you sew thick fabric;
- a flexible measuring tape;
- tailor’s chalk, washable fabric marker, or another appropriate temporary marking tool;
- a few common buttons;
- small scraps of stable fabric for patches;
- a needle threader if threading is difficult.
Add specialty items only when you need them. Heavy denim, leather, upholstery, stretch knit, and very fine silk may require different needles and thread. A basic repair kit should be simple enough that you actually reach for it.
4. Choose a Needle That Matches the Fabric
Needles vary in length, thickness, point style, and eye size. The correct needle should pass through the fabric without forcing an unnecessarily large hole.
For ordinary woven shirts, trousers, dresses, and household fabric, a general sharp hand-sewing needle is a sensible starting point. Fine fabric usually benefits from a finer needle. Heavy denim or canvas requires a stronger needle. Knits may be easier to repair with a ballpoint or appropriate knit needle because a sharp point can split yarns rather than move between them.
If you have to push so hard that the needle bends, the needle is probably too fine for the job, the fabric is too dense for that approach, or you need a thimble and a more suitable needle. Do not grip a resistant needle with bare fingers and force it unpredictably; slipping can cause injury.
Test first: Push the needle through an inconspicuous seam allowance or scrap of similar fabric. It should pass with controlled pressure and should not leave a visibly oversized hole.
5. Choose Thread by Strength, Thickness, and Appearance
For many clothing repairs, all-purpose polyester thread is practical because it is strong, widely available, and suitable for many fabrics. Cotton thread may be appropriate in some applications, especially where matching natural-fiber behavior matters, but there is no rule that every cotton garment must use cotton thread.
Match thread color to the garment when you want the repair to disappear. For hidden internal seams, exact color is less important. For visible mending, contrasting thread can be a deliberate design choice.
Avoid using very heavy thread merely because it feels stronger. Thick thread in fine fabric can create stiff ridges, large needle holes, or concentrated stress. The repair should be strong enough while remaining compatible with the cloth.
When repairing stretchy areas, ordinary thread may have limited give. Stitch choice, stitch spacing, and repair geometry matter. Highly elastic garments can require stretch-specific methods rather than simply tighter hand stitches.
6. Use a Manageable Thread Length
Beginners often cut an extremely long thread because they do not want to rethread the needle. Long thread usually creates more problems than it solves: knots, tangles, abrasion, uneven tension, and wasted time.
A comfortable working length is often around the distance from your hand to your elbow or somewhat longer, depending on your technique. If the thread repeatedly twists or knots, shorten it.
Cut the thread cleanly rather than chewing or tearing it. A crisp end passes through the needle eye more easily.
For most repairs, use a single strand unless the job genuinely needs doubled thread. Double thread can be useful for buttons and some high-stress tasks, but it also adds bulk. A strong backstitch with appropriate single thread can outperform a sloppy repair made with several strands.
7. Thread the Needle Without Fighting It
Work under bright light. Trim the thread end cleanly. Hold the needle so the eye is stable, bring the thread to the eye, and push through a short length. If your vision or dexterity makes that difficult, use a simple needle threader rather than turning threading into a test of patience.
Some needles have larger eyes designed for easier threading. There is no advantage in choosing the smallest eye possible if it prevents you from working comfortably.
Once threaded, leave a tail long enough that it will not pull out during your first stitches.
8. Decide Whether You Need a Knot
A knot is not the only way to secure hand sewing, but it is easy for beginners.
For a basic knot, wrap the end around a fingertip, roll the loop, and pull it into a small knot, or tie a simple overhand knot. Keep the knot small enough to hide in a seam allowance or folded hem.
For repairs where a bulky knot would show, you can secure the thread with several tiny backstitches in an inconspicuous area. Experienced sewists often use these anchoring stitches at beginnings and endings.
Goal: The thread should be secure without leaving a large hard lump that can be felt or seen on the finished garment.
9. Practice Tension Before You Practice Speed
Good hand sewing is not tight sewing. The thread should hold the fabric in position without pulling it into puckers.
Make several stitches on scrap fabric, then lay the sample flat. If the stitch line causes the fabric to wrinkle or gather unintentionally, you are pulling too hard. Loosen your tension.
If the loops are visibly slack or can catch on a finger, the stitches are too loose. Aim for the thread to rest against the surface without digging into it.
Tension is especially important on fine fabrics and hems, where over-tightening makes the repair more visible.
10. Learn the Running Stitch First
The running stitch is the simplest basic hand stitch and a useful way to learn spacing and tension.
- Bring the needle from the back of the fabric to the front.
- Move forward a short distance along your stitch line.
- Push the needle to the back.
- Move forward again and bring the needle to the front.
- Repeat to create a line of dashes.
You can make one stitch at a time or load several small fabric folds onto the needle before pulling the thread through.
Running stitch is useful for basting, gathering, temporary positioning, light seams, and some decorative repairs. iFixit’s current hand-stitch reference notes that classic running stitch is simple and useful for practice and basting, but it is not generally the strongest choice for a stressed permanent repair because the stitches are not locked.
Practice drill: Draw a 10-centimeter line on scrap fabric and sew along it while keeping stitch lengths and gaps reasonably consistent. Do not chase microscopic perfection. Learn to control rhythm.
11. Learn the Backstitch for Strong Repairs
Backstitch is one of the most useful stitches for repairing opened seams by hand. Utah State University Extension describes hand backstitch as a method for securing a seam or hem, and iFixit characterizes it as a particularly strong hand-sewing stitch suitable as a substitute for machine stitching in repairs.
To make it:
- Bring the needle up through the fabric.
- Move a short distance backward along the seam and take the needle down.
- Bring the needle up a stitch length ahead of your starting point.
- Move backward and insert the needle at the end of the previous stitch.
- Repeat, advancing forward while each visible stitch closes the previous gap.
On the front, a full backstitch can resemble a continuous line of machine stitching. On the reverse, the thread overlaps more heavily.
Why it is strong: Each stitch overlaps the previous path, so a local thread break is less likely to release a long section immediately.
Common mistake: Making very long backstitches because they are faster. Long stitches reduce control and can allow the seam to gape. Use shorter stitches in stressed areas and slightly longer ones where the fabric is stable.
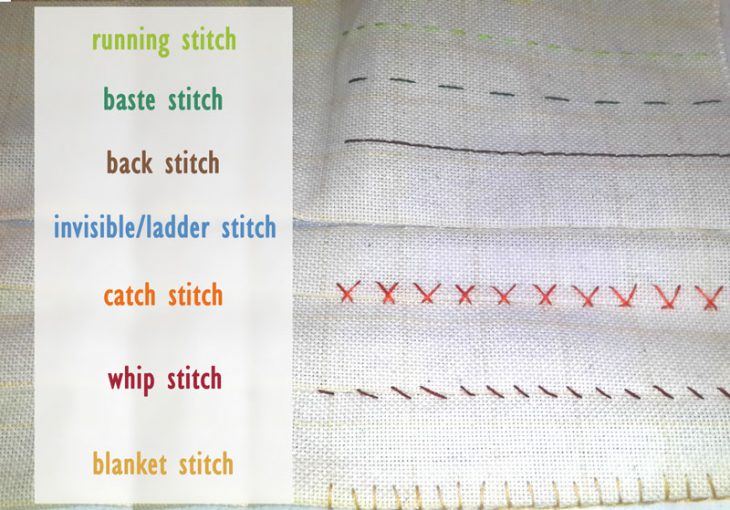 A stitch sampler makes the structural differences easier to see before you use a stitch on a real garment. Image: Hellosewing, Wikimedia Commons, CC BY-SA 4.0.
12. Learn the Whip Stitch for Edges and Patches
Whip stitch wraps over an edge in repeated diagonal stitches. It is useful for attaching some patches, joining felt or non-fraying edges, closing certain tears, and containing raw edges in situations where a visible edge stitch is acceptable.
- Anchor the thread on the back or between layers.
- Bring the needle through near the edge.
- Wrap the thread around the edge and insert again from the same side.
- Advance a small distance and repeat.
Keep the stitch spacing consistent and avoid pulling the edge into a cord-like roll unless that effect is intentional.
iFixit notes that whip stitch can be used to seal a tear, bind an edge, or attach a patch. It is versatile, but because it can be visible, it is not always the best choice for a formal garment.
13. Learn a Slip or Ladder Stitch for Less-Visible Closures
A slip stitch or ladder-style stitch is useful when you want to close a folded opening with minimal visible thread, such as a lining opening, stuffed item, or certain hem repairs.
The basic idea is to hide most of the thread inside the folds:
- Fold the raw edges inward along the intended seam.
- Hide the knot inside one fold.
- Take a short horizontal bite from one folded edge.
- Cross the opening and take a short bite from the opposite fold.
- Continue alternating sides.
- Pull gently so the two folded edges meet.
When tension is balanced, the thread resembles small ladder rungs before tightening and becomes much less visible after the edges close.
This stitch is excellent for appearance, but it is not automatically appropriate for every high-load seam. Choose based on stress as well as invisibility.
14. Use a Hemming Stitch When a Hem Drops
A hem folds a raw or finished edge to create a clean lower boundary. When the original hem stitches break, the goal is usually to reattach the fold without letting large stitches show on the outside.
First press or finger-crease the hem back to its original line. Pin or clip it in place. Then use a hemming or blind-style stitch that catches a tiny amount of the outer garment fabric and a larger bite of the folded hem allowance.
The smaller the bite of outer fabric, the less visible the repair. However, catching only a single fragile fiber can create weak attachment. Practice on scrap or a hidden section to find the balance.
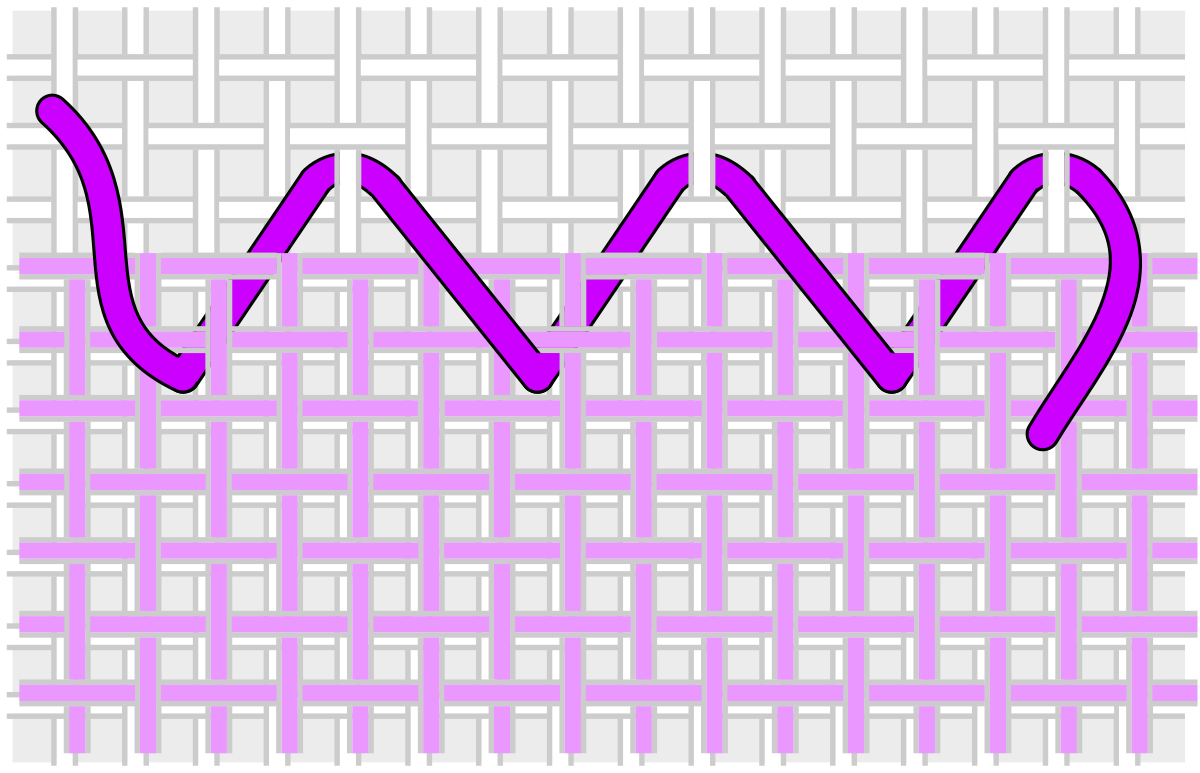 A hemming stitch can anchor a folded edge while limiting how much thread appears on the garment’s face. Illustration: Stilfehler, Wikimedia Commons, CC BY-SA 4.0.
15. Sew On a Two-Hole Button
Buttons are an ideal first repair because the structure is easy to inspect.
- Find the original button position. Existing thread marks often show it.
- Thread the needle and use doubled thread if appropriate for the garment.
- Anchor the thread from the wrong side of the fabric.
- Bring the needle through one button hole and down through the other.
- Repeat several times without pulling the button painfully tight against the fabric.
- Secure the thread on the back with small stitches and a knot.
If the button closes through a thick buttonhole, it may need a small thread shank so there is room for the buttonhole fabric under the button. You can create this by placing a toothpick or spare needle under the stitches while sewing, then removing it and wrapping thread around the stitch bundle beneath the button before securing.
Success check: Button the garment. The fabric should lie naturally without straining around the button. A button that is secure but so tight that the buttonhole cannot slide underneath is not correctly repaired.
16. Sew On a Four-Hole Button
Four-hole buttons can be sewn in parallel lines, an X pattern, or another pattern that matches the remaining buttons.
Inspect the garment before choosing. Consistency matters on visible clothing.
Sew through one pair of holes several times, then the second pair. You can move between pairs on the back of the fabric or secure and restart depending on the desired neatness.
Do not make endless passes “for strength.” Too much thread creates a hard, bulky knot of fibers and can make replacement harder later. A few controlled passes with sound thread are usually enough for ordinary clothing.
17. Repair a Button Before It Falls Off
A loose button is easier to repair than a missing one.
If the existing thread is frayed but the button position is correct, add new stitches before removing old thread if that helps maintain alignment. Then cut away obviously loose broken fibers once the new attachment is secure.
Check neighboring buttons. If one failed because the thread aged or laundry abrasion weakened it, other buttons may be close to failure too. Preventive reinforcement takes less time than searching for a lost matching button.
18. Repair an Opened Straight Seam
This is one of the highest-value hand repairs.
Turn the garment inside out. Align the original seam edges. Existing needle holes or pressed seam allowances often show the original stitch line.
Start sewing about 1–2 centimeters before the opening so your new stitching overlaps sound original stitches. Use backstitch through both layers along the original seam line. Continue 1–2 centimeters beyond the opening and secure the thread.
Overlap matters. If you start exactly where the old thread failed, the old seam can continue unraveling at the junction.
After sewing, turn the garment right side out and inspect the seam. It should lie in the same position as the surrounding original seam, without a bulge or offset.
19. Repair a Curved Seam Without Creating a Corner
Armholes, crotch seams, pockets, and shaped garment sections are curved. The same backstitch can work, but alignment becomes more important.
Pin the seam in several places before sewing. Follow the original seam allowance gradually. Do not pull the curve straight while stitching, because that changes the garment shape.
Use shorter stitches around tighter curves. Let the fabric rotate in your hands as you work rather than forcing the needle to change direction sharply.
After a few centimeters, stop and check the right side. Curved-seam errors compound quickly, so early correction is easier than unpicking the entire repair.
20. Know When a Split Seam Is Actually Torn Fabric
If the stitches failed but the fabric is intact, seam repair is straightforward. If the fabric tore next to the seam, simply sewing on the original seam line may fail because the needle has nothing strong to hold.
Look for fuzzy, shredded, or missing fibers around the opening. If the cloth is damaged, reinforce the area with a patch, backing fabric, appropriate interfacing, or a larger repair that distributes stress.
This distinction is especially important around pockets, crotch seams, elbows, knees, and tight-fitting garments where stress caused the original failure.
21. Patch a Small Hole From the Inside
An internal patch can preserve the original appearance better than stitching a torn hole edge-to-edge.
- Trim only loose dangling fibers; do not enlarge the hole unnecessarily.
- Cut a patch that extends beyond the damaged area in every direction.
- Round the patch corners so they are less likely to lift.
- Place the patch behind the hole.
- Pin or baste it in place.
- Stitch around the patch perimeter with small secure stitches.
- If needed, stabilize the damaged center with additional stitches that spread load into sound fabric.
Choose patch fabric with compatible weight and flexibility. A very stiff patch on thin soft fabric can create a hard stress edge that causes a new tear beside the repair.
22. Use Visible Mending Deliberately
Not every repair has to disappear.
Visible mending uses contrasting thread, patches, decorative rows, embroidery-like patterns, or other intentional details. It can be useful when exact matching is impossible or when the repair itself becomes part of the garment’s design.
The structural requirements still matter. Decorative thread should not be the only thing holding a high-stress tear unless it is strong and appropriately anchored. Stabilize the damaged area first, then add visible design.
A successful visible repair looks intentional because the stitch spacing, patch shape, and color choice are consistent—not because the repair is technically invisible.
23. Repair a Small Tear Before It Grows
Fresh tears are usually easier to repair because the surrounding fabric is still present.
If the edges are clean and the area is low-stress, you may be able to align them and use tiny stitches. If the tear has a missing section, fraying, or high stress, add backing.
Do not pull a V-shaped or L-shaped tear closed so aggressively that the garment puckers. The goal is to restore the original geometry, not simply make the hole vanish.
For delicate or valuable garments, test the repair on an inconspicuous section or consult a tailor. Some fabrics show every needle hole.
24. Repair a Loose Pocket Corner
Pocket corners carry concentrated stress because hands, phones, keys, and pulling forces all meet there.
If a pocket seam opens, use backstitch along the original seam and overlap sound stitching on both sides. At the corner, add several reinforcement stitches in a small area rather than one large knot.
If the fabric itself is torn, add a backing patch inside the garment or pocket. Reinforcement should extend beyond the visibly damaged fibers.
Check the cause: If the pocket is routinely overloaded, the repair may fail again even if the sewing is excellent. Change how the pocket is used or strengthen a broader area.
25. Reattach a Belt Loop Carefully
Belt loops can be deceptively difficult because the attachment points are heavily stressed and often sewn through multiple layers.
If only a few stitches loosened and the fabric underneath is intact, hand sewing may be adequate. Use a strong needle, durable thread, a thimble, and repeated compact stitches through sound material.
If the belt loop tore a chunk from the waistband, the problem is no longer just reattachment. The waistband fabric needs reinforcement first. A tailor may be the better option on structured trousers, suits, or jeans where the repair must tolerate strong pulling.
26. Fix a Dropped Trouser Hem
Turn the trousers inside out and identify the original fold. If the fold has disappeared, compare with the other leg and measure carefully.
Press the hem into position according to the care label and fabric’s heat tolerance, or finger-press if heat is unsafe. Pin the fold.
Use a hemming stitch that catches the hem allowance and only a tiny portion of the outer trouser fabric. Work around the leg without pulling the thread tight.
Every few inches, let the fabric hang naturally. If it ripples, your tension is too tight. Undo the most recent stitches and try again before completing the full circumference.
27. Fix a Sleeve Hem
Sleeve hems are similar to trouser hems but may be narrower and more visible.
Preserve the original fold width. If the garment has a lining, identify whether the hem was attached to the shell, lining, or both. Do not accidentally sew the sleeve opening shut by catching layers that should remain separate.
On delicate blouses, use a fine needle and thread with very small outer-fabric bites. On casual knit cuffs, the original construction may require stretch that a simple woven-style hemming stitch cannot reproduce.
28. Repair a Lining Opening
Jacket and coat linings can split at seams without damaging the outer shell. Because lining fabric can be slippery and fray easily, work gently.
If the seam allowances are still present, align them and use a small backstitch from the inside when accessible. If you must close from the outside of the lining, a ladder stitch can create a cleaner finish.
A lining tear near an armhole or pocket may indicate tension from the outer garment. Reinforce a broader area rather than repeatedly closing the same weak point.
29. Close a Cushion or Stuffed-Item Opening
The ladder stitch is particularly useful for a cushion seam that needs to close from the outside after stuffing.
Fold both seam allowances inward. Start with the knot hidden inside. Take alternating short horizontal stitches along each fold, creating a ladder across the opening. Pull gradually until the edges meet.
Do not wait until the very end to tighten a very long ladder. Tighten every few inches so friction does not lock the thread in an awkward position.
30. Secure a Small Patch With Whip Stitch
For felt, fleece, some workwear, or a deliberately visible patch, whip stitch can be fast and strong enough.
Place the patch so it extends into sound fabric. Pin it. Bring the needle up from behind to hide the knot, then take evenly spaced diagonal stitches over the patch edge.
At corners, add a stitch closer to the corner so the patch cannot lift. On a rounded patch, adjust the angle of each stitch gradually.
Check the reverse side before finishing to ensure you have not accidentally sewn a pocket closed or caught a lining that should move independently.
31. Use Blanket Stitch When You Want an Edge to Be Part of the Design
Blanket stitch loops along an edge and locks each new stitch through the previous loop. It is useful for felt, blankets, decorative patches, and visible edging.
It is not necessary for basic clothing repair, but learning it helps when raw edges are intentionally exposed. Keep the vertical stitch depth and spacing consistent for a professional appearance.
If the fabric frays heavily, blanket stitch alone may not be enough. Finish, fold, or stabilize the edge first.
32. Use a Thimble Correctly on Dense Fabric
A thimble protects the finger that pushes the back of the needle. It is especially useful with denim, canvas, multiple seam layers, and thick hems.
Choose a thimble that fits securely without falling off or squeezing your finger. Push the needle with the thimble rather than the soft center of your fingertip.
If the needle is stuck, do not keep increasing force until it suddenly shoots through. Change the angle, move slightly away from a dense intersection, or use a more suitable needle.
33. Do Not Sew Over Pins
When hand sewing, remove pins as you reach them rather than pushing the needle against or through pin locations. Pins can deflect the needle, scratch your hand, or distort the seam.
Fabric clips are useful when pins would leave holes or when layers are thick. However, clips can be bulky near tight curves.
Basting is another option: use long temporary running stitches to hold a difficult repair in position, complete the permanent stitching, then remove the basting thread.
34. Baste When Alignment Matters More Than Speed
Basting is temporary sewing. It is valuable for hems, patches, slippery fabric, curves, and any repair where pins interfere with access.
Use large running stitches in a contrasting thread so they are easy to remove. Do not knot or secure them so aggressively that removal becomes difficult.
After the permanent repair is finished, cut and pull out the basting stitches. Do not leave contrasting basting thread trapped under final stitches.
35. Mark a Stitch Line When the Original Seam Is Hard to See
Tailor’s chalk or a washable fabric marker can help maintain alignment, but test it first. Some markers can stain or reappear after heat.
Use existing seam holes, folds, and construction lines whenever possible. On a patch, mark the perimeter lightly so stitch spacing remains consistent.
A straight repair line is easier to sew when you are following a physical guide instead of trying to judge each stitch independently.
36. Keep Stitch Length Proportional to the Job
There is no universal perfect stitch length.
Fine fabric and high-stress seams generally benefit from shorter stitches. Temporary basting uses long stitches. Decorative visible mending may use larger stitches by design. Heavy materials may need slightly longer stitches to avoid perforating the fabric excessively.
The key is consistency and load distribution. A seam made from a few giant stitches concentrates force at each hole. A seam made from extremely tiny stitches in fragile material can perforate it like a tear-off line. Match stitch density to the cloth.
37. Avoid Making a “Perforation Line” in Weak Fabric
Every needle hole interrupts the fabric structure slightly. In healthy fabric this is usually insignificant. In old, sun-damaged, dry-rotted, or very thin material, dense stitching can create a line of weakness.
If the cloth tears when you gently tug it away from the damaged area, sewing directly into it may not hold. Reinforce with a larger patch or backing that extends into sound fabric.
This is common in old bedding, vintage garments, worn shirt collars, and fabric weakened by repeated abrasion.
38. Treat Stretch Fabric Differently
Knit and stretch garments can recover their shape after pulling. A rigid repair can stop that movement and create a new tear at the edge of the stitches.
Use a needle suitable for knit fabric where appropriate, avoid excessive tension, and choose a stitch or repair method that allows the necessary movement. For significant tears in performance wear, swimwear, leggings, or highly elastic knit, a machine stretch stitch or specialty repair may be more reliable.
Test by gently stretching the repaired area only as much as it would normally stretch during wear. If the thread prevents normal movement or the fabric strains beside the repair, revise the method.
39. Treat Denim as a Structural Repair
Denim is durable, but once it wears thin the surrounding fibers may be weak far beyond the visible hole.
For a knee or thigh hole, place a patch behind the worn region that extends into strong denim. Secure the patch around its perimeter, then add rows of stitches through the weak area to distribute stress.
Use a strong needle and thimble. Avoid pulling so tightly that the patch creates a hard plate. The repaired section should flex with the jeans.
A professional machine darn can be more efficient for large worn zones, especially near the crotch where stress is high and appearance matters.
40. Treat Fine or Delicate Fabric Conservatively
Silk, chiffon, lace, fine wool, and other delicate textiles can show needle holes, snag easily, or distort under tension.
Use a fine needle and compatible thread. Test on a hidden area. Avoid repeated unpicking because every attempt can damage the cloth further.
For expensive, vintage, heirloom, or structured garments, professional repair is often worth the cost. A beginner repair is easiest to learn on ordinary cotton or stable woven fabric, not a favorite silk blouse.
41. Be Careful With Waterproof and Coated Garments
Rain jackets, technical shells, tents, and coated fabrics depend on surface treatments and seam construction to resist water. Every needle hole can become a leak path.
Do not assume ordinary stitching is the correct repair. Manufacturer-approved patches, seam tape, adhesives, or professional service may be more appropriate. Check the product’s repair instructions first.
The same principle applies to insulated jackets where careless sewing can damage baffles or allow filling to escape.
42. Do Not Attempt Structural Safety Repairs With Casual Hand Sewing
Hand sewing is appropriate for garments and many household textiles. It is not a substitute for engineered repair of safety equipment.
Do not casually hand-repair climbing harnesses, seat belts, fall-arrest equipment, motorcycle protective gear, child-restraint straps, load-bearing lifting slings, or other life-safety webbing. Damage in those products can require replacement or manufacturer-authorized service.
The ability to push a needle through a strap does not mean the repaired strap retains its certified strength.
43. Finish Thread Securely Without a Giant Knot
At the end of a seam, make several small backstitches in place or through the seam allowance. Then tie a small knot close to the fabric if appropriate.
You can also pass the needle through a small loop before tightening the final stitch. Trim the thread tail with scissors, leaving enough that the knot cannot immediately pull free.
Hide the finish inside a seam allowance, fold, lining, or patch whenever possible.
44. Press the Repair Only If the Fabric Allows It
Pressing can make a repaired seam or hem look dramatically better because it restores the fabric’s original fold and shape.
But follow the garment care label. The FTC’s guidance emphasizes that care instructions must account for washing, drying, ironing, bleaching, and necessary warnings. A fabric that cannot tolerate high heat can be damaged by a final “professional-looking” press.
Use a pressing cloth when appropriate, test temperature, and avoid pressing directly over plastic buttons, synthetic trim, coatings, or unknown adhesives.
45. Wash the Repaired Garment Gently the First Time
After repair, inspect the care label and use a normal compatible cleaning method, but consider a gentle first wash for a newly repaired area if the garment allows it.
Turn the garment inside out when appropriate to reduce abrasion on visible stitches or patches. Fasten zippers and hooks so they do not catch the repair.
After washing, inspect the stitch line before machine drying. If a seam is beginning to open, repairing it while damp or freshly washed may be easier than discovering the failure after heat and tumbling.
46. Check the Repair Under Real Tension
A repair that looks good on a table may fail when worn.
For a shirt button, button the shirt and move normally. For a pocket, place a light object inside and check the corner. For a trouser hem, walk and sit. For a seam, gently tension the area in the same direction that caused the original load.
Do not deliberately stress the garment beyond normal use. You are checking function, not conducting a destructive test.
47. Know When to Stop and Unpick
Beginners often continue a bad seam because they do not want to “waste” the work already done. That makes correction harder.
Stop if:
- the fabric is puckering;
- the seam edges have shifted;
- the stitch line is far from the original seam;
- you accidentally caught a pocket or lining;
- the button position is wrong;
- the patch is wrinkled;
- your thread has knotted between layers.
Use a seam ripper or small scissors carefully to remove only the incorrect stitches. Protect the garment fabric from the blade. Restitching a 5-centimeter section is easier than living with a repair that fits badly.
48. Troubleshoot Thread That Keeps Knotting
If the thread knots repeatedly:
- shorten the thread length;
- let the needle dangle occasionally so twist can unwind;
- pull each stitch smoothly rather than jerking;
- avoid letting the thread loop around pins or buttons;
- use better-quality thread if the current thread is fuzzy or damaged.
When a knot forms, stop pulling immediately. Tight pulling converts a loose loop into a hard knot. Use the needle point to loosen the loop and gently work it apart.
49. Troubleshoot Puckered Fabric
Puckering usually means thread tension is too tight, stitch spacing is unsuitable, the fabric shifted during sewing, or the repair is forcing material into a shorter path.
Release the newest stitches and let the fabric relax. Realign the layers. Sew again with lighter tension.
If a tear requires the edges to be pulled significantly together, that is evidence you may need a patch rather than direct closure.
50. Troubleshoot a Repair That Keeps Breaking
If the same repair fails repeatedly, assume the problem is structural rather than simply “weak thread.”
Investigate:
- Is the garment too tight at that location?
- Is the surrounding fabric worn thin?
- Is the stitch type inappropriate?
- Are your stitches too long?
- Is the thread cutting into the fabric?
- Does the area need a reinforcement patch?
- Is the repair at a high-load junction?
Strength does not come only from thicker thread. It comes from distributing force through sound material.
51. Troubleshoot a Button That Pulls Through the Fabric
If a button tears through the garment, sewing the button back into the same enlarged holes will fail.
Reinforce the wrong side with a small patch of compatible fabric or appropriate interfacing. Sew through the reinforcement so the load spreads over a larger area.
On coats and heavy garments, a small backing button on the inside can also distribute load if the original construction used one or the design permits it.
52. Troubleshoot a Hem That Shows Stitches on the Outside
If your hem stitches are obvious, you are probably catching too much outer fabric, using contrasting thread, or pulling too tightly.
Use a finer needle, matching thread, and smaller bites of the garment face. Space the stitches evenly.
On very fine fabric, accept that “invisible” means unobtrusive rather than literally impossible to detect at close range.
53. Practice on a Stitch Sampler
Before repairing clothing, make a sampler from medium-weight woven cotton.
Draw several parallel lines and practice:
- running stitch;
- backstitch;
- whip stitch along an edge;
- ladder stitch between two folded edges;
- hemming stitch on a folded strip;
- button attachment.
Write the stitch names beside the samples with fabric marker. Keep the sampler in your sewing kit as a reference.
This single practice exercise teaches tension, stitch direction, knot placement, spacing, and how the back of each stitch looks.
54. Use a 15-Minute Repair Workflow
For a routine repair, follow this sequence:
- Minute 0–2: Inspect the failure and read the care label.
- Minute 2–4: Choose needle, thread, and stitch.
- Minute 4–5: Trim loose threads and align the fabric.
- Minute 5–6: Pin, clip, or baste.
- Minute 6–12: Sew slowly with controlled tension.
- Minute 12–13: Secure and trim thread.
- Minute 13–15: Turn the garment right side out and test appearance and movement.
Some repairs take longer, but this workflow prevents a small task from becoming disorganized. Preparation makes the sewing itself faster.
55. Worked Example: Repairing a Split Side Seam
Imagine a cotton shirt with a 7-centimeter opening along the side seam. The fabric is intact; only the machine thread broke.
Diagnosis: Because the fabric is not torn, no patch is needed.
Preparation: The shirt is turned inside out. The seam allowances are aligned, and two pins hold the layers together. Matching polyester thread and a general sharp needle are selected.
Stitch choice: Backstitch is chosen because the seam needs permanent strength.
Sewing: The repair begins about 1.5 centimeters before the opening, overlapping intact original stitching. Small backstitches follow the original seam holes. The repair continues 1.5 centimeters beyond the opening.
Finish: Three tiny backstitches secure the thread in the seam allowance before the tail is trimmed.
Check: The shirt is turned right side out. The seam lies flat and the side length matches the other side. The wearer raises both arms and sits down. There is no pulling or gap.
This is a good beginner repair because the original garment construction provides a clear guide.
56. Worked Example: Repairing a Loose Trouser Hem
A trouser hem has dropped for about 20 centimeters but the original fold is still visible.
Diagnosis: The outer fabric is undamaged, and the problem is only detached hem stitching.
Preparation: The trousers are turned inside out. The fold is restored along the original crease and clipped. The care label allows a cool iron, so the fold is lightly pressed.
Stitch choice: A hemming stitch is used to minimize visible marks.
Sewing: The needle catches the folded hem allowance, then a tiny bite of the outer trouser fabric. The process repeats every few millimeters. Tension remains light.
Check: After 5 centimeters, the trousers are turned right side out. No puckering is visible, so the repair continues.
Finish: The final thread is secured inside the hem allowance and trimmed.
The key decision is not stitch speed. It is catching only enough face fabric to hold securely without creating a row of visible dots.
57. Worked Example: Replacing a Missing Shirt Button
A shirt button disappeared in the wash, but a spare matching button is sewn into the inside label.
Position: The original stitch holes identify the button location.
Pattern: Neighboring four-hole buttons use two parallel bars of thread, so the same pattern is copied.
Attachment: Doubled matching thread is anchored on the wrong side. Each pair of holes receives several passes.
Shank: Because the shirt fabric is thin and the buttonhole slides easily, only a small amount of clearance is needed.
Finish: The thread is secured on the back and trimmed.
Check: The shirt is buttoned. The placket lies flat and the new button aligns with its neighbors.
The repair succeeds because it matches both the function and the visible construction of the original garment.
58. Build a Monthly Mending Habit
Small damage becomes expensive when ignored. Once a month, inspect clothes that receive heavy use.
Look for:
- loose buttons;
- open hem sections;
- frayed pocket corners;
- small seam gaps;
- worn knees and elbows;
- loose hooks and loops;
- small holes before they enlarge.
Keep a small “repair basket” rather than returning damaged clothing to the wardrobe. When the basket contains three or four items, schedule a short mending session.
This turns sewing from an emergency skill into routine maintenance.
59. Know When a Tailor Is the Better Tool
DIY repair is useful, but professional tailoring is often a better choice when:
- a suit jacket or structured coat needs reconstruction;
- a zipper must be replaced in a valuable garment;
- the fabric is very delicate or expensive;
- the garment requires resizing rather than repair;
- a large crotch or seat area is worn thin;
- leather or technical fabric needs specialty equipment;
- a formal garment needs invisible repair;
- you cannot identify the original construction;
- the repair would require extensive seam opening and reassembly.
The practical question is not “Can a needle pass through this?” It is “Can I restore strength, fit, and appearance without creating a new problem?”
60. A Beginner’s Four-Week Skill Plan
Week 1: Control the tools
Practice threading, knots, running stitch, and backstitch on scrap. Focus on even tension rather than speed.
Week 2: Practice finishing
Make a folded hem sample, practice hemming and ladder stitches, and sew three spare buttons onto scrap.
Week 3: Make structural repairs
Practice closing an artificial split seam and attaching a patch behind a cut in scrap fabric. Test the repair by gently pulling the fabric.
Week 4: Repair real low-risk garments
Choose ordinary clothing: a pajama seam, tote-bag lining, loose shirt button, or casual trouser hem. Avoid expensive, highly elastic, waterproof, or formal garments until your control improves.
By the end of four weeks, you do not need dozens of stitches. You need confidence with a few stitches and the judgment to choose among them.
Frequently Asked Questions
What is the strongest basic stitch for sewing by hand?
Backstitch is one of the strongest common hand stitches for permanent seams and repairs because each stitch overlaps the previous path. It is a strong default for closing an opened machine seam when the fabric itself is intact.
Can running stitch repair clothing permanently?
It can work for light-duty tasks, but it is less secure than backstitch for stressed seams. Running stitch is excellent for basting, gathering, practice, and some decorative work. Use the stitch that matches the load.
Should I use doubled thread for every repair?
No. Doubled thread adds strength but also bulk. Single all-purpose thread is sufficient for many seams when the stitch is appropriate. Doubled thread is useful for buttons and selected high-stress repairs.
How do I stop hand sewing from puckering fabric?
Reduce thread tension. The thread should lie against the fabric rather than cinch it. Also check that the layers are aligned and that the repair is not forcing torn edges into a shape they cannot naturally occupy.
How long should hand-sewing thread be?
Use a length you can pull comfortably without tangling. Roughly hand-to-elbow length is a practical starting point for many people. Shorten it if knots and twist become frequent.
Can I repair a torn seam without a sewing machine?
Yes, if the fabric is intact. Align the original seam allowances and use backstitch, overlapping sound original stitching at both ends. If the fabric itself is torn, reinforce it rather than treating the problem as thread failure.
What stitch should I use for a hem?
A hemming, blind-style, catch, or slip stitch can work depending on the garment and fabric. The goal is to secure the fold while catching very little of the outer fabric so the stitches remain unobtrusive.
How do I repair a hole without making it smaller and puckered?
Do not force the edges together if fabric is missing. Use a patch or backing that extends into sound fabric and distribute the load across the patch.
Can I hand-sew stretch fabric?
Yes for some repairs, but the repair must preserve enough stretch for normal use. Use a suitable needle, balanced tension, and a stitch that can accommodate movement. Highly elastic performance garments may be better repaired with stretch-specific machine stitching or professional methods.
Should I wash a garment before repairing it?
Usually it is helpful to repair clean fabric, especially before applying patches or adhesives. However, if washing will make a tear grow, stabilize the damage first. Always follow the garment’s care label.
Can I sew through waterproof fabric?
Needle holes can compromise waterproofing. Check the manufacturer’s repair guidance; approved adhesive patches or seam-sealing systems may be better than ordinary stitching.
How do I know when a repair is beyond beginner hand sewing?
If the garment is valuable, highly structured, safety-critical, severely worn, or made from material that shows permanent needle damage, professional repair is the safer choice.
Conclusion: Learn Four Stitches and Better Repair Judgment
You do not need a sewing machine or an encyclopedia of decorative stitches to become useful with needle and thread. A small kit plus running stitch, backstitch, whip stitch, and a discreet ladder or hemming stitch will solve many everyday problems.
The more important skill is diagnosis. Ask whether the thread failed or the fabric failed. Match needle and thread to the material. Preserve the garment’s original shape. Keep tension light enough that the fabric lies flat. Reinforce weak cloth instead of pulling damaged edges together. Follow the care label after the repair.
The most common beginner mistake is trying to make a repair “stronger” by pulling harder and adding more thread. Good repairs distribute stress through sound fabric; they do not strangle the damaged area.
If you want one practical first step, take a scrap of medium-weight cotton and sew 10 centimeters of running stitch followed by 10 centimeters of backstitch. Compare how each line looks on both sides and how it behaves when you gently pull the fabric. That small exercise teaches the foundation for dozens of repairs.
Sources and Further Reading
- iFixit — Hand Sewing Stitches
- Utah State University Extension — Sewing Technique: Backstitch (hand)
- Federal Trade Commission — Care Labeling of Textile Wearing Apparel and Certain Piece Goods
- Federal Trade Commission — Clothes Captioning: Complying with the Care Labeling Rule
Image Credits
- “Seamstress 02.jpg” — Azorbli, Wikimedia Commons, CC BY-SA 4.0.
- “Hand sewing stitches.jpg” — Hellosewing, Wikimedia Commons, CC BY-SA 4.0.
- “Hand Stitches – Hemming Stitch.png” — Stilfehler, Wikimedia Commons, CC BY-SA 4.0.