

Quick answer: To choose a replacement tire safely, start with the vehicle manufacturer’s tire and loading placard or owner’s manual, not the numbers on the old tire alone. A common size such as 225/45R17 94W means a nominal width of 225 mm, an aspect ratio of 45, radial construction, a 17-inch wheel, load index 94, and speed rating W. Then check the required load capacity, speed capability, whether the vehicle needs Extra Load or another special specification, the tire type and seasonal capability, and the DOT/TIN date code. The pressure molded on the tire sidewall is a maximum tire value, not the normal inflation pressure for your vehicle. Use the cold inflation pressure shown by the vehicle manufacturer.
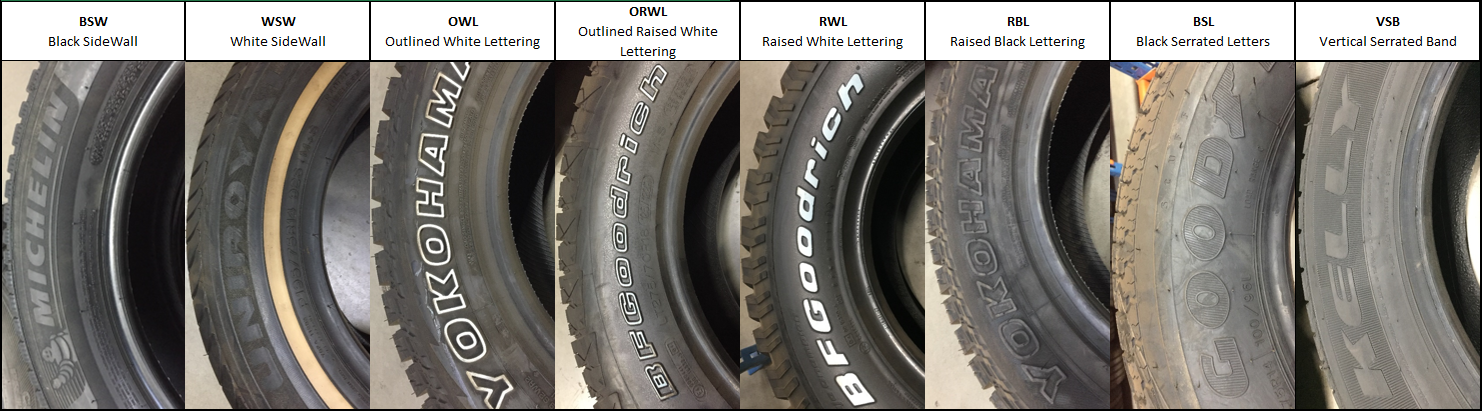 Sidewalls carry specifications, safety information, manufacturing codes, and sometimes cosmetic markings. Image: LeMichael8594, Wikimedia Commons, CC BY-SA 4.0.
A tire sidewall looks like a wall of molded numbers until you know which markings actually matter. The useful information is surprisingly compact: size, construction, wheel diameter, load index, speed rating, maximum load, maximum inflation information, manufacturing identification, and sometimes seasonal, run-flat, directional, or original-equipment markings. Reading those markings correctly can help you compare replacement tires, identify obvious mismatches, understand why two tires that look similar may not be interchangeable, and ask better questions at a tire shop.
But there is an important limit: the sidewall does not tell you everything your specific vehicle needs. The safest replacement reference is the vehicle manufacturer’s information—typically the Tire and Loading Information label on the driver-side door edge or B-pillar, plus the owner’s manual. NHTSA specifically tells drivers to use that vehicle information for the correct tire size and cold inflation pressure. Tire manufacturers likewise warn that the maximum pressure molded on the tire is not necessarily the correct pressure for the vehicle.
This guide is written for ordinary passenger cars, crossovers, SUVs, and light-duty vehicles. It explains the markings in practical order, shows how to compare a candidate replacement against the vehicle requirement, and separates useful information from common misconceptions. It is educational rather than a substitute for a professional fitment decision. If your vehicle has modified wheels, unusual load requirements, staggered front and rear sizes, run-flat requirements, towing demands, or manufacturer-specific homologation markings, confirm fitment with the vehicle manufacturer or a qualified tire professional.
1. Start With the Door Placard, Not the Old Tire
The easiest mistake is to assume the tire currently mounted on the car must be correct. On a used vehicle, the previous owner may have changed wheel size, installed an alternate tire size, chosen a lower load rating, or mixed tires. Even on a car you have owned for years, a tire shop may have installed a substitute size that fits the wheel but is not the manufacturer’s preferred specification.
Open the driver’s door and look for the Tire and Loading Information label. On many vehicles it is attached to the B-pillar or door edge. The exact location varies. The label normally includes the original tire size and the recommended cold inflation pressure. Some vehicles list different front and rear pressures or sizes.
Why this matters: tire size affects more than whether the tire physically mounts to the wheel. It can affect load capacity, clearance, gearing, speedometer and odometer behavior, stability-control calibration, ride, steering response, and the space available around brakes and suspension components.
What to record:
- front tire size;
- rear tire size if different;
- recommended cold pressure front and rear;
- spare-tire information if listed;
- vehicle capacity and loading information;
- any owner-manual notes about alternate tire sizes.
If the car has aftermarket wheels, photograph the door placard and the current tire sidewall before shopping. That gives the tire professional both the original specification and the present setup.
2. Decode a Common Size: 225/45R17
Consider a typical marking:
225/45R17 94W
The first four parts describe the basic size and construction:
- 225 = nominal section width in millimeters;
- 45 = aspect ratio;
- R = radial construction;
- 17 = wheel-rim diameter in inches.
Then:
- 94 = load index;
- W = speed rating.
This format is common, but sidewalls may include additional letters before or after it. The critical point is to treat the complete service description as part of the replacement decision rather than matching only the first three numbers.
3. Understand Tire Width Without Treating It as an Exact Ruler Measurement
The first number, such as 225, is the tire’s nominal section width in millimeters. It is not a promise that every tire labeled 225 will measure exactly 225 mm when installed on every wheel.
Actual dimensions can vary with rim width, tire model, construction, pressure, and manufacturer tolerances. That is why two tires with the same printed size may have slightly different measured widths or shapes.
Practical implication: if you are replacing tires on stock wheels with the manufacturer’s approved size, those small variations are normally handled within the tire and vehicle fitment system. If you are trying to fit an unusually wide tire, use a lowered suspension, or have tight fender clearance, nominal size alone is not enough. Check the tire maker’s detailed dimensional specifications and the vehicle fitment requirements.
4. Understand the Aspect Ratio
The second number, 45 in 225/45R17, is the sidewall aspect ratio. It describes sidewall height as a percentage of the nominal section width.
For 225/45R17, the nominal sidewall height is approximately 45% of 225 mm:
225 × 0.45 ≈ 101 mm
This does not mean the tire’s total height is 101 mm. That figure represents the approximate sidewall portion from rim to tread on one side. The complete tire diameter includes two sidewalls plus the 17-inch wheel diameter.
Lower aspect ratios generally produce shorter sidewalls for a given width, while higher ratios produce taller sidewalls. But do not assume that lower automatically means “better performance” or higher automatically means “more comfort.” Tire construction, compound, wheel width, pressure, suspension, and vehicle design all affect the result.
5. Know What “R” Means
The letter R in a modern passenger-car tire size means radial construction. Radial tires are standard on most modern road cars.
You may encounter other construction codes on specialized or older applications, but do not substitute one construction type for another merely because the dimensions look similar. If a tire size or construction format differs from the vehicle specification, confirm compatibility with a qualified tire professional.
6. Match the Wheel Diameter Exactly
The number after R is the wheel diameter, normally expressed in inches. A 225/45R17 tire fits a 17-inch-diameter wheel, not a 16-inch or 18-inch wheel.
This is one of the least negotiable parts of tire fitment. A tire designed for a 17-inch wheel cannot simply be stretched onto an 18-inch wheel.
If you want to change wheel diameter, you are no longer doing a simple like-for-like tire replacement. You need a wheel-and-tire package that preserves appropriate load capacity, clearance, overall diameter, and vehicle compatibility.
7. Decode the Load Index
The load index is the number immediately after the rim diameter in many passenger-car service descriptions. It is not the number of kilograms or pounds the tire can carry directly. It is an index code that corresponds to a maximum load capacity under specified conditions.
For example, one common load index is 94. You must use a load-index table from a tire manufacturer or standards source to convert that code into the corresponding capacity.
The important replacement rule is not “higher is always better.” It is that the new tire must meet the vehicle’s required load capability and be appropriate for the application. Bridgestone specifically advises checking that a candidate tire meets or exceeds the vehicle manufacturer’s load requirements.
Do not guess from vehicle curb weight. Tire loading depends on axle loads, passengers, cargo, towing, vehicle distribution, and manufacturer requirements. The door placard and owner’s manual are the correct starting points.
8. Understand Standard Load, Extra Load, and XL
You may see XL after the tire size or service description. XL usually means Extra Load. These tires are designed for higher load capacity within the applicable size system than a standard-load version, subject to the correct inflation and fitment requirements.
If the original specification calls for an Extra Load tire, do not casually replace it with a lower-capacity Standard Load version just because the physical dimensions match.
You may also see other load-related markings on light-truck or commercial-type tires. Those systems differ from ordinary passenger tires. When the vehicle originally uses LT, C-type, or other specialized tires, compare the complete specification rather than trying to translate only the size numbers.
9. Decode the Speed Rating
The letter after the load index is usually the speed rating. It represents a standardized performance capability under specified test conditions; it is not a recommended driving speed and it does not override road speed limits.
Common passenger-car symbols include S, T, H, V, W, and Y, among others. The exact speed values are defined in standardized tables.
For replacement tires, follow the vehicle manufacturer’s requirements and local regulations. Bridgestone states that replacement tires should meet the Original Equipment speed requirement to maintain the vehicle’s speed capability and notes that if different speed-rated tires are installed, the lowest rating becomes the limiting rating for the set.
Speed rating also correlates with aspects of tire construction and performance, so choosing solely on the idea that “I never drive that fast” can be oversimplified.
10. Do Not Mix Up Speed Rating With Driving Advice
A W-rated tire is not telling you to drive at the W-rated speed. The rating comes from controlled testing and describes a capability of the tire under specified conditions. Real-world driving includes heat, load, inflation changes, road damage, aging, wet surfaces, and many other factors.
Legal limits, safe conditions, and vehicle capability always govern actual driving.
11. Read the DOT/TIN Manufacturing Code
In the United States, tires carry a Department of Transportation Tire Identification Number, or TIN. NHTSA uses the TIN for identification and recall purposes.
The most useful part for a consumer is usually the final four-digit date code. For tires using the modern four-digit format:
- the first two digits are the manufacturing week;
- the last two digits are the manufacturing year.
For example:
1424 = manufactured in the 14th week of 2024.
The full TIN may appear on only one sidewall, so if you cannot see the complete code on the outside, inspect the inner sidewall or ask a tire shop to locate it.
12. Understand What Tire Age Can and Cannot Tell You
The date code tells you when the tire was made. It does not by itself tell you whether the tire is safe today.
NHTSA notes that tires become more prone to failure as they age and that some vehicle and tire manufacturers recommend replacement in the range of six to ten years regardless of treadwear. The correct age policy for your vehicle may depend on the vehicle manufacturer, tire manufacturer, service conditions, storage, climate, and inspection.
Age is only one factor. A newer tire can be unsafe if it has sidewall damage, a puncture in a non-repairable area, severe irregular wear, impact damage, exposed cords, or chronic underinflation. An older tire with good-looking tread still requires age consideration and professional inspection.
13. Do Not Use the Sidewall Maximum Pressure as Your Normal Tire Pressure
This is one of the most important sidewall-reading rules.
The sidewall may show a maximum permissible inflation pressure or other maximum-pressure information. That is not automatically the correct pressure for your car.
NHTSA instructs drivers to use the recommended cold inflation pressure found on the Tire and Loading Information label or in the owner’s manual. Michelin makes the same distinction: sidewall MAX PRESS information is not necessarily the pressure value specified for the vehicle.
Correct workflow:
- Park long enough for the tires to be cold according to the vehicle/tire guidance.
- Read the vehicle placard.
- Measure pressure with a reliable gauge.
- Adjust to the vehicle manufacturer’s cold specification.
- Reinstall valve caps and recheck periodically.
Do not bleed air from a warm tire simply because the pressure rose above the placard number after driving. Tire pressure normally increases as the tire warms.
14. Know Why Front and Rear Pressures May Differ
Some vehicles specify different pressures for front and rear tires because axle loads, handling balance, tire sizes, and vehicle design differ.
If the placard says 35 psi front and 38 psi rear, setting all four tires to the same number defeats the manufacturer’s specification.
Similarly, some performance vehicles use different tire sizes front and rear. A rear tire may be wider or have a different service description. Do not assume rotation or replacement should make all four tires identical.
15. Check for Directional Rotation Arrows
Some tires are directional. The sidewall may have an arrow showing the required direction of rotation.
A directional tread installed backward may not perform as designed, particularly in wet conditions. If a wheel is moved to the opposite side of the car during rotation, the tire may need to be remounted on the wheel to preserve its rotation direction, depending on the vehicle and tire configuration.
If the tire has a rotation arrow, verify that the arrow points forward when the vehicle moves forward at the top of the tire.
16. Check for “Outside” and “Inside” Markings on Asymmetric Tires
Asymmetric tires may have different tread zones on the inner and outer portions. The sidewall can be marked OUTSIDE and INSIDE.
That is not the same as a directional tire. An asymmetric tire may or may not also be directional.
After installation, the side marked OUTSIDE should face outward. If you see INSIDE on the visible outer sidewall, ask the installer to inspect the mounting.
17. Understand M+S, M/S, and Similar Mud-and-Snow Markings
Many all-season tires carry an M+S or similar mud-and-snow designation. Do not assume that this symbol means the same thing as a severe-snow performance symbol.
M+S is a category marking associated with tread characteristics and market regulations. For winter driving, look at the specific legal and performance requirements in your region and whether the tire carries the Three-Peak Mountain Snowflake (3PMSF) symbol when severe-snow capability is required.
18. Recognize the Three-Peak Mountain Snowflake Symbol
The 3PMSF marking uses a mountain outline with a snowflake. It indicates that the tire meets a defined severe-snow traction performance requirement under the applicable standard.
That still does not make every 3PMSF tire identical. A dedicated winter tire, an all-weather tire, and another severe-snow-rated tire can have very different behavior on ice, slush, dry roads, warm pavement, and at high speed.
 Seasonal markings can indicate different capabilities; they are not interchangeable labels. Image: RubberMeetsTheRoad, Wikimedia Commons, CC0 1.0.
19. Understand Run-Flat Markings
Run-flat tires may use manufacturer-specific abbreviations or branding. Examples in the market include systems identified by terms such as RFT, SSR, ZP, ROF, and other brand-specific markings.
If your vehicle was designed around run-flat tires, do not replace them with conventional tires without understanding the consequences for spare-tire provision, suspension tuning, TPMS, mobility after a puncture, and manufacturer requirements.
Likewise, a run-flat tire that has been driven while deflated may have internal damage that is not obvious from the outside. Follow the tire manufacturer’s inspection and repair rules.
20. Look for Original-Equipment or Homologation Markings
Some automakers and tire makers use sidewall symbols to identify tires developed or approved for a particular vehicle brand, model family, or original-equipment specification.
These markings vary widely. They may indicate a specific construction, compound, noise treatment, load characteristic, or tuning target.
If your vehicle came with manufacturer-homologated tires and you are considering a different specification, ask whether the replacement changes handling, warranty expectations, or fitment approval.
21. Understand “TUBELESS”
Most modern passenger-car tires are tubeless, and the sidewall may state TUBELESS.
That does not mean the tire cannot lose air. Air can escape through punctures, damaged valve stems, wheel corrosion, bead leaks, cracks, or impact damage.
If a tire repeatedly loses pressure, do not simply top it up forever. Have the tire, valve, and wheel inspected.
22. Read Maximum Load Information Carefully
Sidewalls may include a maximum load statement in pounds, kilograms, or both. This value describes the tire’s capacity under specified conditions.
Do not use that number to calculate how much cargo you can put in the vehicle. Vehicle payload limits are determined by the vehicle manufacturer and include axle, chassis, suspension, braking, wheel, and other limits.
The vehicle’s Tire and Loading Information label is the correct place to start for occupant and cargo limitations.
23. Understand UTQG Treadwear, Traction, and Temperature Grades
Many U.S.-market passenger tires display Uniform Tire Quality Grading information:
- Treadwear
- Traction
- Temperature
These grades can be useful, but they are often misunderstood.
Bridgestone cautions that treadwear grades are best used within a manufacturer’s product line because variations in testing procedures make cross-brand comparisons less straightforward than consumers often assume.
Do not buy a tire based on one UTQG number alone. Consider wet braking, noise, ride, snow performance, rolling resistance, warranty terms, load, speed rating, and the vehicle’s use.
24. Know That Dedicated Winter and Certain Other Tires May Not Carry UTQG
UTQG requirements do not apply equally to every tire category. Dedicated winter tires and some light-truck or specialized tires may be excluded.
If a tire lacks a familiar treadwear grade, that does not automatically indicate a low-quality tire. It may belong to a category for which the grading system is not used.
25. Learn the Difference Between Tire Type and Tire Size
Two tires can share 225/45R17 94W and still be very different products.
One may be:
- summer performance;
- all-season touring;
- all-weather;
- run-flat;
- low-rolling-resistance;
- original-equipment tuned;
- ultra-high-performance;
- comfort-focused.
Size answers “will this fit the intended wheel and load/speed system?” Tire type answers “what conditions and priorities was it designed for?”
26. Compare the Entire Service Description
Suppose your placard or original tire specification is:
225/45R17 94W XL
A candidate tire is:
225/45R17 91V
The basic dimensions match, but the load index and speed rating do not. That is not a like-for-like replacement.
Do not stop comparing after the R17.
27. Do Not Assume a Higher Load Index Is Always a Free Upgrade
A tire with a higher load index may be acceptable for some applications, but that does not mean every higher-rated tire is automatically the best choice.
Different load constructions can influence ride, weight, pressure requirements, and handling. The vehicle manufacturer’s approved specification and the tire professional’s fitment data should guide the decision.
28. Do Not Assume a Wider Tire Is Better
Drivers sometimes choose a wider tire for appearance or perceived grip. A wider nominal size can alter clearance, rolling diameter, wheel-rim compatibility, steering feel, hydroplaning behavior, fuel use, and suspension interference.
If the vehicle manufacturer lists an alternate size, use that approved combination. If not, treat the change as a fitment engineering decision rather than a cosmetic swap.
29. Check Overall Diameter When Changing Size
If you use a manufacturer-approved alternate wheel and tire package, the tire’s overall diameter is usually selected to stay reasonably close to the original configuration.
Changing overall diameter can affect:
- speedometer reading;
- odometer accuracy;
- effective gearing;
- ground clearance;
- ABS and stability-control behavior;
- clearance at full steering lock;
- clearance under suspension compression.
Do not rely on an online calculator alone for safety-critical fitment. Use approved vehicle data and professional fitment references.
30. Check Wheel Width Compatibility
A tire size is approved for a range of wheel widths, and the measured dimensions change depending on the wheel used.
A tire that technically fits a wheel diameter may still be unsuitable if the wheel is too narrow or too wide for that tire size.
The tire manufacturer’s specification sheet normally lists approved rim-width ranges. If you have aftermarket wheels, confirm the actual wheel width and offset.
31. Understand Staggered Setups
Some performance vehicles use wider rear tires than front tires. Others use different wheel widths or even different diameters front and rear.
In a staggered setup:
- front-to-rear tire rotation may not be possible;
- replacement pairs must stay on the correct axle;
- different pressures may apply;
- matching tread pattern and compatible tire construction becomes especially important.
Record both front and rear specifications before shopping.
32. Be Careful With All-Wheel-Drive Tire Replacement
Many AWD systems are sensitive to differences in rolling circumference between tires. A single new tire with full tread can have a different effective circumference from three heavily worn tires.
The acceptable difference varies by vehicle and manufacturer. Some vehicles may require replacing multiple tires or shaving a new tire to match tread depth under controlled professional guidance.
Do not use a universal “AWD rule.” Check the vehicle manufacturer’s limit.
33. Inspect Tread Wear Indicators
Tires include treadwear indicators molded into the tread grooves. When tread wears to the indicator level, the tire has reached the minimum tread-depth marker represented by that bar.
NHTSA also advises checking tread regularly and replacing tires when the tread is worn to the minimum level or when the tire shows damage.
 Treadwear bars provide a built-in reference, but condition, age, damage, and wet-weather needs also matter. Image: VVVN, Wikimedia Commons, CC BY 3.0.
34. Do Not Wait for the Wear Bars if Your Conditions Require More Tread
The legal minimum tread depth is not the same as “optimal performance in every condition.” Wet-weather and snow performance generally decline as tread becomes shallower.
Local law, climate, tire type, and driving conditions may justify replacement before the absolute minimum. If you regularly drive in heavy rain or snow, ask the tire manufacturer or service professional about the performance implications of remaining tread depth.
35. Inspect the Sidewall for Damage Before Reading the Numbers
A perfectly matching service description does not make a damaged tire safe.
Look for:
- bulges;
- bubbles;
- cuts;
- deep cracks;
- exposed cords;
- impact damage;
- separation;
- objects embedded near the shoulder or sidewall;
- evidence the tire was driven severely underinflated.
A sidewall bulge can indicate internal structural damage and requires professional attention. Do not attempt a do-it-yourself sidewall repair.
36. Understand Why Sidewall Punctures Are Different
Repairability depends on puncture location, size, tire condition, type, and manufacturer/industry procedures.
Ordinary repair standards generally treat the tread repair area differently from the shoulder and sidewall. Do not assume that a plug kit makes every puncture repairable.
If damage is in the shoulder or sidewall, or the tire was driven while flat, have it professionally inspected and follow the tire manufacturer’s rules.
37. Check for Uneven Wear Before Buying New Tires
New tires will not fix the cause of old-tire wear.
Look across the tread:
- one shoulder worn more than the other;
- both shoulders worn;
- center worn faster;
- cupping or scalloping;
- feathering;
- patchy wear.
Possible causes include inflation errors, alignment, worn suspension parts, wheel imbalance, loading, driving style, or combinations of these. Diagnose the cause so the new tires do not repeat the same wear pattern.
38. Check Tire Pressure Before Blaming Alignment
Incorrect inflation can create wear and handling symptoms. Before assuming the car needs major suspension work, set pressures correctly when cold and recheck behavior.
However, visible severe irregular wear or a steering pull still deserves professional inspection.
39. Understand the TPMS Relationship
Tire Pressure Monitoring Systems warn when tire pressure falls significantly below the expected level, but NHTSA warns that TPMS does not replace routine manual pressure checks.
When you replace wheels or tires, sensor service may be required. Some vehicles use sensors in the wheels; others infer pressure indirectly through wheel-speed data.
If the TPMS warning remains on after correct inflation, follow the vehicle manual or service procedure rather than ignoring it.
40. Record the Tire Model, Not Just the Brand
A tire brand may offer dozens of models in the same size.
When comparing or replacing one tire, record:
- brand;
- model or product line;
- full size;
- load index;
- speed rating;
- XL or other load designation;
- run-flat status;
- seasonal rating;
- DOT/TIN date code;
- remaining tread depth.
This is much more useful than writing “Michelin 17-inch tire” or “Bridgestone all-season.”
41. Replace Tires in Matched Sets When Required
The ideal replacement strategy depends on the vehicle, drivetrain, tire condition, and manufacturer requirements.
In many cases, replacing all four with matching tires provides the most consistent handling. If replacing only two, follow the vehicle and tire manufacturer guidance on axle placement. Do not create a random mix of summer, winter, all-season, run-flat, non-run-flat, and widely different tread patterns without understanding the handling effects.
42. Ask About New-Tire Placement When Replacing Only Two
Tire manufacturers often recommend placing the pair with greater tread depth on the rear axle to preserve rear traction and reduce oversteer risk in wet conditions. Vehicle-specific recommendations may differ.
Do not assume “new tires always go on the driven wheels.” Ask the installer to follow the vehicle/tire manufacturer guidance for your exact vehicle.
43. Understand Spare-Tire Markings Separately
Temporary spare tires commonly use a different size, pressure, and speed limitation from the normal road tires.
A compact spare is intended for temporary emergency use under the vehicle manufacturer’s restrictions. The sidewall and owner’s manual normally state limitations.
Do not treat the spare as a normal replacement because its rim diameter happens to fit.
44. Check the Spare’s Age and Pressure Too
Spare tires are easy to forget because they may never touch the road for years.
NHTSA specifically reminds drivers that spare tires age too. Check the spare’s pressure and date code according to the vehicle maintenance schedule. A spare that has been flat in the trunk for six years is not useful during a roadside emergency.
45. Understand Tire Recalls and the Importance of the TIN
The TIN helps identify whether a tire is included in a recall.
If you hear about a recall affecting your brand or model, do not rely on the model name alone. Compare the complete TIN and recall range using NHTSA or the tire manufacturer’s recall information.
After buying tires, keep your invoice and registration information. That makes warranty and recall questions easier later.
46. Shop by Vehicle Specification, Then by Use Case
A practical buying sequence is:
- Confirm approved size and service description.
- Confirm wheel size and any special requirement.
- Choose the seasonal category appropriate to your climate.
- Choose performance priorities: wet grip, snow, comfort, noise, efficiency, handling, tread life.
- Compare manufacturer test data and independent professional testing where appropriate.
- Check warranty terms and exclusions.
- Check manufacturing date and condition at installation.
- Install, balance, and set pressure correctly.
Starting with price before specification increases the chance of comparing tires that are not truly equivalent.
47. Do Not Treat Warranty Mileage as a Performance Score
A longer tread-life warranty does not automatically mean a tire is better for every driver.
Warranty coverage can depend on rotation records, alignment, inflation maintenance, vehicle condition, and other terms. Performance-focused tires may prioritize grip over maximum tread life.
Read the actual warranty documentation rather than comparing only headline mileage numbers.
48. Check the Tire’s Intended Climate
Summer, all-season, all-weather, and winter categories are not interchangeable marketing names.
Compounds and tread designs are optimized for different temperature ranges and conditions. A summer tire can provide excellent warm-weather handling but is not intended for freezing conditions. A dedicated winter tire is optimized for cold, snow, and ice but may wear quickly or feel less precise in hot weather.
Choose for the worst conditions you realistically expect, not the best day of the year.
49. Read the Tire Label or Product Page Beyond the Sidewall
The sidewall cannot show every useful buying metric.
Depending on your market, the tire may also have a standardized retail label describing characteristics such as fuel efficiency, wet grip, noise, or winter capability. Tire manufacturer product pages may provide warranty, technology, and application details.
Use the sidewall to verify identity and fitment, then use current product documentation to compare performance.
50. Worked Example: Replacing a Worn Touring Tire
A sedan’s door placard specifies:
225/45R17 94W XL
The current front tires read the same size but are heavily worn.
A budget tire is offered in 225/45R17 91V.
The customer sees “225/45R17” and assumes it matches. But the service description is different: the candidate has a lower load index and lower speed rating. The correct next step is not to debate whether 91V “feels good enough.” It is to compare the candidate against the vehicle manufacturer’s required load and speed specification and choose an approved tire.
A second candidate is 225/45R17 94W XL. Now the basic specification matches, so the customer can compare season, wet performance, noise, tread warranty, price, and other characteristics.
51. Worked Example: The Maximum-Pressure Mistake
A driver reads MAX PRESS 51 PSI on the sidewall and inflates all four tires to 51 psi.
The vehicle placard actually says 35 psi cold.
The error is assuming the sidewall maximum is the vehicle target. The correct action is to follow the vehicle manufacturer’s cold inflation specification, after checking that the tire itself is an approved fitment.
This is exactly why NHTSA emphasizes the placard rather than the tire maximum when setting routine pressure.
52. Worked Example: Used Tire With a Good-Looking Tread
A used tire has deep tread and no obvious puncture. The date code ends in 2315.
That means it was manufactured in the 23rd week of 2015. Even if the tread appears strong, age becomes a major factor. NHTSA notes that some vehicle and tire manufacturers recommend replacement around six to ten years regardless of treadwear.
A tread-depth photo is therefore not enough to evaluate a used tire. The buyer should also check age, sidewall condition, repairs, internal condition, storage history when known, load/speed rating, and whether the tire matches the vehicle.
53. Worked Example: Staggered Performance Car
A coupe uses 225/40R19 front tires and 255/35R19 rear tires.
A tire shop mistakenly quotes four 225/40R19 tires based on the front sidewall.
The correct workflow is to check the door placard or manufacturer fitment data for both axles, not copy one tire’s marking to all four positions. The rear axle may require a different width, load index, speed rating, and pressure.
54. Common Tire-Sidewall Mistakes
“The size matches, so the tire is correct.”
Not necessarily. Check load index, speed rating, load category, run-flat requirements, seasonal type, and vehicle-specific approvals.
“The sidewall pressure is the pressure I should use.”
No. Use the vehicle manufacturer’s recommended cold inflation pressure.
“The tire is new because the tread is deep.”
Deep tread does not reveal manufacturing age. Check the date code.
“M+S means it is a full winter tire.”
Not necessarily. Severe-snow performance uses additional standardized markings such as 3PMSF.
“A higher speed rating always means a better tire.”
No. It describes a performance capability, not overall quality for your use case.
“A higher load index always improves the car.”
No. It must be compatible with the vehicle, wheel, pressure, ride, and intended specification.
“TPMS means I never need a gauge.”
NHTSA still recommends regular manual pressure checks.
“If one tire is bad on AWD, I can always replace just one.”
Not always. Check the vehicle manufacturer’s allowable circumference or tread-depth differences.
55. A 10-Minute Tire Inspection Before a Long Trip
- Check all four tire pressures cold against the door placard.
- Check the spare or mobility kit.
- Inspect sidewalls for cuts, bulges, cracks, and damage.
- Inspect tread depth and wear bars.
- Look for uneven wear.
- Verify valve caps are present.
- Confirm no TPMS warning remains active.
- Check that directional arrows and OUTSIDE markings appear correct.
- If towing or carrying heavy loads, review the owner’s manual for load and pressure guidance.
- If anything looks unusual, have it inspected before the trip.
56. Replacement-Tire Shopping Checklist
- Vehicle make, model, year, and trim recorded.
- Door-placard tire size photographed.
- Front and rear sizes checked separately.
- Cold pressures recorded.
- Wheel diameter and width confirmed if aftermarket.
- Load index requirement confirmed.
- Speed rating requirement confirmed.
- XL or other load designation checked.
- Run-flat requirement checked.
- Seasonal category chosen for real climate.
- 3PMSF requirement checked where relevant.
- Original-equipment marking considered if applicable.
- DOT/TIN date code checked at installation.
- Tread and sidewalls visually inspected.
- New tires balanced.
- TPMS operation confirmed.
- Invoice and warranty documents saved.
57. When to Stop Reading the Sidewall and Ask a Professional
Get professional fitment help when:
- the current tire size differs from the door placard;
- wheels are aftermarket;
- the suspension is modified;
- tires rub at full steering lock;
- the car has staggered sizes;
- the car uses run-flat tires;
- the vehicle tows or carries heavy loads regularly;
- the tire shows a bulge, exposed cord, or sidewall damage;
- a tire was driven flat;
- you are replacing only one tire on AWD;
- you want to change wheel diameter;
- you cannot identify the full service description.
In those situations, a simple “same-looking tire” decision can become a safety or fitment problem.
Frequently Asked Questions
What does 225/45R17 94W mean?
225 is nominal width in millimeters, 45 is the aspect ratio, R means radial construction, 17 is wheel diameter in inches, 94 is load index, and W is speed rating.
Where do I find the correct tire size for my car?
Start with the Tire and Loading Information label on the driver-side door edge or B-pillar and the owner’s manual. Do not assume the old tire is correct.
Where is the tire manufacture date?
Look at the DOT/TIN information. The final four digits of the modern date code identify week and year. For example, 1424 means the 14th week of 2024.
Is the maximum PSI on the tire the pressure I should use?
No. The normal cold inflation pressure comes from the vehicle manufacturer’s placard or owner’s manual.
Can I use a tire with a lower load index?
Do not do so unless the vehicle manufacturer or qualified tire professional confirms that the tire meets the required load specification. The safer default is to meet or exceed the vehicle’s required load capacity using an approved fitment.
Can I use a lower speed rating?
Follow the vehicle manufacturer’s required rating and local regulations. Do not lower the rating merely because you do not intend to drive at high speed.
What does XL mean on a tire?
XL generally means Extra Load. It identifies a higher-load version within the applicable sizing system. If the vehicle specifies XL, preserve the required load capability.
What is the difference between M+S and 3PMSF?
M+S is a mud-and-snow designation, while 3PMSF indicates that the tire meets a defined severe-snow traction performance standard. They are not the same marking.
How old is too old for a tire?
There is no single age that replaces inspection and manufacturer guidance. NHTSA notes that some vehicle and tire manufacturers recommend replacement around six to ten years regardless of treadwear. Check both the vehicle and tire manufacturer policies.
Can I replace one tire on an AWD car?
Sometimes, but the allowable difference in tread depth or rolling circumference is vehicle-specific. Check the owner’s manual or manufacturer guidance before replacing only one.
Conclusion: Read the Sidewall as a Specification, Not a Shopping Shortcut
A tire sidewall gives you enough information to avoid many common replacement mistakes, but only if you read the complete specification. Start with the vehicle placard. Decode width, aspect ratio, radial construction, wheel diameter, load index, and speed rating. Then check load class, seasonal symbols, run-flat or original-equipment markings, direction, and the DOT/TIN date code.
The most important error to avoid is treating one sidewall number in isolation. The maximum PSI is not the normal vehicle pressure. The rim diameter alone does not define fitment. Deep tread does not prove a tire is young. And matching width does not guarantee adequate load or speed capability.
Your first practical step is simple: photograph the driver-door tire placard and all four tire sidewalls. With those images, you can compare the vehicle requirement against the tires already on the car and any replacement quote before money changes hands.
Sources and Further Reading
- NHTSA — Tire Safety Ratings and Awareness
- NHTSA — Tire Safety Month Guidance
- Bridgestone — Tire Specifications and Speed Ratings
- Bridgestone Americas — Determining Tire Size
- Michelin — Tire Markings Explained
Image Credits
- “Examples of different tire sidewall markings.png” — LeMichael8594, Wikimedia Commons, CC BY-SA 4.0.
- “MS 3PMSF IGS 240.png” — RubberMeetsTheRoad, Wikimedia Commons, CC0 1.0.
- “Tread Wear Indicators of Studless Tire.jpg” — VVVN, Wikimedia Commons, CC BY 3.0.